Top 3 Ways to Stop iCloud Storage Notification on iPhone
There’s a saying that we can never have enough of backups. It’s the one thing that we wish we have on the rare occasions of having to restore our devices. But on the other side of the coin, backups also take valuable storage spaces, both online and offline. And this storage-space-eating problem becomes more apparent when we are talking about iOS devices and their iCloud storage counterpart.
The concept behind iCloud is great. The service provides a hub to connect all of your devices and sync your data across them. But everybody would agree that Apple could do better with the amount of storage space that they can offer to their free iCloud users.
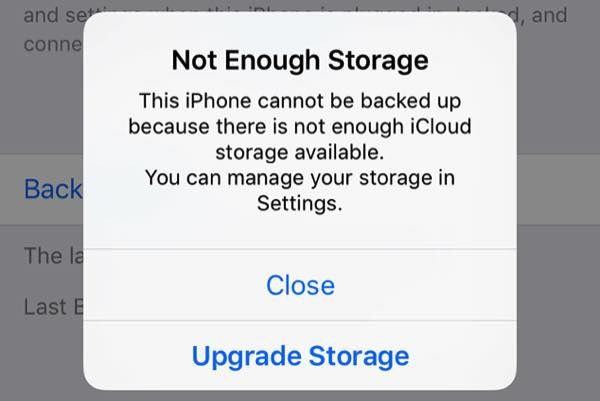
This small space setting leads to the annoying “Not Enough Storage” notifications that keep popping up on users’ iPhone and other iOS devices. Read along if you want to get rid of iCloud notification on iPhone 7/7 Plus/6s/6/5s/5.
How to Get Rid of the Warnings?
The “Not Enough Storage” warning will appear when the storage space of your iCloud space is nearly full. This situation will earn you at least a daily notification of the problem.
By default, your iPhone will be backed up to iCloud when it’s charged, locked, and connected to Wi-Fi. If you have little to none storage space left, you will likely see the warning message during these times because your phone can’t upload the backup.
The easiest way to get around the problem is to pay Apple to upgrade your storage. But if you want to stay on the free side, there are several ways that you can do to avoid the problem.
1. Delete Old Backups
The year of 2017 marked as the 10th anniversary of iPhone. If there’s only one new version of iPhone every year, there will be ten different versions on the market, and most of them are obsolete. If you are an iPhone loyalist, there’s no doubt that you own more than one version of iPhone throughout the years, and each one of them is backed up to your iCloud. It’s also possible that you have backups of other iOS devices.
But have you taken the time to erase old backups of the iDevices that you don’t use anymore?
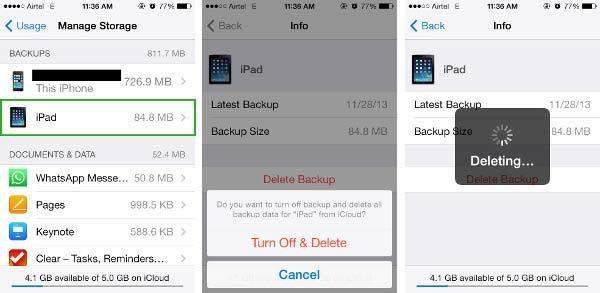
If you haven’t, deleting those unnecessary hogs could save you a considerable amount of the precious iCloud space. Go to Settings > General > Storage & iCloud Usage, and tap Manage Storage under the iCloud section. If there are any device(s) you no longer own or use listed there, just tap and click "Delete Backup."
2. Choose Carefully
Not all data are created equal. While you would want to keep your contacts and calendar entries always safe, you don’t need that Candy Crush Saga game save, do you?
Apps data are automatically backed up to iCloud by default, and you could save a decent amount of storage by turning off the ones that you don’t need.
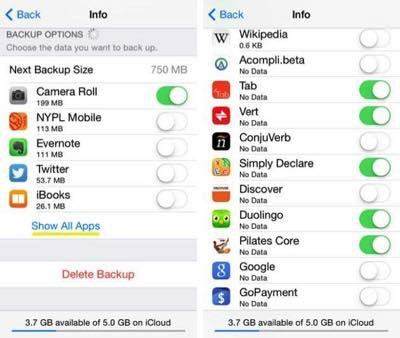
Go to Settings > General > Storage & iCloud Usage, then tap Manage Storage under the iCloud section. Select your device (“This iPhone”) and tap Show All Apps. Go through the list and toggle off all the apps that you can live without the backup.
Since you could see how much space each app takes, you could also prioritize based on the backup size.
3. Use Alternatives
From the app list, it’s obvious that one of the biggest hoggers is “Photo Library”. Selfie is already an inseparable part of our modern lifestyle, right?
But if you are running out of iCloud space, you could safely turn off “Photo Library” backup and use the alternative. Be sure to backup your iPhone to your computer before you turn it off, just in case.
The first alternative is switching from iCloud Photo Library to My Photo Stream. The benefit that My Photo Stream has over iCloud Photo Library is that the former will automatically upload your photos to your other devices with the same Apple ID (and your friends, with your permission). This will make sure that you have copies of your photos on other devices without eating out your iCloud storage.
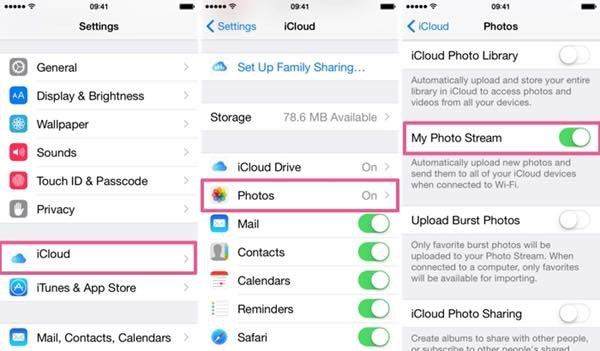
The second alternative is to use Google Photos. Just install the app and login with your Google ID. The app will automatically upload all of your photos and virtually has no storage limit unless you opt for higher definition. But since photos taken by today’s smartphone cameras are not yet qualified to meet Google’s standard of High Definition, you could go crazy with your selfies without worrying about running out of storage space.
Back Your Heart Up, and Restore
Now that you’ve cleared out the space hogs, you should have enough space to backup your iPhone to iCloud. You could do it manually by going to Settings > iCloud > Backup and tap Back Up Now. This time, there will be no more “Not Enough Storage” warning to annoy you.
Of course, no amount of backups will do you any good if you can’t use them to restore your device in the time of need. This is where Tenorshare iPhone Data Recovery comes to the rescue. This app will help you to restore your iPhone data either from iCloud, iTunes backup, or from the iPhone itself, and get your phone running in no time.
Speak Your Mind
Leave a Comment
Create your review for Tenorshare articles
