Top 28 MacOS Catalina Update Problems And Its Solutions
The new MacOS Catalina update is quite excellent, praised by many developers and even the users. There are many reasons for that; first of all the new MacOS Catalina looks quite nice and it is packed with numerous features which are mostly loved by the users.
First of all, there is no iTunes. It is replaced by Music, Podcasts and TV. The Sidecar feature makes the MacOS a second display. There is a "Find My Mac". Screen time is also incorporated, it lets the user monitor their screen time, similar to iOS. Even after all these, newly allocated features users are still having issues, with the released beta version of the OS. The finished version may not have these terrible issues but at this moment users are really struggling as they have to deal with these issues. In this article, we are going to show you top 28 MacOS Catalina update problems and its solutions
- Problem 1: It Could Not Normally Run The IntelliJ
- Problem 2: Stuck in Catalina Updates
- Problem 3: All My Reminders Have Gone
- Problem 4: Not Able to Share Screen via Skype
- Problem 5: Remove Beta System Settings Freeze
- Problem 6: Could Not Connect to The Server
- Problem 7: Asks Me for My Apple ID to Download from The App Store
- Problem 8: iTunes Be Discontinued as Stated by News Media
- Problem 9: ExpressVPN Problems
- Problem 10: iPhone Ringtones Sync Problems
- Problem 11: Mac Error Code -1008F
- Problem 12: Quicktime Player 7 Not Supported iOS Catalina
- Problem 13: What Is AMPDevicesAgent in macOS Catalina
- Problem 14: Unable to Sync iPhone after Updating to macOS Catalina
- Problem 15. An Error Occurred While Installing The Selected Updates
- Problem 16. Mac Can’t Update to Catalina
- Problem 17. Bluetooth Not Working in macOS Catalina OS
- Problem 18. Keyboard Not Working after Updating to macOS Catalina
- Problem 19. iPhoto Not Working on macOS Catalina
- Problem 20. Wifi Not Working on Mac Catalina
- Problem 21. How to Go back to The Mail Classic View in Catalina
- Problem 22. iTunes Remote App Not Working after Catalina Update
- Problem 23. macOS Could Not Be Installed on Your Computer
- Problem 24. Fix macOS Catalina Battery Drain Problems
- Problem 25. AirPods disconnect after Catalina Update
- Problem 26. High CPU Usage on macOS Catalina
- Problem 27. Is It Necessary to Pay for Updates for Work, Excel, Outlook
- Problem 28. Mac Will Not List Any AirDrop Recipients
Problem 1: It Could Not Normally Run The IntelliJ
A lot of users stated that the InstalliJ is not running properly on MacOS Catalina. The reasons can be many but here is the solution.
You can reinstall the OS, which could relieve the issue. But this is a very systemic procedure. If you don’t want to lose all the data from your Mac, you have to make a backup of the device first. Then, you have to follow the 2 different methods to complete the installation properly.
Solution 1: Erase MacOS Catalina
Step 1: First, you have to connect your Mac to the internet. Wi-Fi or Ethernet, anything will work.
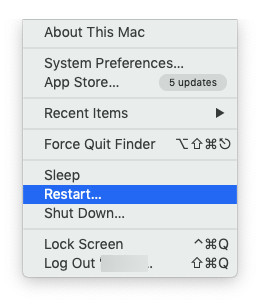
Step 2: There is an Apple icon at the top left corner of the screen, you need to click on it.
Step 3: After that, the drop-menu will be revealed and select "Restart" option from the menu.
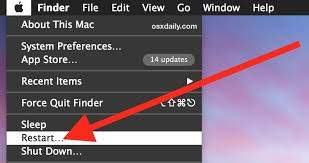
Step 4: You also need to hold "Command + R" keys until the Mac reboots. Holding those key will send the Mac into Recovery Mode.
Step 5: In the Recovery Mode, navigate to OS X Utilities and select "Disk Utility". Followed by, a click on "Continue" to proceed.
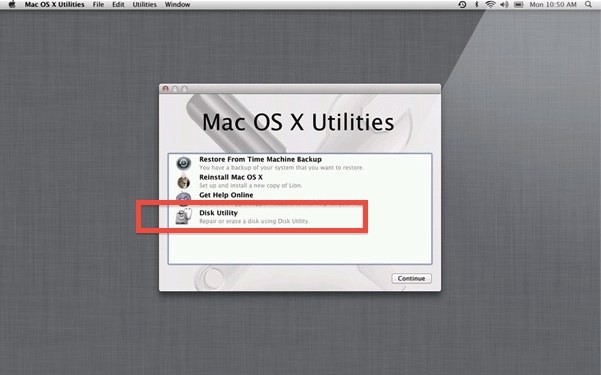
Step 6: Now, you have to select "Startup Disk" and then, click "Erase" found at the top of the panel.
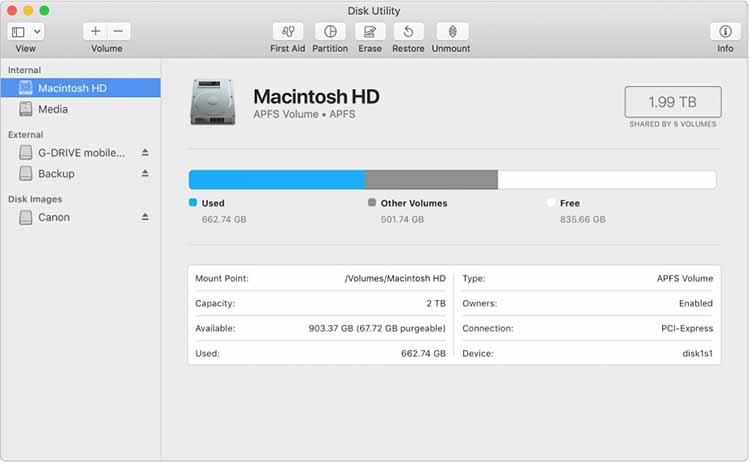
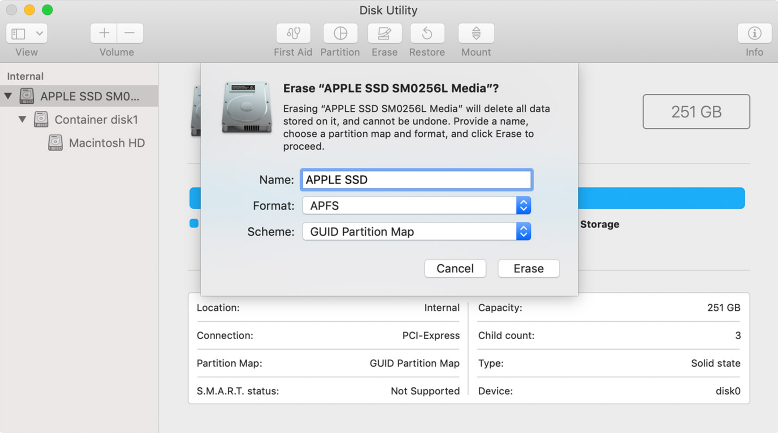
Step 7: Here, you have to type a name for the file that is to be erased. So, type MacOS Catalina.
Step 8: Now, a format list will be visible. If the Mac is using "HFS+" then you have to choose "Mac OS Extended"; if the Mac is using "APFS", then just select "APFS" from that list.
Step 9: Then, select "GUID Partition Map".
Step 10: Lastly, click "Erase" in order to erase the beta version of MacOS Catalina.
Upon completing this procedure successfully, you can exit Disk Utility and your Mac is ready to install MacOS Mojave.
Solution 2: Reinstall MacOS Mojave
Now that you have erased MacOS Catalina from your Mac, you will have to install a version of MacOS; in this case, it is MacOS Mojave. The steps are pretty simple, let’s have a look;
Step 1: Again, connect the Mac to an internet connection.
Step 2: You obviously have a bootable hard drive, create to install Mojave on the Mac.
Step 3: Click on the Apple icon at the top left corner and select "Restart" from the drop-menu.
Step 4: As your Mac restarts, you have to press and hold the "Option" key; doing this will initiate the Startup Disk.
Step 5: Now, you have to select your "bootable drive with MacOS Mojave" from the list startup disk list.
Step 6: The installation will begin after you click "Continue" on the MacOS Mojave window.
Problem 2: Stuck in Catalina Updates
Many users have complained that while they were trying to update to Catalina, the Mac got stuck on Catalina update.
Solution 1: Restart Mac
In such a scenario, our first solution would be to restart Mac. The steps are very simple;
Step 1: Open your Mac and click on the Apple logo at the top left corner of the windows.
Step 2: A drop-menu will appear and click on the "Restart" option.
After the Mac is restarted successfully, you can try again installing the MacOS Mojave. You can look at the installation procedure of MacOS Catalina in the solutions above.
Solution 2: Check The Storage
It is also possible that due to lack of storage you are facing this issue. The MacOS updates are very large; so, even before you proceed with the installation check the storage.
Step 1: Go to Apple Menu and click on "About This Mac".
Step 2: Inside that section, you will be able to check "Used" and "Available" storage.
Problem 3: All My Reminders Have Gone
Sometimes after updating to new MacOS Catalina all the saved reminders are getting erased. And this is quite a common issue recently.
Solution: Restore Reminders
Step 1: Open the iCloud official website. Sign in to your iCloud account and then go to the settings.
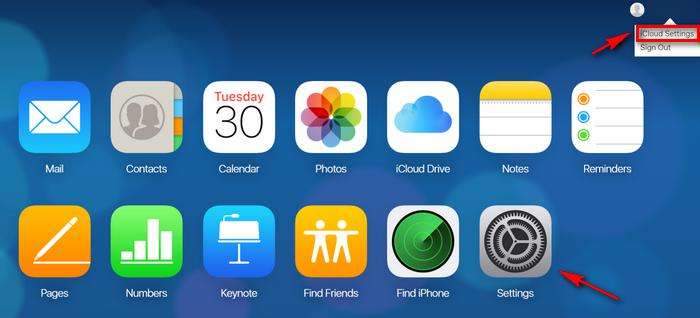
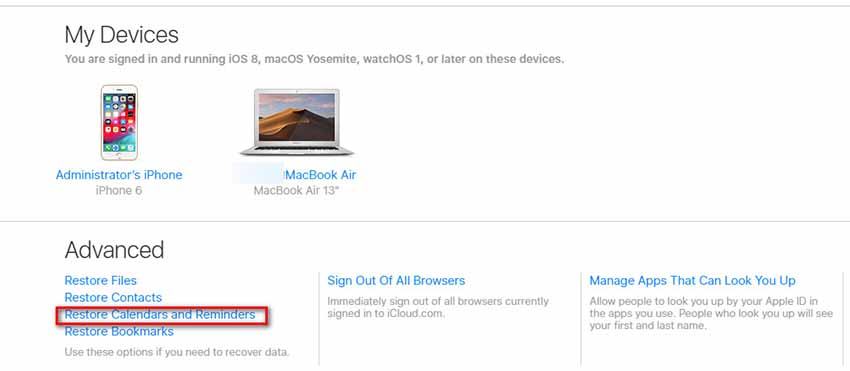
Step 2: Inside the settings, you will find "Restore Calendars and Reminders" option at the left bottom of your screen. Click on that option to restore them back and it works. But you won’t be able to access them on iCloud.
Problem 4: Not Able to Share Screen via Skype
Users are having issues while launching Skype screen sharing feature after updating to new MacOS Catalina. Well, you can try 2 things to fix this;
Solution 1: Clear Skype Cache
Step 1: Log out and quit Skype and go to "Finder".
Step 2: Press Command + Shift + G and type "/users/<MacUsername>/library"
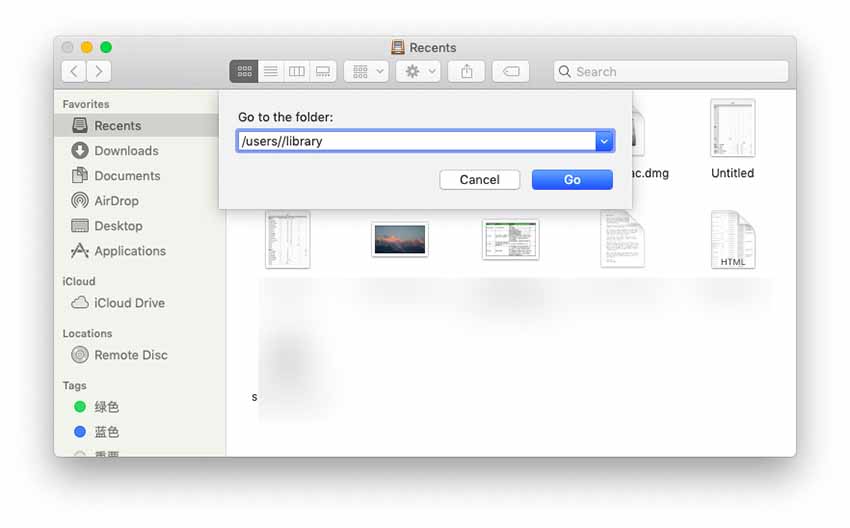
After that, delete the following;
- Containters > com.microsoft.SkypeForBusiness
- Internet Plug-Ins > MeetingJoinPlugin.plugin
- Logs > LwaTracing
- Saved Application State > com.microsoft.SkypeForBusiness.savedState
- Preferences > com.microsoft.skypeforbusiness.plugin.plist
Solution 2: Clear The Keychain Access
You can also try to clear the keychain access. Just go to the KeyChain folder and delete everything.
Problem 5: Remove Beta System Settings Freeze
"I am trying to remove the new Catalina Beta from my system but every time I do that; beta system settings freeze."
Solution: Enter The Recovery Mode
The solution is very simple; you have to boot the device into the Recovery Mode. Erase your hard drive completely and then restore to the previous version of MacOS using your Time Machine backup or any other backup you have stored.
You can reboot Mac and hold "Command + R" keys until the Mac reboot is complete. Holding those key will send the Mac into Recovery Mode.
Problem 6: Could Not Connect to The Server
While updating to the Beta version of MacOS Catalina users are having trouble to connect to the server. They are getting "An error occurred while installing the selected updates".
Solution: Try to Update Again
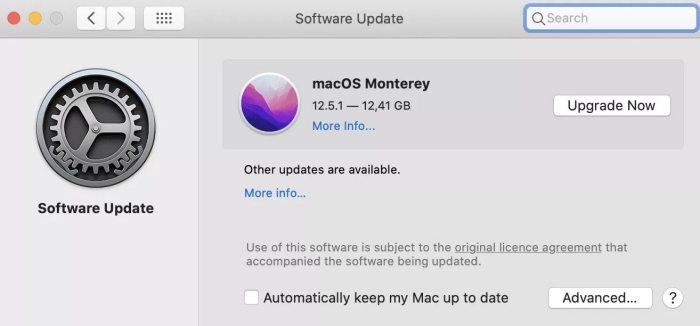
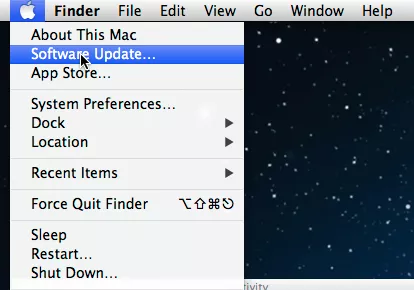
It is possible that the server is down and you can try to update again. Just Navigate to the Apple menu at the upper left of the Mac screen. Click on the “Apple” logo. Next, choose “about this mac”. Then, you will see the pop-up windows below, click “Software Update”.
Problem 7: Asks Me for My Apple ID to Download from The App Store
After I reinstalled MacOS on my computer, I was asked to download my Apple ID from the App Store. This is very disturbing because I intend to sell the device.
Solution: Clear iPhone Data
We don’t know if the Apple ID is still saved on your device but you can take the following 6 steps to makes sure that it is erased for good.
1. First, you need to create a backup of the device. All the important files and data must be stored.
2.After you have backed up the entire device; sign out of iTunes.
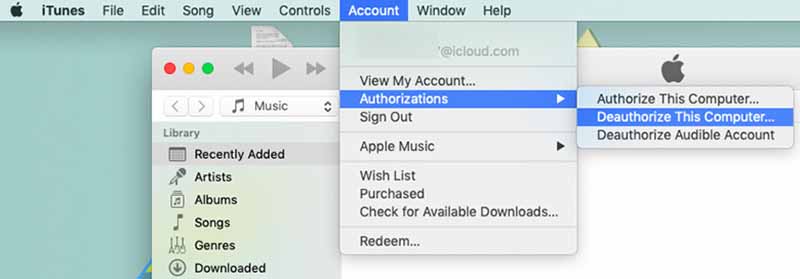
Step 1: Launch iTunes and at the top of the panel, click on "Account"
Step 2: Then, go to "Authorizations" and finally click on "Deauthorize This Computer". You will be asked to provide your Apple ID and password.
3.After that, sign out of iCloud;
Step 1: Go to Apple Menu and click on "System Preferences".
Step 2: Click on iCloud and then click on "Sign Out".
You will be asked if you want to keep a copy of your iCloud data on the Mac; so, just click "Keep a copy to proceed".
4.Now, you have to sign out of iMessage. Steps are;
Step 1: Go to the Messages app and click "Messages".
Step 2: Then, navigate to "Preferences" and click "Accounts".
5.This step is optional but if you have paired any Bluetooth devices with the Mac, you need to unpair them.
6.Finally, erase your hard drive clean. The best option is to Factory Restore the device.These are steps, after completing them you will be ready to sell your device.
Problem 8: iTunes Be Discontinued as Stated by News Media
Apple has eliminated iTunes form the new MacOS Catalina for good, and they have distributed its functions into 3 parts; Apple TV, Apple Podcasts and Apple Music. But users are worried about what will happen to their purchased music files that they have compiled for decades.
Solution: Go to 3 Parts of The iTunes
As per Apple, they have split the iTunes functionality into 3 parts in the new MacOS Catalina. It has been split into Apple Music, Apple TV, and Apple Podcast. Any purchased movies will be transferred to Apple TV; purchased music will be transferred to Apple Music and podcasts will get transferred to Apple Podcast.
Problem 9: ExpressVPN Problems
The EpressVPN is not running on the new MacOS Catalina properly. It is simply not getting launched and some users have also complained that it is not even accepting the activation codes.
Solution: Remove All Applications Related to ExpressVPN
So, if you are having issues with ExpressVPN on MacOS Catalina beta, you need to follow the steps below to get it fixed;
Step 1: Go to "Applications" and look for "ExpressVPN" and send it to the bin.
Step 2: Now, go to "Finder" and search for "ExpressVPN". Your entire computer will be searched and you need to eliminate every application related to ExpressVPN.
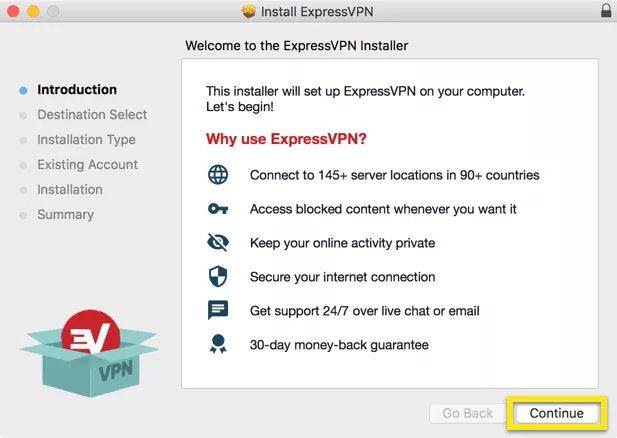
Step 3: Now, reinstall the app again.
This procedure should work and get rid of the said issue.
Problem 10: iPhone Ringtones Sync Problems
You tried to transfer music to your new iPhone after updating to Mac Cantina but the device is not syncing.
Solution: Connect The iPhone to The MacBook
Step 1: First, select your iPhone, you will find it in the list of devices just under the location section.
Step 2: Now, pair the iPhone to the MacBook.
Step 3: "Trust This Computer" message will appear on your iPhone, click "Trust".
Step 4: You will be asked for your password and only after providing it you will see the details of the connected device on the screen of MacBook.
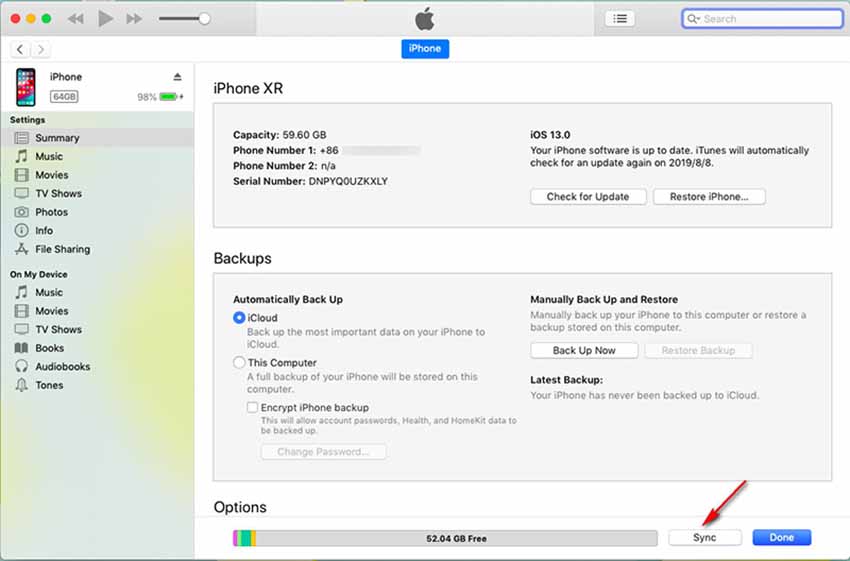
Step 5: Lastly, click "Sync" in order to start the process.
Problem 11: Mac Error Code -1008F
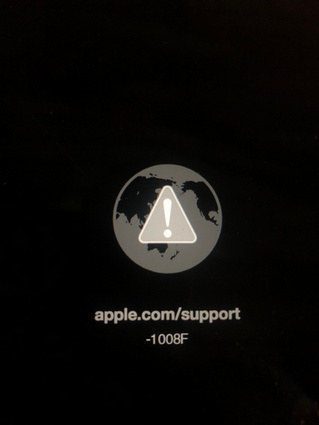
"So I was trying to reinstall Mojave after running Catalina and when I go through the internet recovery I get the spinning globe with the download bar beneath it. When it just about finishes it gives me an error code which is 1008F. Tried google with no help. Even went to the link my Mac said but it comes back with no page found.
After launching Catalina, Mac error code - 1008F occurs very often when you try to reinstall Mojave. It usually means that the Internet recovery process cannot be completed.
Solution 1. Reset NVRAM
- Shut down your Mac and turn it on again.
- When you hear the startup sound, quickly press and hold the following four keys together: Option + Command + P + R. Keep pressing these four keys until your Mac restarts. You will hear the startup sound again.

Solution 2. Troubleshoot with the Disk Utility Tool on Your Mac
- Restart your Mac by clicking Apple Menu > Restart.
- Press and hold the Command and R keys together until the Apple logo appears.
- Click Disk Utility > View > Show all Devices, then choose the disk that you need to troubleshoot > Click “First Aid” button > click “Run”.
Solution 3. Update Software
Navigate to Apple menu > click the Apple icon > select “Software Update”. After updating, turn to see if the error code-1008F still occurs.
Solution 4. Seek Help from Apple Repair Centers
If all solutions mentioned above fail, it is possible that there is something wrong with the hardware. It is suggested to visit an Apple repair clinic and have it checked.
Problem 12. Quicktime Player 7 Not Supported iOS Catalina
"Hey so did QuickTime player 7 does not supported Catalina this year? so I used QTP7 on my iMac mid 2011 inch its works fine also iTunes as well! Thanks!
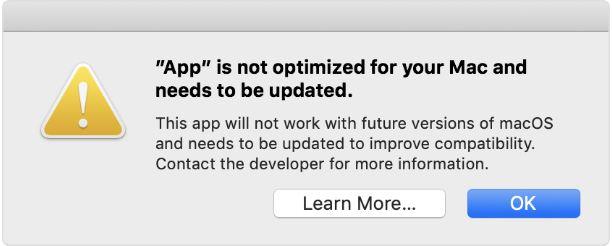
This user encountered the problem that QuickTime 7 couldnot be installed on your Mac and needs to be updated. Actually, there are many apps are having the same problem after macos is updated to Catalina. The reason is that macOS Catalina only supports the 64-bit apps instead of 32-bit apps. So, how to solve the problem of Quicktime Player 7 not supported iOS Catalina ? Here is the quick fix.
Solution: Update Your Quicktime Player
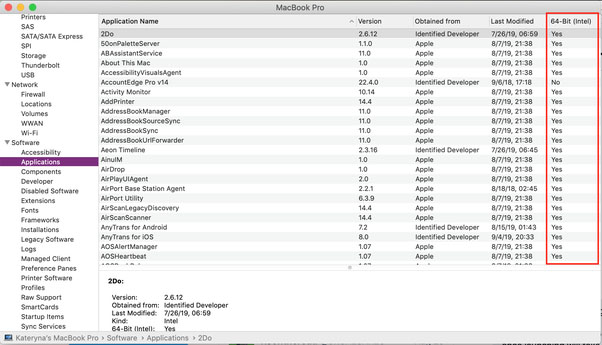
macOS Catalina only support 64-bit apps and the 32-bit apps will not be supported. Quicktime Player 7 is 32-bit application, which is not compatible to the macOS Catalina. You can update this application to QuickTime Player 10, which is 64-bit.
Tip: How to Check Whether Your Apps Are 64-bit Or Not
Navigate to Apple logo > About this Mac > System report > Scroll down to find "Applications"
Problem 13: What Is AMPDevicesAgent in macOS Catalina
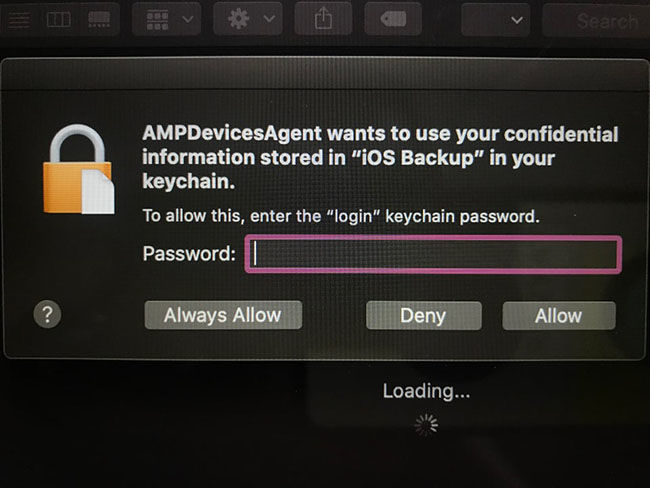
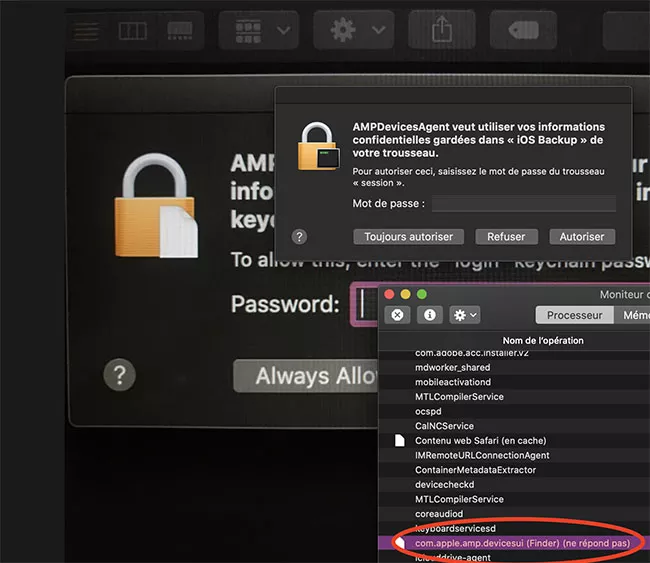
After having updated to macOS Catalina, you may get a pop-up window stating “AMPDevicesAgent wants to use your confidential information stored in iOS backup in your keychain” when you backup up your iPhone or iPad. So what is AMPDevicesAgent? Is this something new within macOS Catalina? Here we collect several the most frequently asked questions and provide the answer for you.
Common Questions about AMPDevicesAgent and Answers
1.What Is AMPDevicesAgent?
It is a package named “AMPDevicesAgent”. It's from /System/Library/ which should be a Read-Only Volume.
2.When Will The Notification Windows Pop Up?
In general, it appears when syncing your iPhone or iPad over WiFi and it is the first time connect it to your Mac with a cable.
3.Is AMPDevicesAgent from Apple or The Third-Party Request?
It's part of the OS which is from an iOS private framework instead of the third-party request.
4.Is It Safe to Allow?
Yes, you can enter your keychain password and tap “Always allow” if the mac is trusted.
Problem 14: Unable to Sync iPhone after Updating to macOS Catalina
According to some users’ report, their macBook fail to sync with iPhone/iPad after updating to macOS Catalina. It seems that the Finder app on Mac is unable to recognize the connected iOS devices. If your are encountering the same problem, you can try to use the following tips to solve this sync problem on your MacBook running macOS Catalina.
Quick Fix
1.Enabled iOS Devices in The Finder Settings
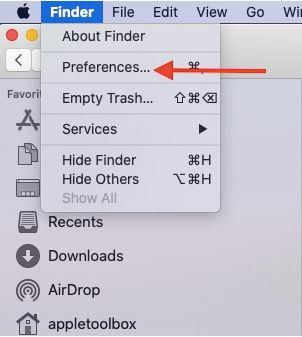
- Navigate to the top menu and click on Finder, select “Preferences”.
- Switch to the “SideBar” option, tick the “CDs, DVDs, and iOS Devices” box. (If you don’t enable it, your iPhone/iPad will not be located.)

2.Restart the Finder App
- Disconnect your iPhone from your Mac first.
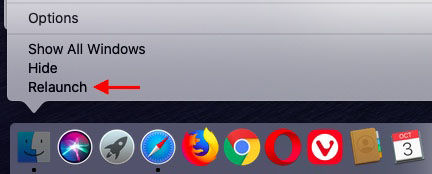
- Press the Option key in your keyboard. Then right click on the Finder on the dock, tap on Relaunch.
- Connect your iPhone/iPad again to see if Finder detect your device successfully.
3.Restart Your Mac And Then Open Finder App Again to See If It Detects Your iPhone.
Problem 15. An Error Occurred While Installing The Selected Updates
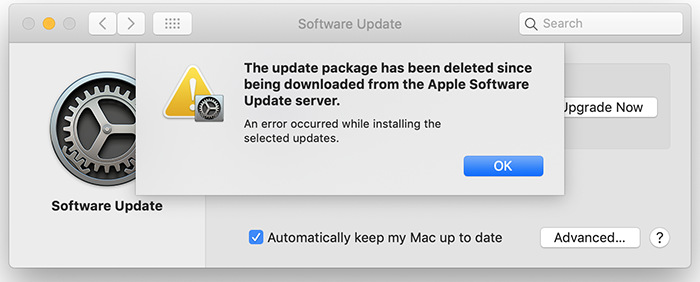
This problem arises when you try to install the latest macOS Catalina in the system preference. When you click the “Update Now” button and enter the downloading interface, the windows will pop up saying “The update package has been deleted since being downloaded from the Apple Software Update server.” It indicates that there was something wrong with the update. So how to fix this errors? Here’s quick fix.
Quick Fix:
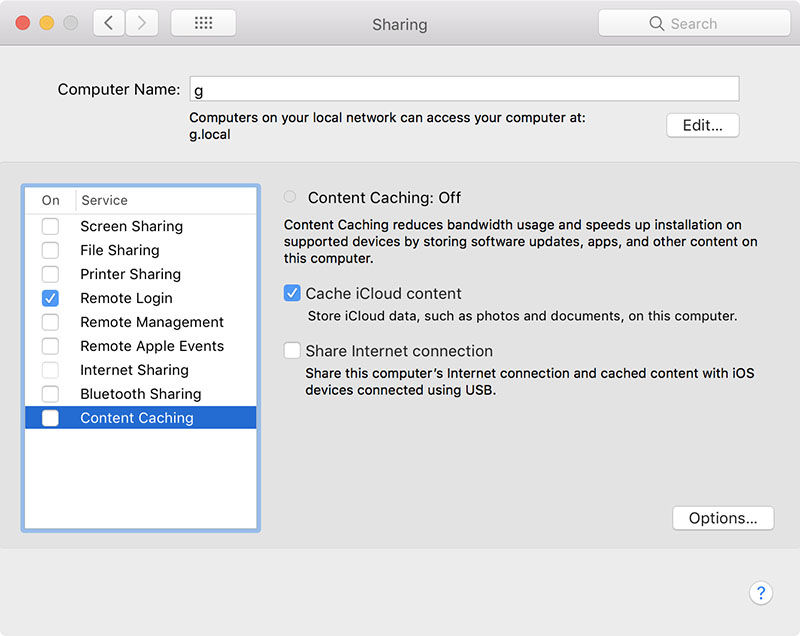
Step 1. Disable The Content Caching Service
- going to System Preferences > Sharing > Unchecking the ”Content caching” option
- After that, restart your Mac.
Step 2. Free up The Storage Space
Step 3. Go to “System Preferences” and Update again. (Press the “Command–R” to refresh the list of available updates if you don’t see the update.)
Problem 16. Mac Can’t Update to Catalina
Some users, especially for late 2015 iMac users,complained that they are unable to update to Catalina because their Mac does not notice the new update. Or, they get the following message. "Update not found. The requested version of macOS is not available" . So How to get Catalina and update to it?
Quick Solution:
1.Click the Apple menu > Check System Preferences > Software Update > Update Now
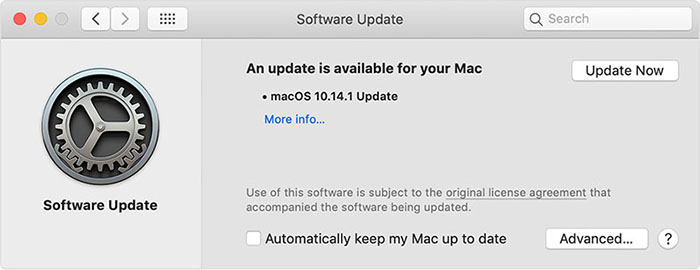
2.Go to the App Store and search for Catalina to download.
3.Check The Storage Space
Installing Catalina require your Mac has at least 12.5GB of available storage space and 4GB of memory. So if your Mac has insufficient storage space, you need to free up storage space by deleting unimportant files or software.
Problem 17. Bluetooth Not Working in macOS Catalina OS
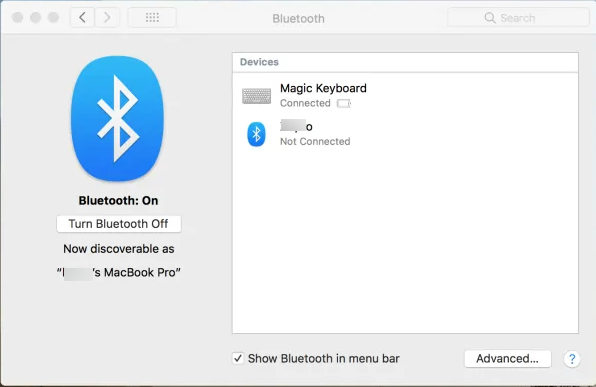
Some users reported that they couldn’t connect to Bluetooth after updating to macOS Catalina. To fix the issues of Bluetooth not connecting at all or couldn’t find the Bluetooth, you can try below steps.
Quick Fix:
- Remove the .plist files (~/Library/Preferences/com.apple.Bluetooth.plist, ~/Library/Preferences/ByHost/ com.apple.Bluetooth.XXX.plist)
- Reset PRAM/NVRAM, just holding the Command + Option + P + R keys.
- Reset bluetooth module + Removing all devices
- Restart Mac
Problem 18. Keyboard Not Working after Updating to macOS Catalina
"I have install Catalina, i have install the first update, now is not working the keyboard en the mousepad, now i'm use a extern keyboard(usb) but can not use the command ctrl-r for a reset, what can i do?"
If your keyboard is not working after update to macOS Catalina, you can try the following methods.

Quick Fix:
- Clean the keyboard.
- Restart Your Mac
- Remove the back off your macbook.
- Delete Recent Apps
Problem 19. iPhoto Not Working on macOS Catalina
“I just updated to Catalina what a horrible mistake.....I lost access to my photos on iPhoto. how do I fix it.”
After updating to macOS Catalina, you will find that iPhoto is unavailable. What’s the problem with this issue? Here are the reasons:
- iPhoto is a 32 bit app which is incompatible with the Catalina now.
- iPhoto has been phased out by Apple since Yosemite 10.10.3 was released in 2015 and replaced by Photos application. It means that you cannot update the iPhoto through the App Store if your iPhoto is not 9.x version.
Since iPhoto is not working on macOS Catalina, how do you access your photos stored in the iPhoto on your Mac? Is there alternative to the iPhoto? The following are some of the things you can do.
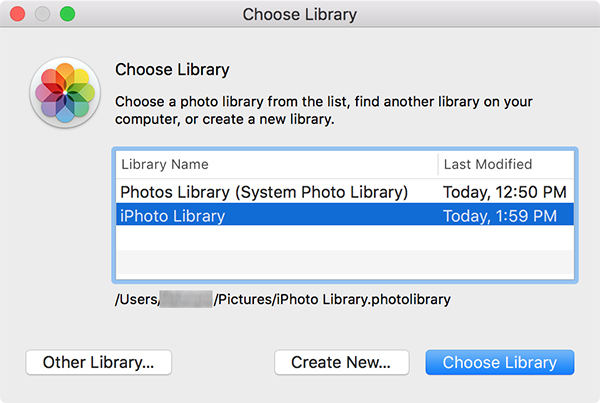
Way 1.The application “Photos” can open existing iPhoto library so you can simply continue with “Photos”. Just press the Option key on your keyboard and select the iPhoto library, then you can access to your photos on iphoto.
Way 2. Purchase a different photo app to replace it.
Way 3. Use Google Photos to Replace iPhoto.
Suggested Reading: iPhoto Not Working on macOS Catalina, What to Do
Problem 20. Wifi Not Working on Mac Catalina
“when installing Mas Os Catalina, the WiFi module stopped working. Reinstalling Mas Os Catalina did not help. Standard diagnostic tools did not help.”
It is a common problem with the new macOS Catalina, it seems that Apple didn't include the driver for a specific WiFi chip in Catalina. If your iPhone can connect the same Wifi perfectly, then it's not the Wifi issue. To fix WiFi not working on macOS Catalina, try the following solutions.
1. Restart your router and try again. (Turn off the power supply and Turn on again, Wait for several minutes and connect the WiFi again).
2. Restart Your Mac [Navigate to the Apple logo > Restart or directly press the Power button on Mac]
3. Remove/delete the wifi network and then join again.
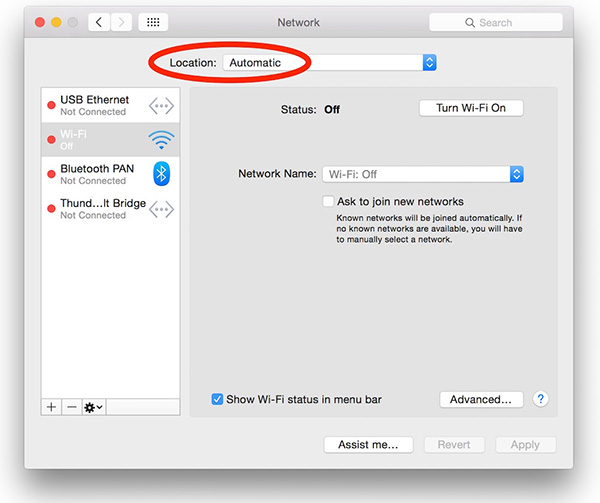
- Navigate to the Apple Menu on Mac > System Preference > Network.
- Click on the "Wi-Fi" option on the left side > Click "Advanced" on the bottom right corner > Select the network you want to remove > click the "-" sign.
- After removing the network, you can add it again. Just click "+" sign > enter the network name > click "OK".
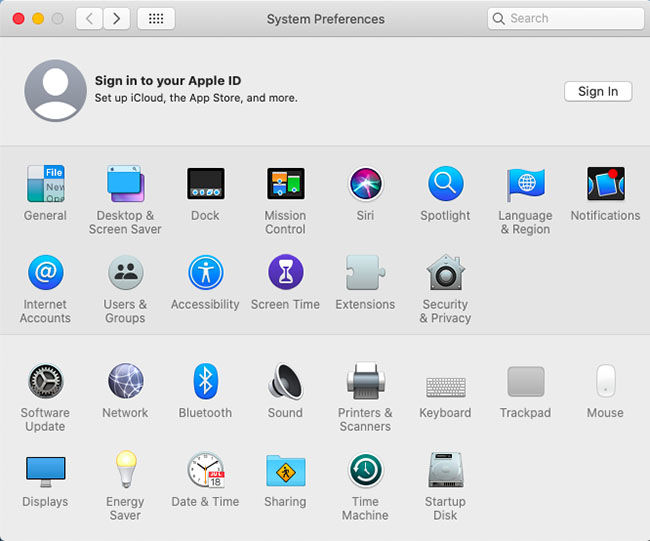
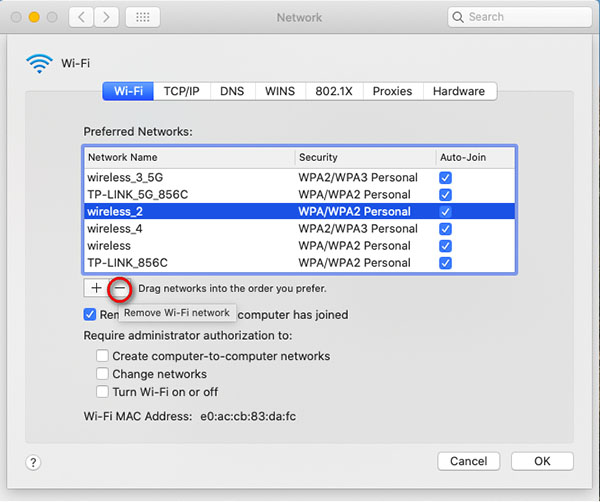
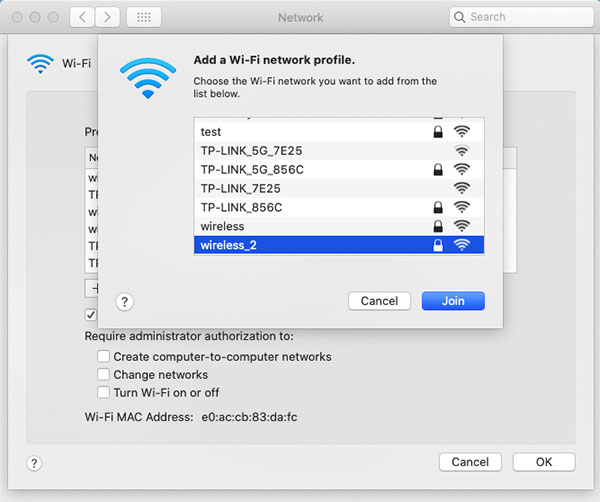
4. Troubleshoot with Network Diagnostics [Apple Logo > System Preferences > Network > WiFi > Select Active WiFi Network].
5. Downgrade to Mas Os Mojave
Problem 21. How to Go back to The Mail Classic View in Catalina
"I updated to Catalina today. However when I open Mail, I no longer see the Column headings. Can anyone assist in getting back the column headings in Mail under the Catalina operating system? The classic view is no longer available under Mail Preferences." Sourece: apple discussion about Catalina mail problem.
In the new macOS Catalina, the classic view of mail is no longer in preference, which means that you cannot adjust the column width and change the message list font style. So, how to get classic view back? Regrettably, Apple has removed the mail classic view option in the newest Catalina and there is no direct way to shift to the classic view. But you can change the viewing as following.
1.Go to Mail menu > Preferences > Viewing, In the “list Preview” option, choose “None” from the drop-down.
2.Go to View menu and enable the three selections: Use Column Layout; Hide Mailbox List; Hide Tool Bar.
3. If you think it too troublesome, then you can also send your feedback to Apple. Apple may make a difference in the next update because many Mac users have complained this mail issue in Catalina. Here is the link: https://www.apple.com/feedback/mail.html.
Problem 22. iTunes Remote App Not Working after Catalina Update
After Catalina update, the remote app (iPhone and iPad) is not working properly. I can still see and connect to my music library (running on the new music app) and search it. However I cannot play, or in general control, music using the remote app.”
-- From https://discussions.apple.com
iTunes Remote is a free app designed for iOS devices (iPhone, iPad, iPod Touch, and Apple Watch), which is used to remote control your iTunes within the range of Wi-Fi controlled. About the issues of iTunes remote app not working with Catalina, so far Apple has no good solution to the problem. Apple explains that the remote app is only compatible with Mojave and previous macOS versions, there will be a new Remote app or update in the future. You can try to update your macOS when it releases the new version. If you has not updated to macOS Catalina yet, then you can try the following methods to fix iTunes remote not working issues.
Quick Fixes:
- Update your iOS device to the latest iOS 13.3 or iPadOS 13.3, go to Settings > General > Software Update > click “Download and Install”.
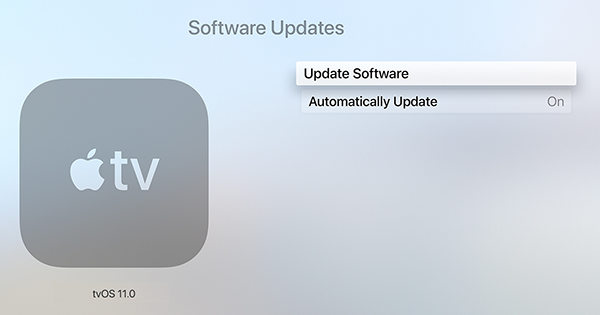
For Apple TV, turn to Settings > System > Software Updates > Update Software.

- Turn off “Home Sharing” function first, then go to iTunes Remote app, click Settings > Add an iTunes Library. Later, your iPhone will receive a 4-digit number. Enter your phone name and the 4-digit code on your phone. After that, a message showing “Your Remote is now able to control Music” and your mac’s library appears.
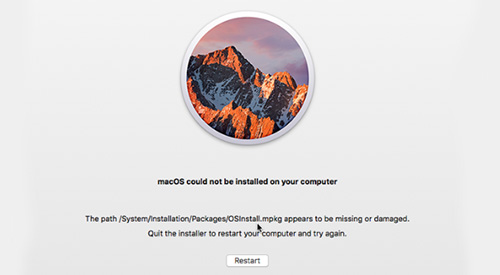
Problem 23. macOS Could Not Be Installed on Your Computer
macOS could not be installed on your computer an error occurred while updating firmware? There are many possible reasons, for example:
- You Mac models is not compatible with the version you are going to install.
- Not enough storage available: your Mac does not have enough space to download and install a new version of macOS. To upgrade to macOS Catalina, there is at least 12.5GB of storage space in your Mac.
- There's something wrong with the disk on your Macbook.
- Some software is interfering with the process of upgrade.
- 5.macos could not be installed on your computer the path /system/installation/packages/osinstall.mpkg
If macOS could not be installed on your computer the installer resources were not found, you can try these solutions below.
- Quit the installer to restart your mac and try again.
- Free up disk space by deleting files or application that you don’t need.
- Reset the NVRAM. After shutting down your Mac, turn it on and hold down these four keys together: Option + Command + P + R.
Run “Disk First Aid” to repair your disk, go to Application > Utilities > Disk Utility.

- Download the latest combo update from the path provided by Apple.
Check if your system date and time is set correctly. Go to System Preference > Date & Time, tick the box saying “Set date and time automatically.”

Problem 24. Fix macOS Catalina Battery Drain Problems
Has anyone else's battery life degraded drastically (specially on standby), after updating your mac to catalina?( I own a macbook air 2018)."
-- A user from Reddit Community
Battery draining is the typical problem that arises with every macOS release, here are some tips to extend battery life.
Quick Fixes:
1. Click the battery icon to check which application are draining your battery. Besides, close some applications running in the background.
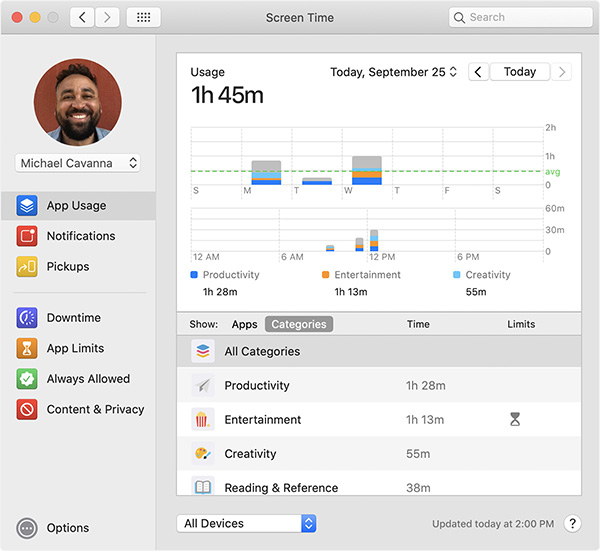
2. Using Screen time to track the usage and set time limit for some apps, which can prevent your device battery from draining too fast. Just navigate to the Apple Menu and click it > System Preferences > Screen Time, you can turn on the app limits.
3.Some default settings may cause draining battery life faster, so you can try to change them.
- Turn off Bluetooth If you rarely use it.
- Dimming the screen to save the battery life.
- Put your macbook in the energy-saving mode.
4.Turn off the location services if you don’t need if. Go to Apple menu > System Preferences > Security & Privacy option
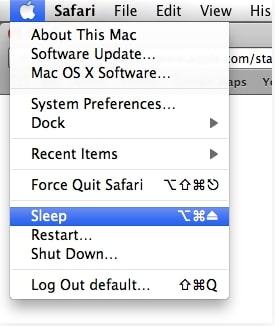
5.Turn your macbook into sleep mode when you're not using it for a long time.
Problem 25. AirPods disconnect after Catalina Update
Since updating to Catalina, my AirPods won't stay connected to my MacBook Pro. To try troubleshooting I've:
- Reset AirPods
- Connected/Disconnected from Bluetooth
- Turned Bluetooth on/off
- Reset PRAM
- Reset SMC
- Restarted the laptop
- Turned laptop on/off
- Trashed the audio and Bluetooth preferences
- Signed out/back in to iCloud
- Reinstalled Catalina
I figured a reinstall would get it working, but alas it did not.
-- A user from Apple Community
Beyond the above methods that the users has tried, there are other methods you can have a try.
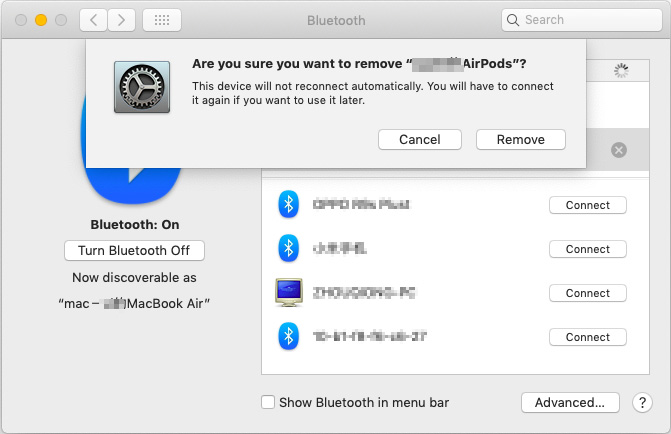
Remove Airpods Devices from Mac And Re-Connect. Go to the "System Preference" on your Mac > Bluetooth > Airpods > click on the "X" tab > Confirm "Remove".

- Update to the new software for AirPods 2 and the AirPods Pro. Just put the AirPods in the case with the power source connected, then pair the AirPods to an iPhone or iPad, which will force the update. To check if the AirPods update sucessfully, open the Settings app on your iOS device > General > About > AirPods, check the number next to "Firmware Version."
Problem 26. High CPU Usage on macOS Catalina
“Just after the upgrade, I noticed my Macbook Pro 15" (2018) has high CPU utilization and fans are continuously running. The activity monitor shows 'SecurityAgent' is consuming ~95% of CPU.”
-- A user from Reddit Community
Many mac users reported that macOS 10.15 is hogging the CPU regardless if a task was running or not.
Quick Fixes:
- Open the Activity Monitor and click on CPU. Close the apps you don't need to use.
- Uninstall unnecessary apps or extensions that consuming most of your CPU
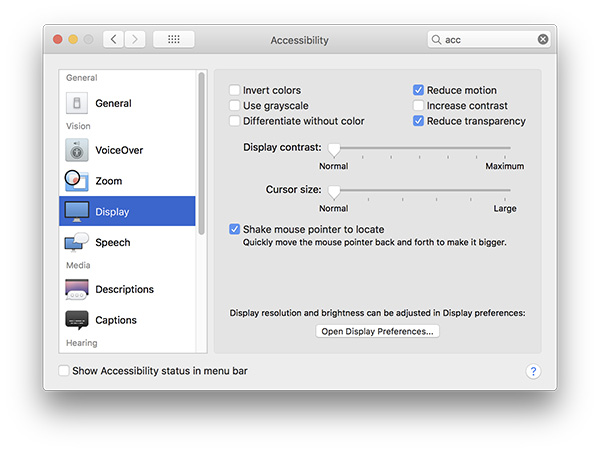
Reduce Transparency and Reduce Motion: Turn on System Preference > Accessibility > Select Display. In the right-hand column, check the two boxes, "Reduce motion" and "Reduce transparency".

- Reset PRAM/NVRAM
- Reset SMC
Problem 27. Is It Necessary to Pay for Updates for Work, Excel, Outlook
I just updated to Catalina and now the icons look different and it says they need to be updated. What is this all about? I am skeptical and concerned about 'malwarebytes Agent' notifications that just came up also. Do I allow or Don't allow the notifications?"
This question come from the Apple Support Communities, the mac user are not sure if it is necessary to update Microsoft software after updating to macOS Catalina.
- If you were using MS Office 2011 or earlier version, you will find that you cannot run it any more, because Catalina does not support 32 bit applications. You need to update the MS software or you won't be able to use it on mac running Catalina.
- Office 2016 is compatible with Catalina but it will reach end of life on Oct 13th 2020, no more updates will be made available.
- Office 2019 and Office 365 are compatible with Catalina.
Problem 28. Mac Will Not List Any AirDrop Recipients
If you find that your macbook cannot list any AirDrop recipients sending from the Mac, it may be because your macbook don’t support AirDrop. Besides, you need to turn on Bluetooth and Wi-Fi on both devices when you send files with AirDrop. To check whether your macbook support AirDrop or not, you can take a look at this information.
AirDrop between two Macs is supported by the following models:
- Late-2008 or later MacBook Pro
- Late-2010 or later MacBook Air
- Late-2008 or later MacBook
- Early-2009 or later iMac
- Mid-2010 or later Mac mini
- Early-2009 Mac Pro with AirPort Extreme card
- Mid-2010 or later Mac Pro
Note: The late-2008 17-inch MacBook Pro and the late-2008 white MacBook do not support AirDrop. Both Macs need to have OS X Lion or later installed.
AirDrop between OS X and iOS is supported by the following Mac models:
- 2012 or later MacBook Air
- 2012 or later MacBook Pro
- 2012 or later iMac
- 2012 or later Mac mini
- Late-2013 or later Mac Pro
Note: iOS devices should run iOS 7 or later and the mac os system should be OS X Yosemite or later.
Extra Tips: How to Recover Deleted Data/Files from MacOS Catalina
If a few of your precious data or particular files got deleted during the fix of MacOS Catalina problems, don’t get upset.
There are extraordinary applications available which are capable of recovering data even from the deepest crevice of your hard drive. The solution to these MacOS issues are really effective but it can erase or delete files from your hard drive. So, it will be best for you to be prepared.
The data recovery software we are about to discuss is called 4DDiG for Mac Data Recovery. This version of Tenorshare UltData is specifically designed for Mac data recovery. The software is really effective for lost file recovery. Among other things, the installation and even the operation of the program are very simple. Let’s have a look at how to operate 4DDiG for Mac Data Recovery;
Step 1: Download and install the 4DDiG for Mac Data Recovery on your Mac.
Step 2: After completing the installation, choose a location on your hard drive. Click "Scan" and the program will start scanning for lost files on your Mac.

Step 3: 4DDiG for Mac Data Recovery will take a significant amount of time to scan the hard drive for the deleted files. After that you will be able to view the generated results, all the recoverable files will be listed and categorized. You can click on specific files to preview more details.

Step 4: After selecting files from the preview list, click the "Recover" button below and you also have to specify a path to save them on your hard drive.
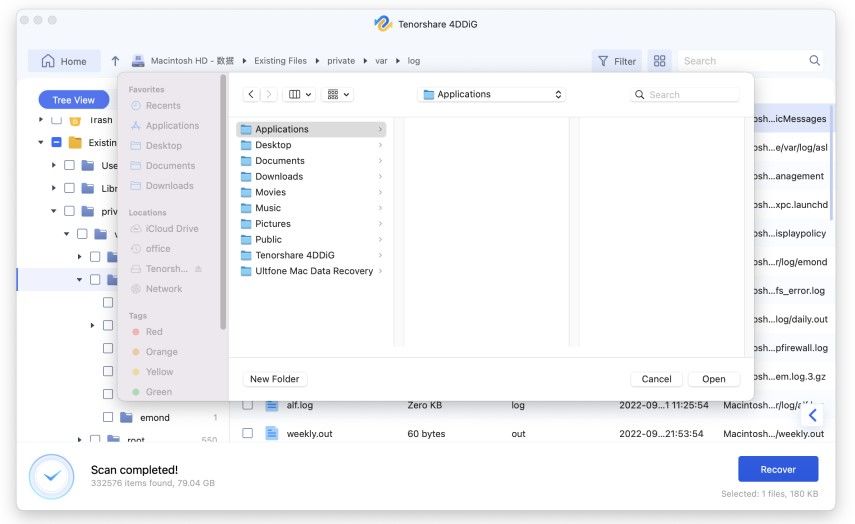
You can clearly, see how simple it was to recover deleted files with UltData, there is simply no complications. But you need to remember not to save the recovered files on the same partition where you lost them, doing the said could lead to permanent loss of data.
Video tutorial on How to Recover Deleted Files from Mac?
Conclusion
MacOS Catalina is the latest one in the MacOS line up, and every year the company releases the beta version for the users hoping to work with their responses. But it is also true that the beta version is not the finished version and it gives the users its fair share of trouble while they are using the OS. So, we are just saying to stay prepared, the solutions we provided can be integrated to those specific MacOS Catalina update problems and they are effective but you also need to be ready if some important files were lost with 4DDiG for Mac Data Recovery. You will be able to recover them immediately. What's more, you can see the answer for"Where are my ringtones on my iPhone?"
Speak Your Mind
Leave a Comment
Create your review for Tenorshare articles

