How to Fix Grey Screen On Mac in 6 Ways Easily?
It is not every day that you face Macbook pro stuck on grey screen problem on your computer. So, if you encountered it and have no way to get rid of it. What solutions you anticipate for fixing it? Well, don't fret over it. We have got your back. The Mac screen goes unusually black, deceiving you to think that, your Mac has been turned off. In this article, we have listed number of ways to deal with it.
- Part 1: What Is Gray Screen Startup Problem on Mac?
- Part 2: How to Fix Grey Screen on Mac?
- Part 3: What If You Lost Important Files on Mac?
Part 1: What Is Gray Screen Startup Problem on Mac?
When your Macbook pro gets stuck on grey screen, it actually becomes so dark and rather looks black. Due to Retina display on Mac, there is no power indicator on a Mac screen. When the system starts, your screen goes grey resulting in grey screen problem. It might have spinning gear, Apple logo, spinning globe etc.
Part 2: How to Fix Grey Screen on Mac?
There are various reasons as to why your Mac get stuck on grey screen. We are going to check all of this out in the guide below to fix Mac grey screen problem, so let's get started.
Method 1: Remove All External Peripherals
Macbook pro stuck on grey screen can be resolved by disconnecting all external peripherals or cables. A defective or unauthorized peripheral jeopardizes your work.
Step 1. Shut down your Mac using the power key.
Step 2. Remove all peripherals from Mac, except keyboard, mouse and display (Mac computer). Audio in or out cables, Ethernet cable or headphones to be precise.
Step 3. Direct connect mouse and keyboard to Mac sans USB and restart Mac.
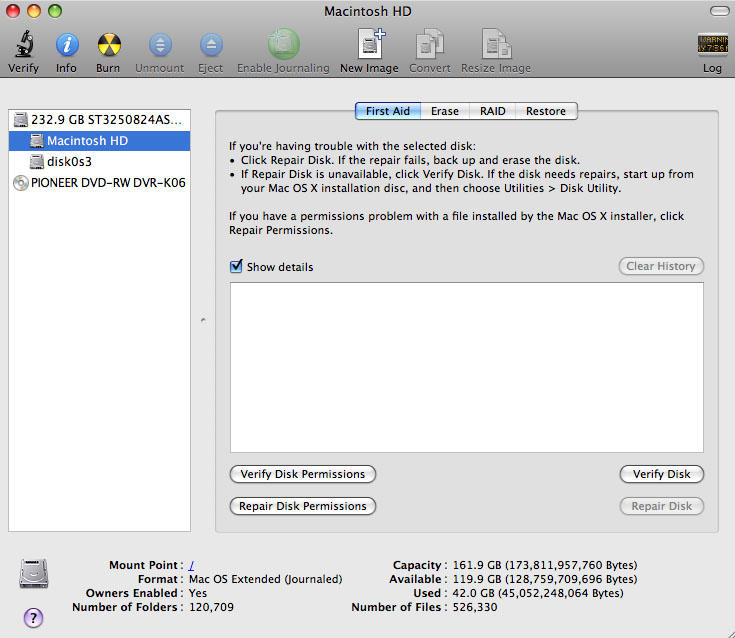
Method 2: Repair Disk using Disk Utility
Repairing disk with disk utility fixes Macbook pro stuck on grey screen issue. Running disk utility shows, whether you got any issue or not.
Step 1. Turn down your Mac by pushing down the power button.
Step 2. Start the Mac by pressing 'Command' + 'R'.
Step 3. On 'OS X Utilities' popup, choose 'Disk Utility'.
Step 4. From the left panel, pick the inbuilt Mac drive and press 'Verify Disk' on the bottom-right part of the screen.

Method 3: Start Mac Using Safe Boot
You can eliminate Macbook pro grey screen of death by Safe Boot. It ensures minor issues are avoided to run your Mac.
The following is how you do it:
Step 1. Push the power button and turn off the Mac.
Step 2. Hold down 'Shift' key to restart Mac.
Step 3. While Safe Boot is busy in action, you can hit 'Shift' + 'Command' + 'V'. You can view Verbose Mode and Safe Boot mode's status.
Step4. Once the desktop is fully displayed, restart Mac from Apple menu.

Method 4: Reset PRAM
Resetting PRAM is tedious and takes it to default Mac settings. Here is the guide:
Step 1. Except the keyboard and mouse, remove any other peripherals attached to your Mac. Now, reset PRAM/NVRAM.
Step 2. Restart the Mac and connect peripherals again.
Method 5: Repair a Startup Drive
The reason for Macbook grey screen might be a faulty Startup drive. In case, an OS X install disk, USB flash drive or Recovery HD can start your Mac.
Here is how to test it:
Start from an OSX installer DVD:
Plug the installer DVD to Mac's optical drive > shut down the Mac > hold down the 'C' key and start your Mac > Mac will boot from optical drive media.
Start from Recovery HD:
Shut down the Mac > start Mac by pressing 'Command' + 'R' keys.
Start from an external drive:
Shut down your Mac > connect flash drive to UDB port > hold down 'Option' key and start Mac > select target drive with bootable OS X using arrow keys > 'Return'.
If any of the methods turned on your Mac. Your Mac is repairable. Seek an expert to do the needful.
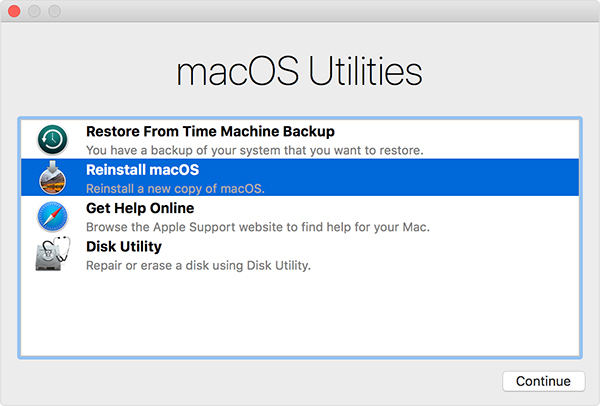
Method 6: Reinstall Mac OS X
Eliminating Macbook pro grey screen issue can be possible by reinstalling the Mac OS X. Here is the guide:
Step 1. Turn off your Mac system.
Step 2. Power on the Mac by pushing 'Command' and 'R' keys together.
Step 3. A pop-up window named 'Mac OS X Utilities' appears. Tap the 'Reinstall Mac OS X' button and you are done!

Part 3: What If You Lost Important Files on Mac?
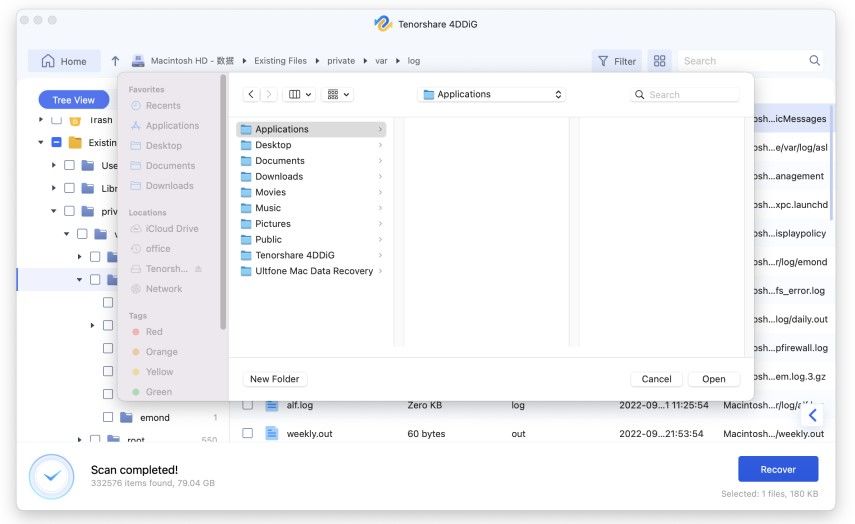
Well, while you are busy fixing grey screen on Mac. You are running the risk of losing vital data from your MacBook. We bring Tenorshare 4DDiG for Mac Data Recovery, for your rescue. It can recover your lost data from a Mac or hard disk effortlessly. No matter, whether you lost it during hard drive formatting, deleted accidentally, or during a system crash. Approximately 550 types of data on your Mac can be recovered using the tool. Let's go through the detailed guide for 4DDiG for Mac Data Recovery to recover the lost data:


Step 1 Run Tenorshare 4DDiG for Mac Data Recovery after installation and then choose the data recovery location on Mac. Here, select the hard drive and click the 'Scan' button.
Note: Deactivate SIP on your Mac OS High Sierra or newer disk, so this program can read Mac file.

Step 2 After a while, deleted Mac files will be scanned. You can click and preview them from the result area.

Step 3 Tap on the 'Recover' button and select the target folder to save data. Ensure that the source of file and current location are different. Otherwise, you might lose the data forever.

You have successfully recovered lost files on your Mac.
Video tutorial on how to recover deleted lost files on Mac
Conclusion
Witnessing grey screen on Mac can be a little troublesome. However, there are ways to fix this issue on your own. We introduced 6 effective ways to get the grey screen problem fixed. On a plus, we shared a productive tool that can help you recover lost files, in case you lose any. We hope you're now able to fix the issue. Thanks!
Speak Your Mind
Leave a Comment
Create your review for Tenorshare articles


