How to Recover Unsaved Word Document on Mac?
"I lost an unsaved Word file while using it from my Mac, is there any way I can recover that document? Please help me out!"
Nowadays almost every device comes with a recovery program that may not always work but most of the times it is able to get back the files you have lost or deleted. You are using one of the best electronic devices of this generation, so, there are obviously a few recovery programs that came with the MacOS with the power to recover word document Mac. The one that could help in this situation is called Auto Recovery. It is a feature that comes pre-programmed with Mac, you just have to know how to use it. You will find the required procedures mentioned below in this detailed guide.
- Way 1: Open Doc Again to Recover an Unsaved Word Document on Mac
- Way 2: Recover Word Document on Mac from Auto Recovery Folder
- Way 3: How to Recover Unsaved Word Document Mac from Temporary Folder
- Way 4: How to Recover Unsaved Word Document Mac using 4DDiG for Mac Data Recovery (Efficiently)
Way 1: Open Doc Again to Recover an Unsaved Word Document on Mac
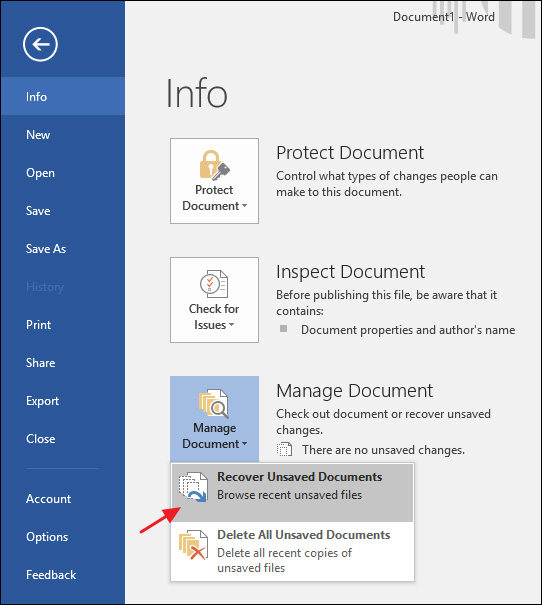
If you are forced to quit Word Office because of system crash, just re-open the application. And then you will find that your unsaved doc is launched again and just go to File > Save. If you still can’t find the doc, head to Info > Manage Document > Recover Unsaved Documents. Sometimes, if you’re using the third-party word application. Usually, when you open any of doc, there will be a prompt warning like “restore unsaved doc?” Just remember to click this and open that unsaved word doc.
Way 2: Recover Word Document on Mac from Auto Recovery Folder
First of all, if you are looking for how to recover unsaved word document 2016 Mac, the very first thing you need to know that MacOS has a built-in feature which is known as Auto Recover. This particular feature is always turned on by default. It means that even when you are working on a document the program is saving the data even without manually operating it. For this program to work you will need to save the document first, with a proper name then the program will continue to save the document after every 10 minutes or lesser whatever you choose.
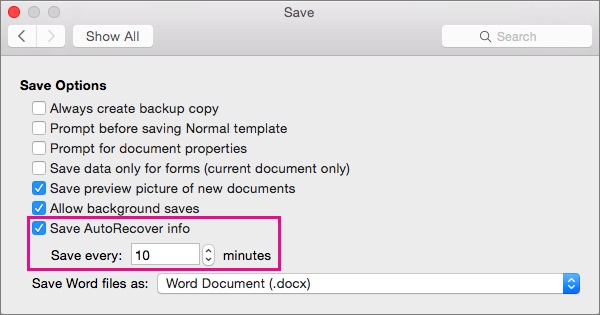
Now, if an unexpected shutdown has removed the file from the device then you will be prompted for a recovery procedure when you launch the Word next time. But if it's not the case then you will still be able to recover a version of the document if you just look into the Auto Recovery Folder.
So, how to recover word document Mac from Auto Recovery Folder:
- Step 1: Open Word and go to Menu.
- Step 2: Now, look for Auto Recover.
- Step 3: Now, there may be a few files, so, you must check the dates of every one of them to find the one you are looking for.
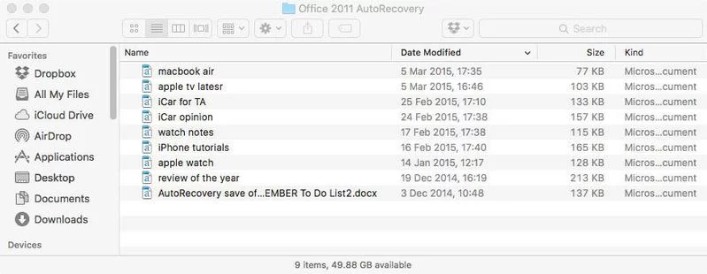
Step 4: Ultimately, when you find the missing file you must not click to open it, just save it using a new name.
But this procedure will only work for Word 2011, sadly who are using the Word 2016 they are in for a challenge. The Auto Recovery Folder for Word 2016 is inside the system and for that, you will need to make the hidden folders visible. So, the steps you can take to find the Auto Recovery Folder while using Word 2016 are as follows:
Step 1: Go to Finder and click on the Home icon.
Step 2: After that, you have to go to the location mentioned below,
Library/Containers/com.microsoft.Word/Library/Preferences/AutoRecovery/
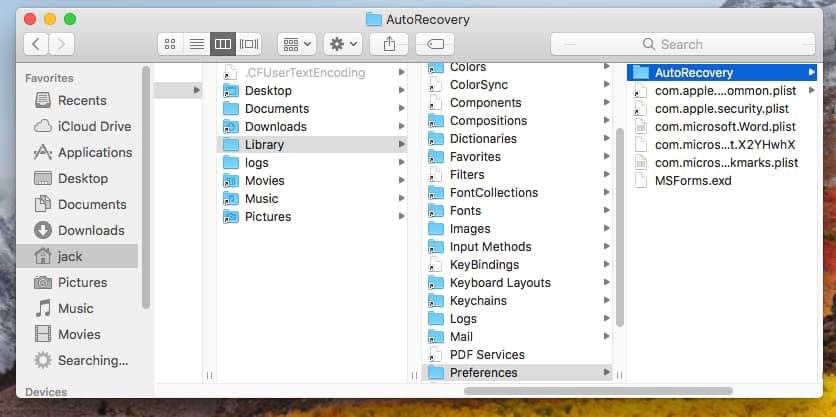
This is how to recover unsaved word document Mac. So, if you actually have any Auto Recovery file they will be inside that location. But the Auto Recovery files are not permanent, if the Mac was shut down unexpectedly then Auto Recovery will save the file but if you have deleted it then Auto Recovery will not save the file as you have closed the file according to proper procedure.
Way 3: How to Recover Unsaved Word Document Mac from Temporary Folder
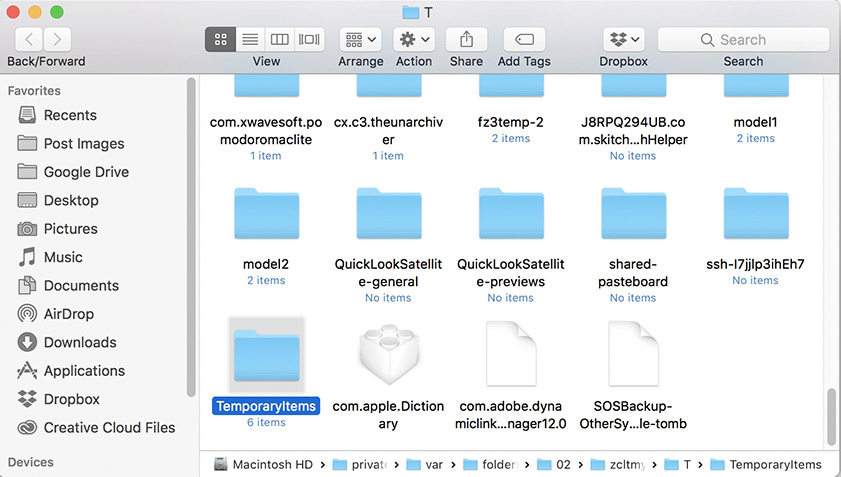
Another way about how to recover unsaved word document mac is “Temporary Folder”, which enables you to have chance of recovering doc even if you forget to save. Of course, we can’t assure it’s a 100% successful way but sometimes it works greatly.
- Step 1:Go to Finder>Application>Terminal.
- Step 2:Then key in “open $TMPDIR” in the new window and press “Enter”.
- Step 3:Find “Temporaryitems” and there are some docs you edit before.
- Step 4: Open docs through TextEdit application.
- Step 5: Copy the text to Office Word.
Way 4: How to Recover Unsaved Word Document Mac using 4DDiG for Mac Data Recovery
The official procedure mentioned above should be enough to recover unsaved word document Mac, but if you are having trouble to use it or just simply don't want to use it then there are independent recovery tools or software you can use to get back that file. For the time being the best tool to recover Word Document or any kind of file is 4DDiG for Mac Data Recovery for Mac tool.
It is developed by Tenorshare to recover various types of deleted/lost/formatted files such as music, audio, video, documents etc. Here's how to recover deleted word documents on Mac using this recovery tool:
Step 1 First you need to download this software then run it on your Mac. Then select a location to scan deleted files.

Step 2 After scanning, you will get a preview of the files found by the software. You can either choose Tree View or File View.

Step 3 Select the files you need and then click on "Recover" at the bottom of the window.
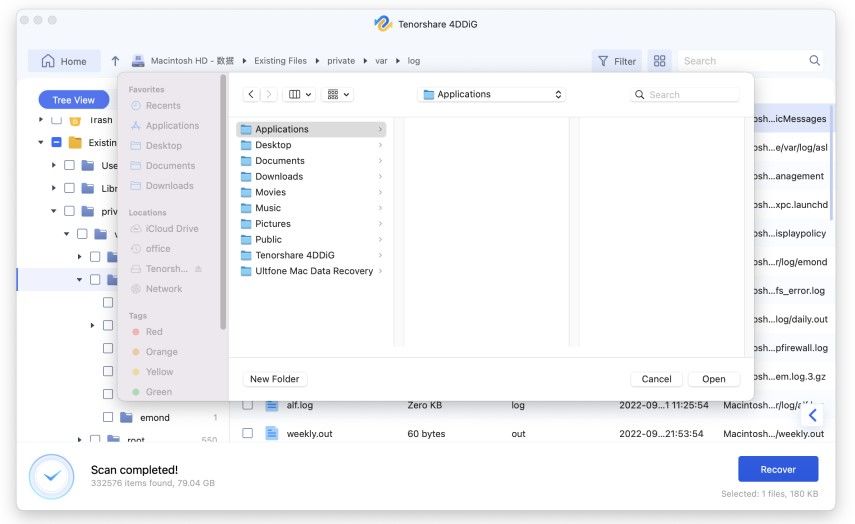
Well, this is considered as the best recovery tool of our time, even if it's a recently deleted file or a very older one you will always have a chance to recover it if you are using 4DDiG for Mac Data Recovery tool.
Conclusion
Needless to say that there aren't any guarantees in these types of situations, even if you are using official programs such as Auto Recovery or Time Machine, you might think that they are developed by Apple so they are bound to help you but actually, that is not always true. It mostly depends on the situation but if you want a sure-shot option then use 4DDiG Mac Data Recovery. It is the finest recovery tool in the market. The recovery rate is admirable and we highly recommend this software.
Speak Your Mind
Leave a Comment
Create your review for Tenorshare articles


