[Solved] External Hard Drive Not Recognized in Windows 10/8/7
"Hello, I am using Windows 10 on a hp elitebook 8440p. My computer is not recognizing my external hard drive nor am I able to view my usb ports under "my computer". My external hard drive does light up and blink like it did when it worked previously and when I check in disk management, it does not show up."
Imagine the dilemma when your precious data is locked inside your external hard drive but you are unable to retrieve it. The reason being the hard drive went non-recognizable turns things worse. So, for such a crucial situation, where the external hard drive is not recognized by your Windows computer, what would you do? Well! If you are not well aware of the technical nuances of recovering hard drive data, that's not a serious issue. We have some amazing solutions for you to get hold of the situation and make the hard drive run smoothly. Keep reading to explore more!
- 1. Restart Computer and try another USB Port
- 2. Update or Reinstall the Device Driver
- 3. Use the Built-in Hardware and Device Troubleshooter
- 4. Change Drive Letter and Path in Disk Management
- 5. Create a New Partition on Your Removable Drive
- Extra Tip: How to Recover Data from External Hard Drive That Is Not Recognized?
Related Read: How to Fix WD External Hard Drive Not Recognized In Windows 10/7/8.1?
1. Restart Computer and try another USB Port
If your Windows system's hard drive is not recognized, then there might be problem with the USB port. You can connect your hard drive to another port and try if it works. Apart from the USB port, check the cable and connection as well.
- Change the USB cable, if it doesn't work properly.
- Change the USB port and see if everything is fine.
- Get your hard drive connected to another virus free computer for ensuring it is being recognized properly.
2. Update or Reinstall the Device Driver
If your wd hard drive not recognized, you can try:
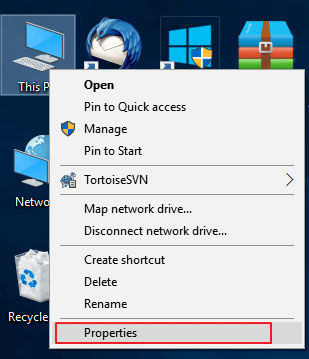
Step 1. On your Windows desktop/laptop, right-tap on 'This PC'/'My Computer' and go to 'Properties'.
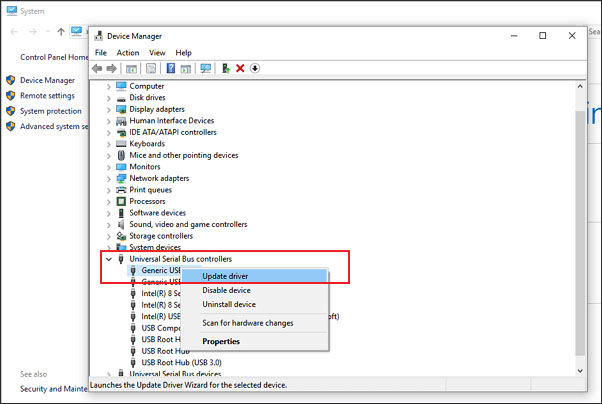
Step 2. Hit 'Device Manager' from the left taskbar. Expand the 'Universal Serial Bus controllers' option to find a yellow exclamation mark. It means your disk driver is out dated.
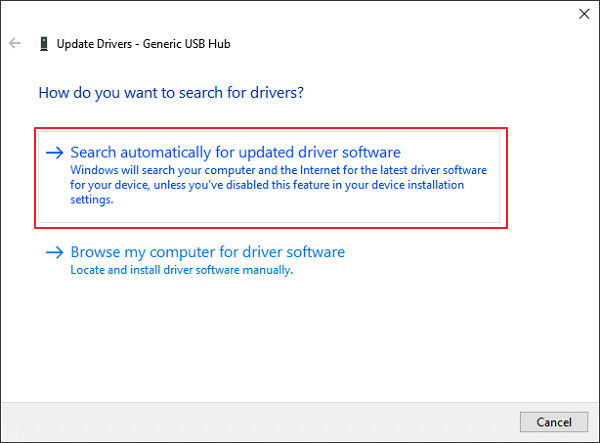
Step 3. Right-click there and pick 'Update driver' and then 'Search automatically for updated driver software'.
3. Use the Built-in Hardware and Device Troubleshooter
In order to fix wd external hard drive not recognized issue, Windows has an inbuilt troubleshooter with it. You can use this troubleshooter to fix the issue, in case you have installed a new hardware or drive.
Step 1. Go to 'Control Panel' > 'Hardware and Sound' > 'Configure a device'.
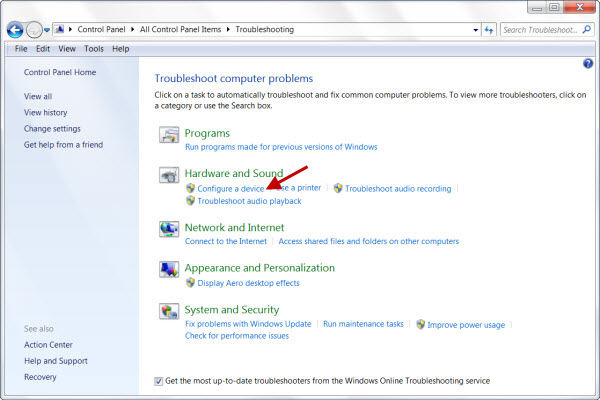
Step 2. Once the hardware troubleshooter is launched, the problems can be detected automatically to get fixed or can be fixed as you desire. Select the desired option and hit 'Next'.
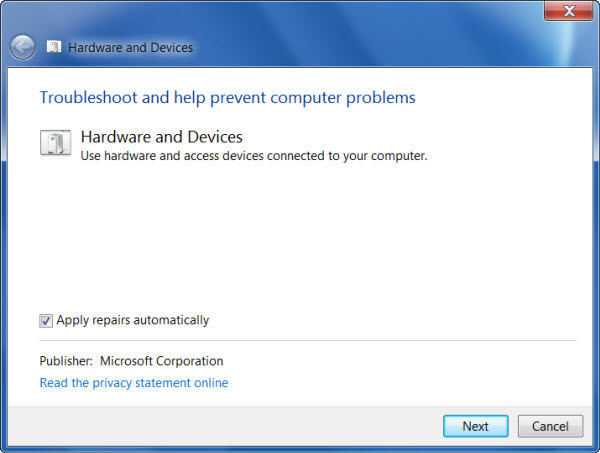
Step 3. From the final report, you can select the problem to be fixed and click 'Next'. Your hard drive issue will be fixed by the 'hardware and Devices Troubleshooter'.
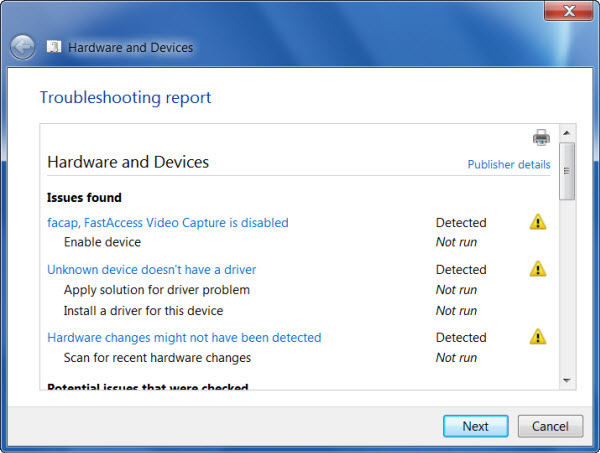
4. Change Drive Letter and Path in Disk Management
If your hard drive not recognized, you can try:
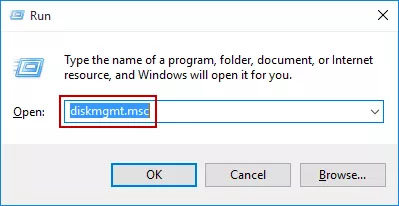
Step 1. Tap on the 'Windows' key and 'R' simultaneously. Enter 'diskmgmt.msc' within the box and hit 'OK'.
Step 2. Now, find it and right click on the WD drive. Tap 'Change Drive Letter and Paths….'.
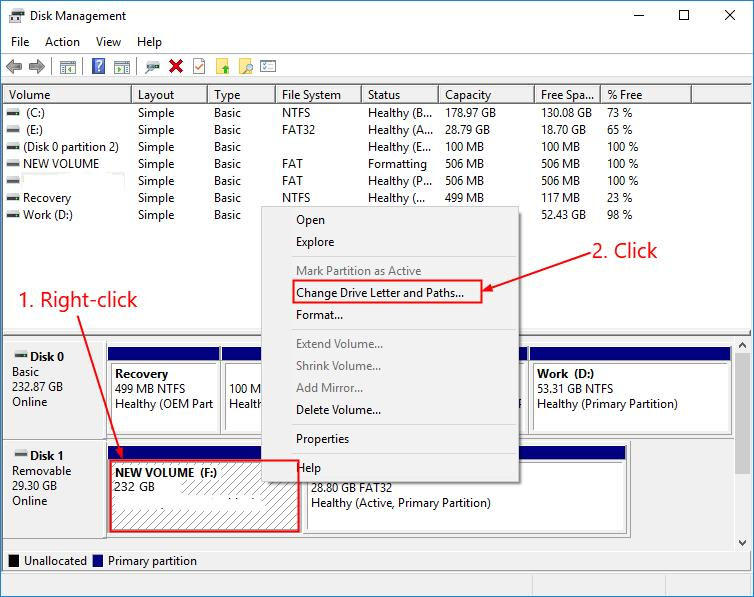
Step 3. Hit 'Change' and then assign a letter from the drop-down menu followed by tapping 'OK'.
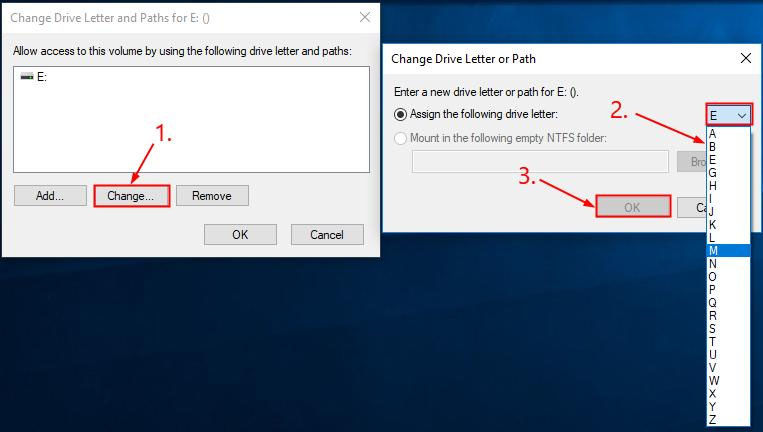
Step 4. Now, restart your Windows system and make sure that the WD external hard drive is detected or not.
5. Create a New Partition on Your Removable Drive
Step 1. Hit the 'Windows' and 'R' key together and then enter 'diskmgmt.msc' into the box. Click 'OK' afterwards.

Step 2. Right-click 'Unallocated area' and then tap on 'New Simple Volume…'
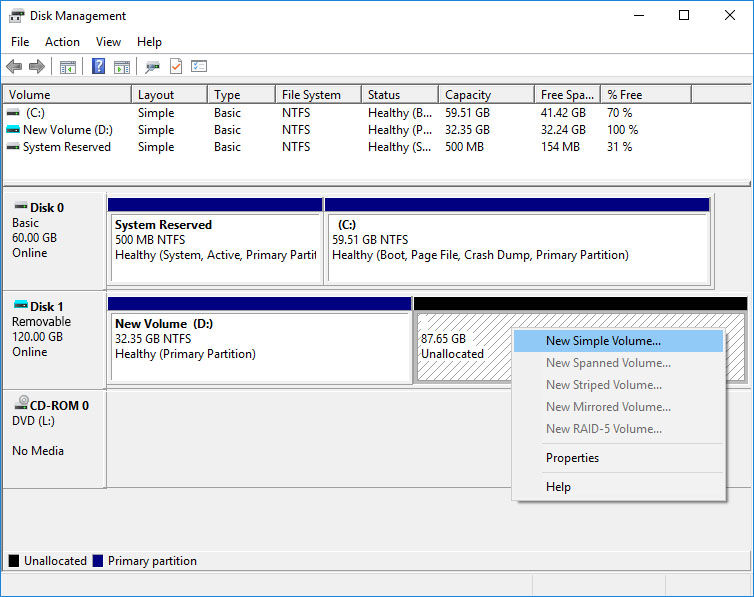
Step 3. Create a partition following the wizard.
Step 4. You got to restart your Windows computer now in case the drive is detected. In case the external hard drive not recognized Windows 10 continue with step '2'.
Extra Tip: How to Recover Data from External Hard Drive That Is Not Recognized?
When nothing could resolve the external hard drive not recognized in Windows 10 issue, you can opt for Tenorshare 4DDiG for Windows Data Recovery to recover lost data from your hard drive. With the 4DDiG for Windows Data Recovery, it can also recognize devices that were unrecognizable by your Windows system. Media player, digital camera, USB drive, or HDD/SSD, it can recover data from any storage medium. Moreover, formatted, lost or deleted data can be found in a jiffy with this tool. It is completely secure and has high recovery rate.
Here is what to do, when your Windows hard drive is not recognized, using 4DDiG for Windows Data Recovery.
Step 1: Choose a Location
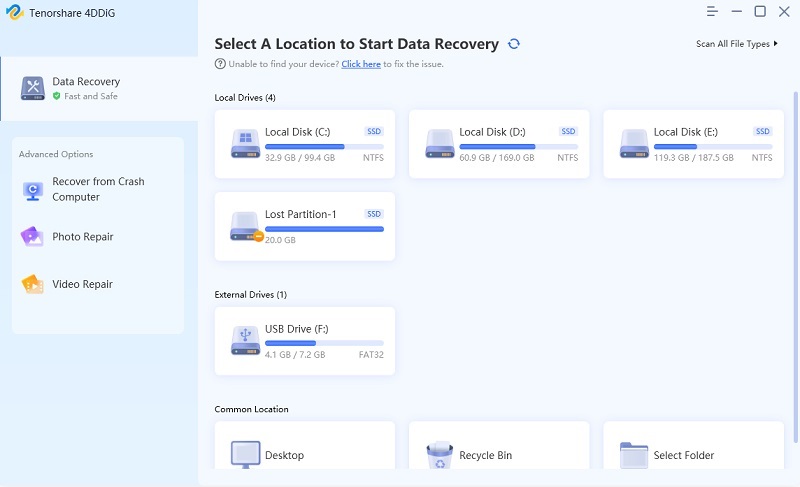
After you download and install Tenorshare 4DDiG on your computer, launch the program and connect your external hard drive to PC. 4DDiG should detect it instantly so that you can click Scan to proceed.
Step 2: Scan and Preview
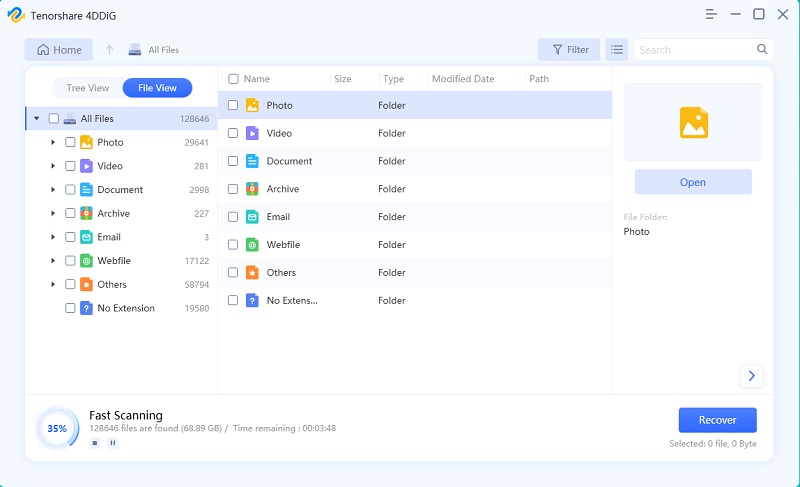
4DDiG will do an all-round scanning on the selected drive to find lost data. If you can't find desired files, try Deep scan. After the scanning, you can choose files to preivew.
Step 3: Restore Lost Files
Now you can choose target files and then tap on the Recover to save them.

Final Verdict
From the above article, we have found that 4DDiG for Windows Data Recovery is an amazing option, when it comes to retrieving data from a hard drive that is not recognized by your Windows system. You can always scan the drive and preview the data before you restore it on your computer. The only thing you should keep in mind is, not saving the file on the source location, from where you lost it. Be it an external drive, storage device or a computer, 4DDiG for Windows Data Recovery can seamlessly recover your deleted files without much hassle.
Speak Your Mind
Leave a Comment
Create your review for Tenorshare articles


