4 Best Ways to Transfer Videos from iPad to iPhone (iPadOS 17 & iOS 17)
Transferring data from iPad to iPhone is not very difficult, both are iOS operated devices and the protection or security of the devices is more or less the same. There are many solutions when it comes to data transfer with Apple certified apps such as iCloud or iTunes. There is AirDrop, and also there are options to use third-party apps as well. All of these apps will enable you to transfer data from your iPad to any iPhone models from SE/ 5/5S/6S to the new iPhone 14. So, if you are wondering how to transfer videos from iPad to iPhone, you are just in the right place! This article will provide you with 4 very suitable and easy solutions to get your job done now.
- Part 1: How to Transfer Videos from iPad to iPhone with Tenorshare iCareFone
- Part 2: How to Send Video from iPad to iPhone Using iCloud Backup
- Part 3: Transfer Videos from iPad to iPhone with iTunes Backup
- Part 4: How to Move Videos from iPad to iPhone with Airdrop
- Part 5: Comparison in Transferring Data from iPad to iPhone
Part 1: How to Transfer Videos from iPad to iPhone with Tenorshare iCareFone
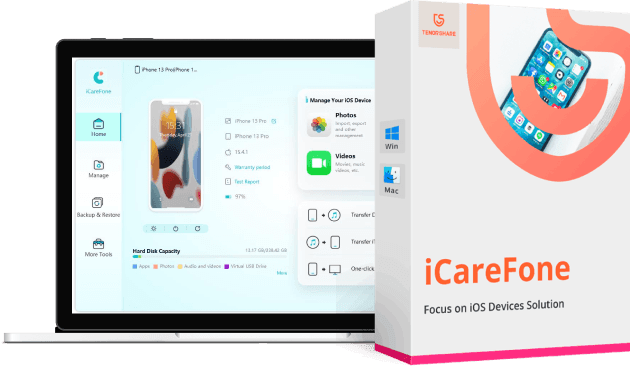
Want to transfer videos from iPad to iPhone? We highly recommend you to go for Tenorshare iCareFone software. It is a very powerful app which can perform on multiple platforms with ease. This fast and sleek third-party app is loved by its huge number of followers thanks to the ability to transfer files with just 1-click. It is by far the best and the easiest method in this article to transfer videos across iOS phones.
Advantages of Tenorshare iCareFone:
- As a multi-platform app which is available on both Windows PC and Mac, it has a very simple interface and it is very easy to use
- It offers 1-click video or any data transfer.
- Lightning transfer speeds
- No iTunes or iCloud login and space restrictions
- No Wi-Fi needed
Follow the instructions below to make it work:
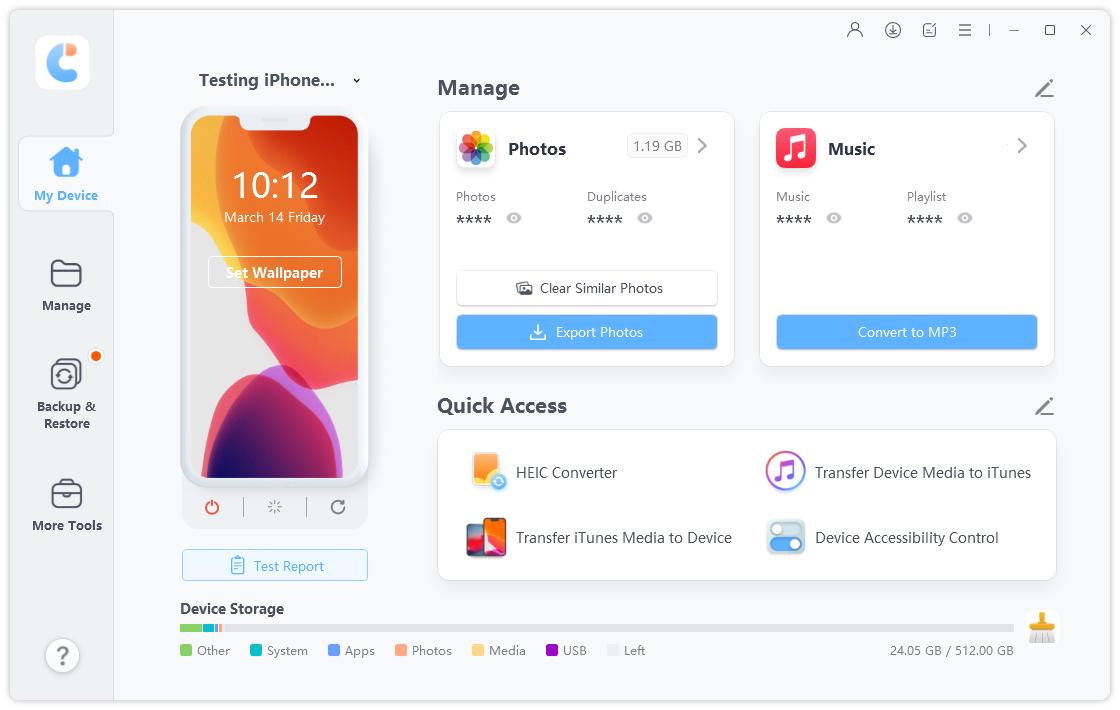
- Download, install and launch Tenorshare iCareFone. and connect your iPad to your computer.
-
Start the program and click Backup & Restore on the left menu bar.

-
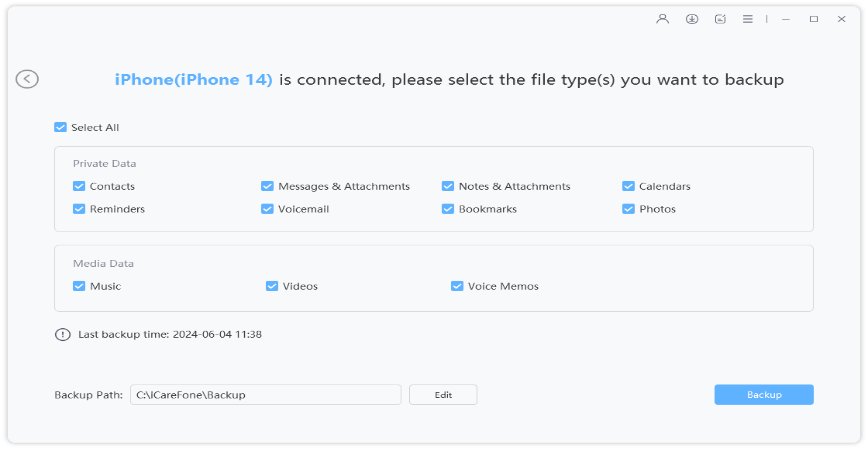
Various data option will be available, choose the Photos and Videos option and click "Backup". And the backup will be completed in a few minutes.

-
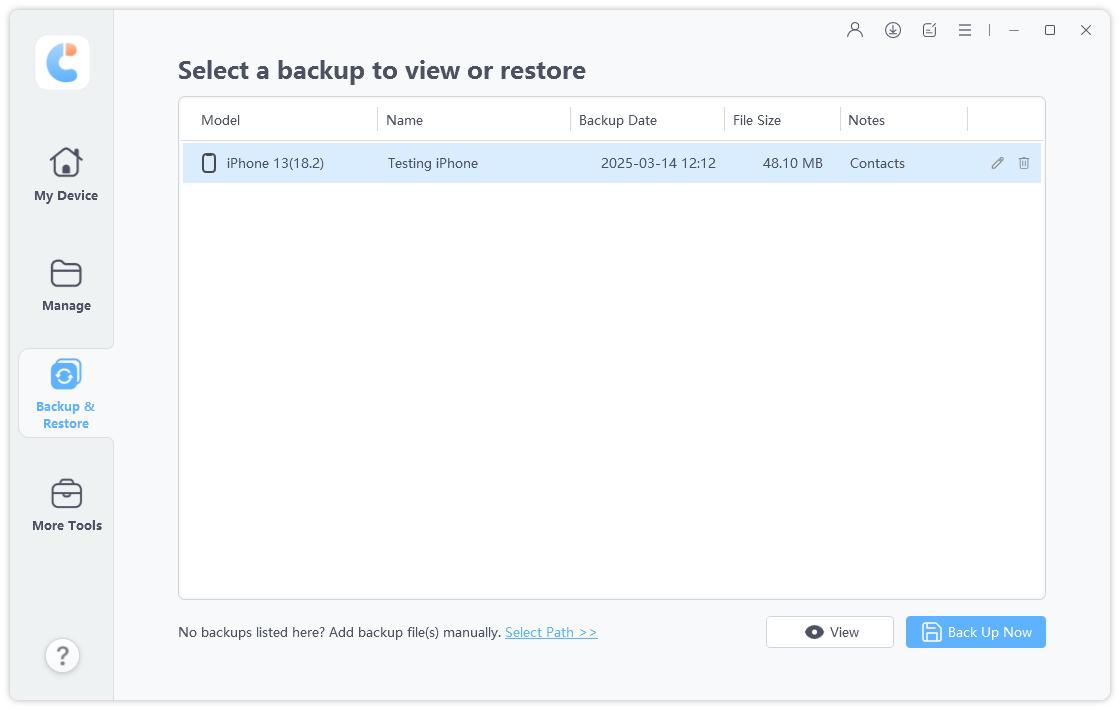
Now connect your iPhone to the computer and go to Restore section at this time.

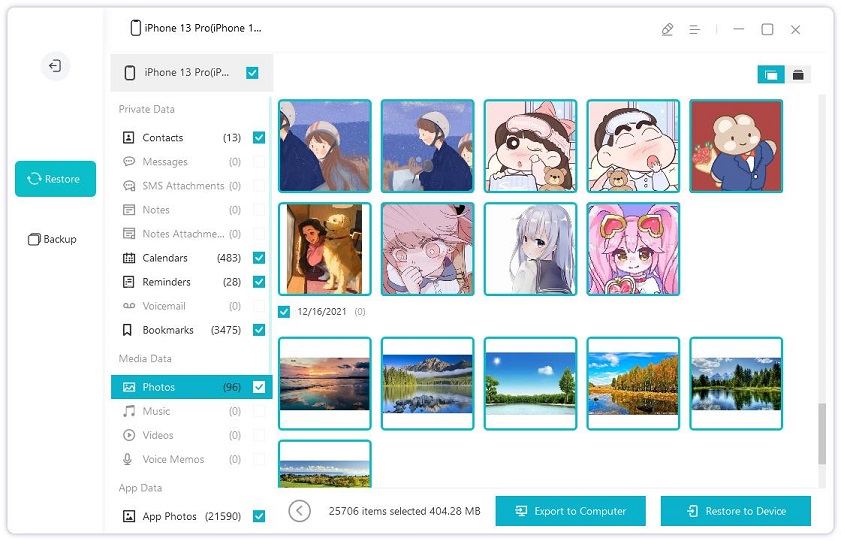
Select the latest backup record and click on View. You can now see all the photos and videos saved on your iPad.
Select the photos and videos you want to transfer to your iPhone, and click on Restore to Device.

- And it's done! Just wait for a few minutes for the program to send videos from your iPad to iPhone.
Part 2: How to Send Video from iPad to iPhone Using iCloud Backup
iCloud is also a suitable option if you want to move video from iPad to iPhone. It is an old app but it has a lot of valuable features that has created a huge follower base as it is designed by Apple. Keeping that in mind, with the iCloud Photo and Media Library many of you might think that the app is only able to move images and music files from one device to another, fortunately, that is not so. iCloud is also able to transfer video files with the same efficiency but with some restrictions like all-time steady Wi-Fi connection and storage space issues. Anyhow, there are two stages of this transfer process, and they are elaborated below:
Backup from iPad to iCloud:
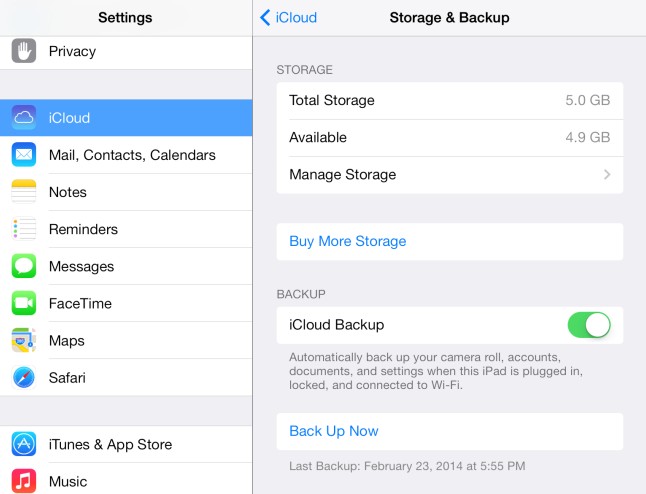
- Navigate to "Settings" and get into iCloud and sign-in with your Apple ID.
- Then go to "Storage and Backup" and turn on "Backup iCloud".
-
Then tap on "Backup Now" option to instantly upload the video files to iCloud.

Restore Backup from iCloud to iPhone:
- On your iPhone, navigate to Settings, enter name and then tap on iCloud.
- Now, open Storage and then again tap Manage Storage, to see the device and details of the latest backup.
- Again navigate to Settings, open General and hit "Erase all content and settings" under the Reset tab.
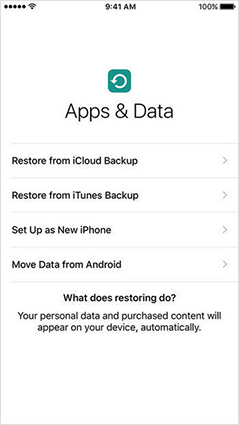
- Once you get the "Apps & Data" screen, simply click "Restore from iCloud Backup", and log in to iCloud using the same Apple ID as before.
-
Now, tap "Choose backup," then select the recent backup and you are done.

Here's how to transfer video from iPad to iPhone using iCloud Backup.
Advantages of iCloud:
- All of the registered iCloud users get 5GB free cloud space to store data
- If you are transferring with iCloud, then you will not need any data cable or computer support to transfer your data.
- The app is free of cost and Apple certified
Disadvantages of iCloud:
- There are various security issues with the app and there is also a risk of data damage/loss.
- An efficient and strong internet connection is needed to complete the transfer process.
- Most of the time the free 5GB space is not enough, you can get extra space but in exchange for a fee.
- Being dependent on good Wi-Fi, data transfer speeds are usually a bit slow.
- Doesn't support all files.
Part 3: Transfer Videos from iPad to iPhone with iTunes Backup
iTunes is one of the oldest Apple certified apps on the market. Although there are lots of better options available on the App Store, some users prefer to use iTunes to transfer data as it is tried and tested. But when it comes to backing up and restoring data with iTunes, it comes with its own limitations. One being, the backed up data is encrypted and unusable and you won't be able to choose a specific file while backing up and restoring. So, if you still want to know how to send video from iPad to iPhone with iTunes Backup then follow the steps below:
Backup with iTunes on iPad:
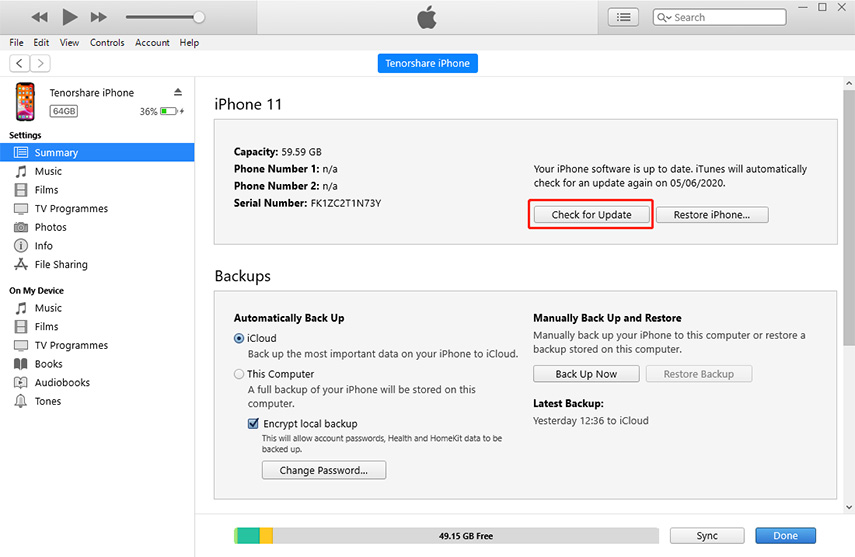
- Connect the iPad to your computer and run iTunes.
- You will be instructed to provide a password, and your device will appear on the iTunes panel under the Device icon.
- Select what kind of device you are using; in this case, it is iPad.
- Now, tap on Summary from the left-hand side panel, go to Backups section and simply tap on "Back Up Now" option.
-
The process will begin immediately after it is finished look for it on your computer.

Restore Backup with iTunes on iPhone:
- Connect your iPhone with your computer and run the app again.
- Unlock your iPhone and it will appear on the iTunes panel.
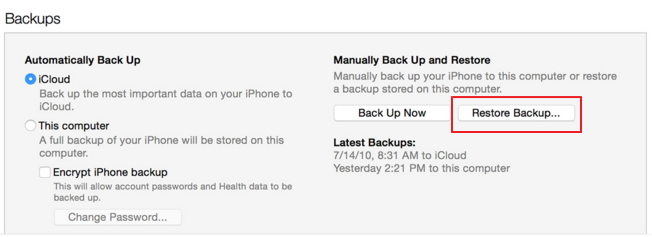
- Go to Summary tab, and now select the "Restore Backup" option from the panel.
-
Select the backup you want to restore, and then click "Restore".

Advantages of iTunes:
- The app is free
- The data encryption is secure
Disadvantages of iTunes:
- Not very user-friendly unlike other options here.
- The app is not very reliable. There are crash issues and even risk of data damage/loss
- When you backup with iTunes, it replaces the previous backup. So, you cannot keep more than one.
- The backup file cannot be used unless you restore it.
- It is impossible to choose a specific kind of data to backup as it is backed up as a whole.
Part 4: How to Move Videos from iPad to iPhone with Airdrop
If you are still wondering how to transfer video from iPad to iPhone, then AirDrop can be another viable option. Although the app was released a few years back, still many users are not aware of all of its capabilities. It is a pure wireless form of data transfer and it is completely dependent on Internet or Cellular connection. So, if you want to know how to Airdrop video from iPad to iPhone, then follow the instruction below:
- Turn on Bluetooth and Wi-Fi on both devices; iPad and iPhone.
-
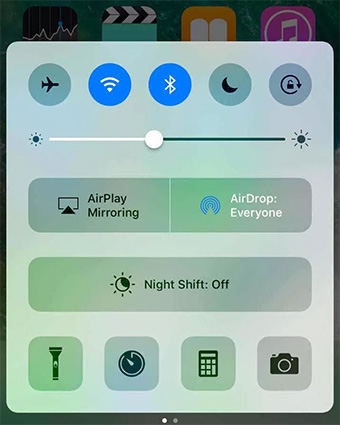
Navigate to "Control Center" on your iPad and iPhone and then tap on AirDrop and select "Everyone" on both devices.

- Now, launch the Photos App on your iPad and select the videos for transfer.
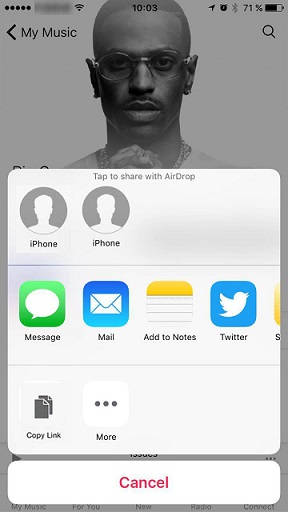
- Then, tap on the "Share" button at the bottom of the panel.
-
Now, the name of the iPhone will be visible on the AirDrop panel of your iPad.

-
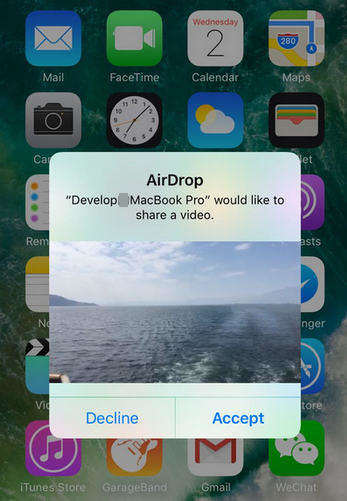
Finally, on your iPhone tap "Accept" to send the videos.

Just make sure that you are using the latest version of iOS, as AirDrop is a new app, it does not support the older models of iPhone and older versions of iOS.
Advantages of Airdrop:
- Fast and secure
- User-friendly interface and easy to use
- Multi-platform support
Disadvantages of Airdrop:
- Needs steady Wi-Fi or else it will fail
- Needs the latest iOS support and doesn't work on old devices.
Part 5: Comparison in Transferring Data from iPad to iPhone
| FEATURES | Tenorshare iCareFone | iCloud BackUp | iTunes BackUp | AirDrop |
|---|---|---|---|---|
| Lightning transfer speed | ||||
| Chance of data loss | ||||
| Selective Transfer | ||||
| 1-click transfer/clone | ||||
| Wi-Fi or Internet needed | ||||
| Data Limitation | ||||
| Same Apple ID Limit |
The solutions mentioned in the article are genuine and you can use any one of them to safely transfer videos from your iPad to iPhone. There are some particular users who may prefer to use only Apple-certified apps like iCloud or iTunes, and many may go for AirDrop to stream video from iPad to iPhone. If you want to go beyond that and compare the features using the comparison table above, you will see that Tenorshare iCareFone is a clear winner here. So, we highly encourage you to use this program; it is fast and will transfer videos effectively.
If you like this article, do share and comment below!
- Free backup everything you need on iPhone/iPad/iPod
- Transfer music, photos, videos, contacts, SMS without limitation
- Selectively restore files without erasing current data
- 1-Click to transfer photos from iPhone to PC/Mac
- Sopport the latest iOS 26 and iPhone 16
Speak Your Mind
Leave a Comment
Create your review for Tenorshare articles

Tenorshare iCareFone
Best Free iPhone Transfer & iOS Backup Tool
Easily, without iTunes


