Time Machine Stuck on Preparing Backup? Here's the Fix
I have a MacBook 12 inch early 2015 running macOS Mojave v 10.14.3. I am backing it up via wifi to an AirPort Time capsule. It has been running fine up until now. It no longer makes it past the "Preparing backup ..." message. I have let it run for two days and still nothing. I have tried to stop it and then go into the Backups.backupdb for the MacBook. There is never any file with the extension/name of .inProgress. What steps are there to troubleshoot and fix the hung TM process?
-- From Apple Community
Are you suffering from a similar problem? Has your MacBook's time machine stuck on preparing backup? Well, you don't need to worry as we have got solutions to fix your problem. The article below shall address the reasons and solutions to time machine stuck on preparing backup on Mojave or Sierra.
- Part 1. Reasons for Time Machine Got Stuck on Preparing Backup
- Part 2. Fix Time Machine Stuck on Preparing Backup with 4 Steps
- Extra Tip: What if I Lost Data During the Repairing Process?
Part 1. Reasons for Time Machine Got Stuck on Preparing Backup

Reason 1: The changelog gets corrupt
The time machine is a quick and efficient method of preparing backups of your data, which ensures that your data is backed up without any error. The time machine keeps track of any changes in your data and maintains a changelog that can help make a swift backup when required. However, due to the presence of any virus or malware, the changelog might get corrupted. A corrupt changelog would need prolonged loading time or might not even load in the first place.
It can be a significant reason behind time machine stuck in preparing backup and must be resolved to ensure a swift backup.
Reason 2: The file size of the back up is too large
As we all know that the backup involves transferring data from a portal to another, time machine backup is no different. It creates a backup of your desired files in the time capsule that can be used whenever you need it. At certain times, a Mac might appear stuck at the backup procession when it has to create a large data backup. The time machine stuck in preparing backup might be a consequence of an attempt to back up extensive data. Hence, to overcome the problem, you might need to reduce the size of a backup and complete the process in smaller chunks.
Reason 3: Your device might be functioning improperly
Another reason for your time machine stuck in preparing backup might be the slow performance of your device. In case of a virus, malware attack, or an old hard drive, the performance of your PC is adversely affected. Its impact on the backing up of data is no different, and there is a fair chance that the backup might take hours and hours to complete. In order to speed up the process, you would need to erase the virus or malware from your PC through the use of an effective anti-virus program.
Part 2. Fix Time Machine Stuck on Preparing Backup with 4 Steps
The Time Machine stuck on preparing backup can be fixed by following the below-stated guide:
Step 1. Stop the Current Time Machine backup Attempt
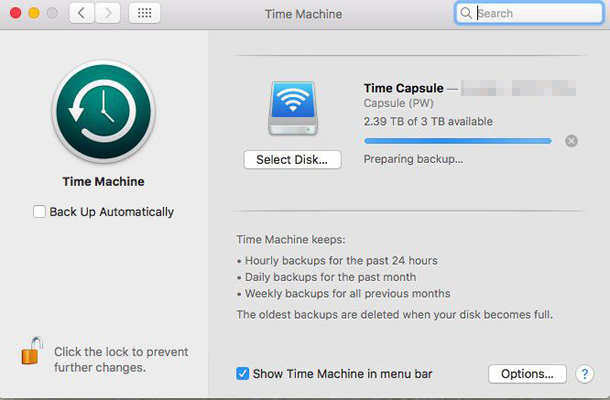
- Open the Time Machine preferences pane from System Preferences.
Now, click on the small (x) button to stop the Time Machine backup.

Step 2. Stop Spotlight from Indexing the Time Machine Backup Volume
Spotlight can conflict with the Time Machine preparation process if it's performing an index of the Time Machine backup volume. You can prevent Spotlight from performing index of Time Machine by adding the Time Machine backup volume to the privacy tab. Here are the steps that you need to follow:
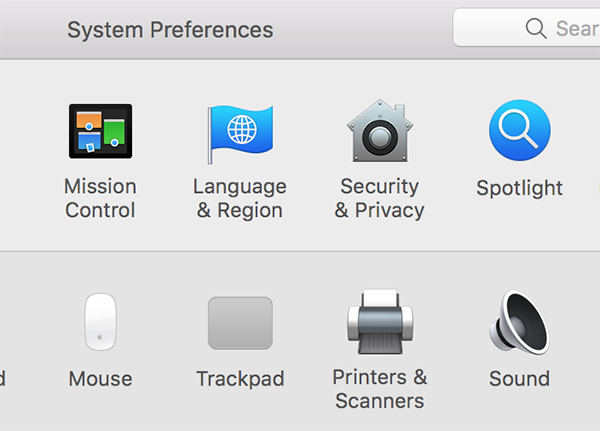
- Launch System Preferences from the Apple menu.
Click on the "Spotlight" preferences icon to launch it.

- Now, click on the "Privacy Tab".
- You can either drag-and-drop the Time Machine backup volume to the list of the locations that don't need to be indexed or just click on the Add-Button to browse the Volume and add it to the list.
Step 3. Remove the in. Progress File
When you successfully added the Time Machine backup file to the privacy tab, the next thing to do is trash the Time Machine placeholder file. Here are the steps to remove in.Progress file:
- Launch "Finder" on your Mac.
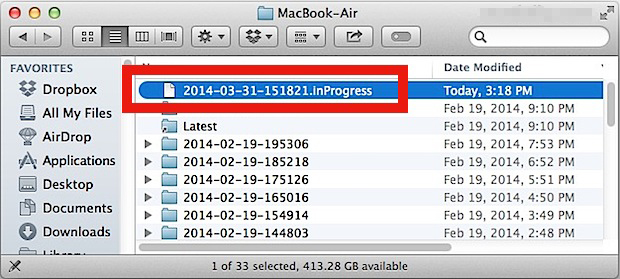
- Navigate to "Backups.backup" folder. Backups.backup is the folder where Time Machine is storing the backups.
- Now, Sort the directory by Date Modified and look for the most recent file with in.Progress extension.
When you have found the "xxxx-xx-xx-xxxx.inProgress" file, remove it.

Step 4. Reboot the Mac and Start Another Backup
After removing the in.progress file, reboot your Mac and turn Time Machine on to initiate the backup. Following the step by step instructions would surely have assisted you in resolving the problem.
Extra Tip: What if I Lost Data During the Repairing Process?
It is quite common that the Mac users have to suffer from data loss while fixing Time Machine stuck on preparing backup error. Therefore, here we bring a reliable and trustworthy tool called Tenorshare 4DDiG Mac Data Recovery to recover all of your disoriented data. With Tenorshare 4DDiG, all of your previously deleted or lost files can be retrieved back to your Mac. Furthermore, other impressive features of the Tenorshare 4DDiG are stated below:
- Recovers over 1000 types of file, including the MP4, doc, rar, and zip.
- Recover data from a formatted external drive or USB flash disk.
- Allow you to preview files before recovering them.
- Capable of repairing corrupted video and audio files.
Here is the procedure to use Tenorshare 4DDiG:
Download and launch Tenorshare 4DDiG on your Mac. Select the hard drive and then click on the "Scan" button to search for lost files.

It takes a while to scan all deleted files. When the scan is finished, tick on the files and click on the "Recover" button.

Conclusion
All the techniques to fix "Time Machine stuck on Preparing Backup" issue discussed in this article have been tried and tested by many users. However, there is an ample chance that you might lose your data during the repairing process. Therefore, we would recommend our readers to try Tenorshare 4DDiG. With Tenorshare 4DDiG, you'll 100% get rid of data loss troubles.
Speak Your Mind
Leave a Comment
Create your review for Tenorshare articles


