How to Create and Fill PDF Forms
PDNob PDF Editor offers a powerful yet intuitive set of tools designed to simplify creating and filling PDF forms with precision and ease. Whether you need to build professional forms from scratch, fill out interactive fields, or collect data efficiently, the editor provides everything required to generate, customize, and complete forms seamlessly. Let’s explore each function step by step to help you master PDF form creation and management.
1. Create a PDF Form
To create professional fillable PDF forms using PDNob, you can achieve this by following the simplified, step-by-step process presented below.
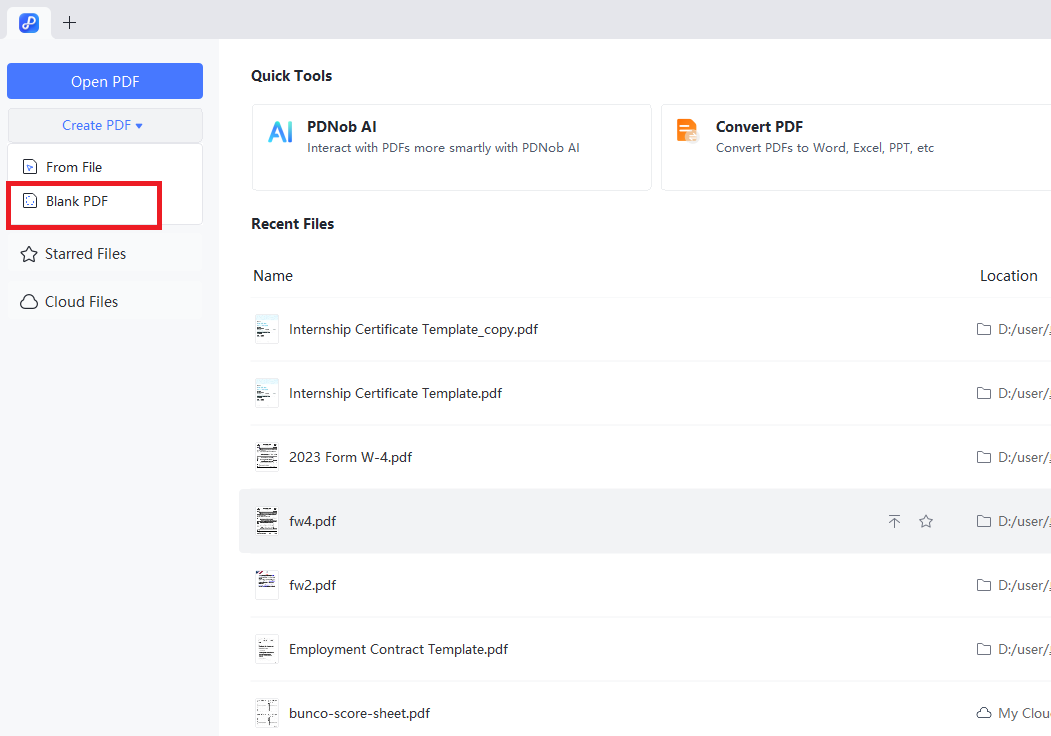
Step 1: Upon launching PDNob, navigate to the "Create PDF" section from the main interface. Then, select the "Blank PDF" option from the menu to proceed with creating a new document.
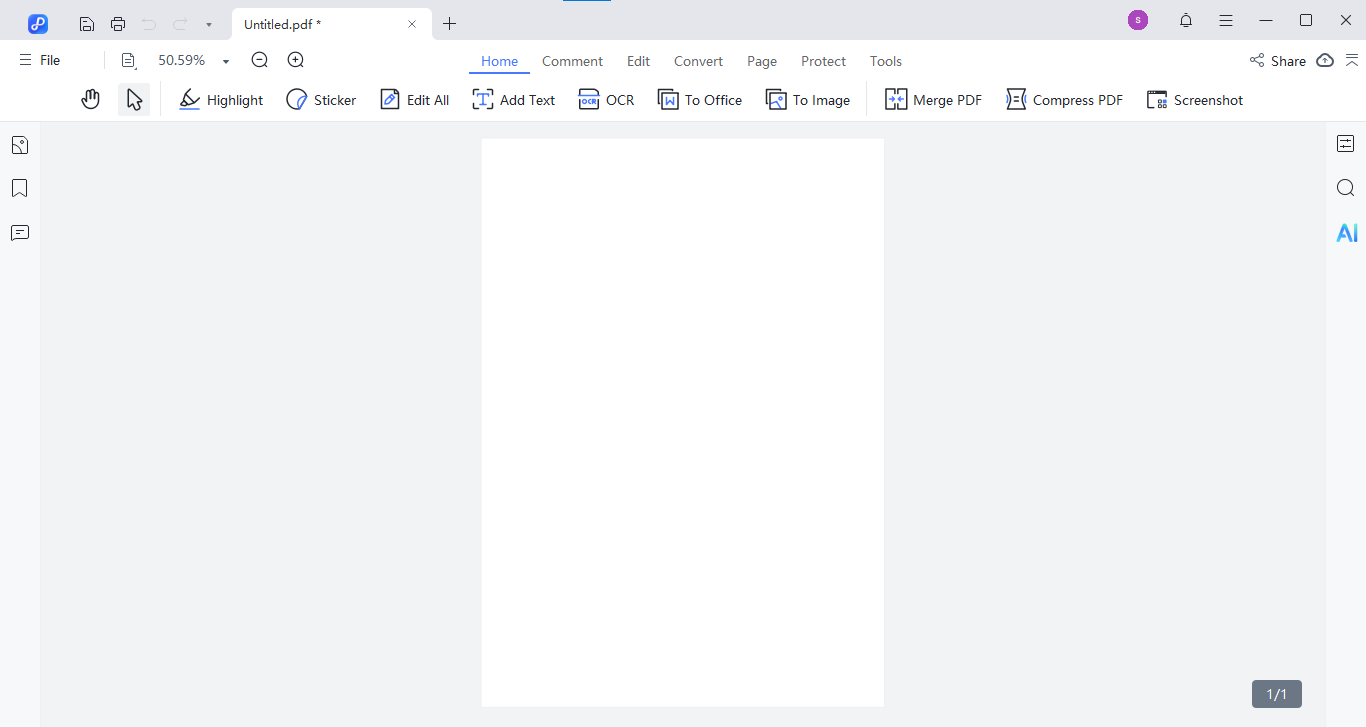
Step 2: To add custom elements like a title or instructions to your blank PDF form, navigate to the "Edit" tab from the top menu. In the toolbar that appears, you will find options such as "Add Text", "Add Image", and "Link", allowing you to insert and customize necessary components for your form.
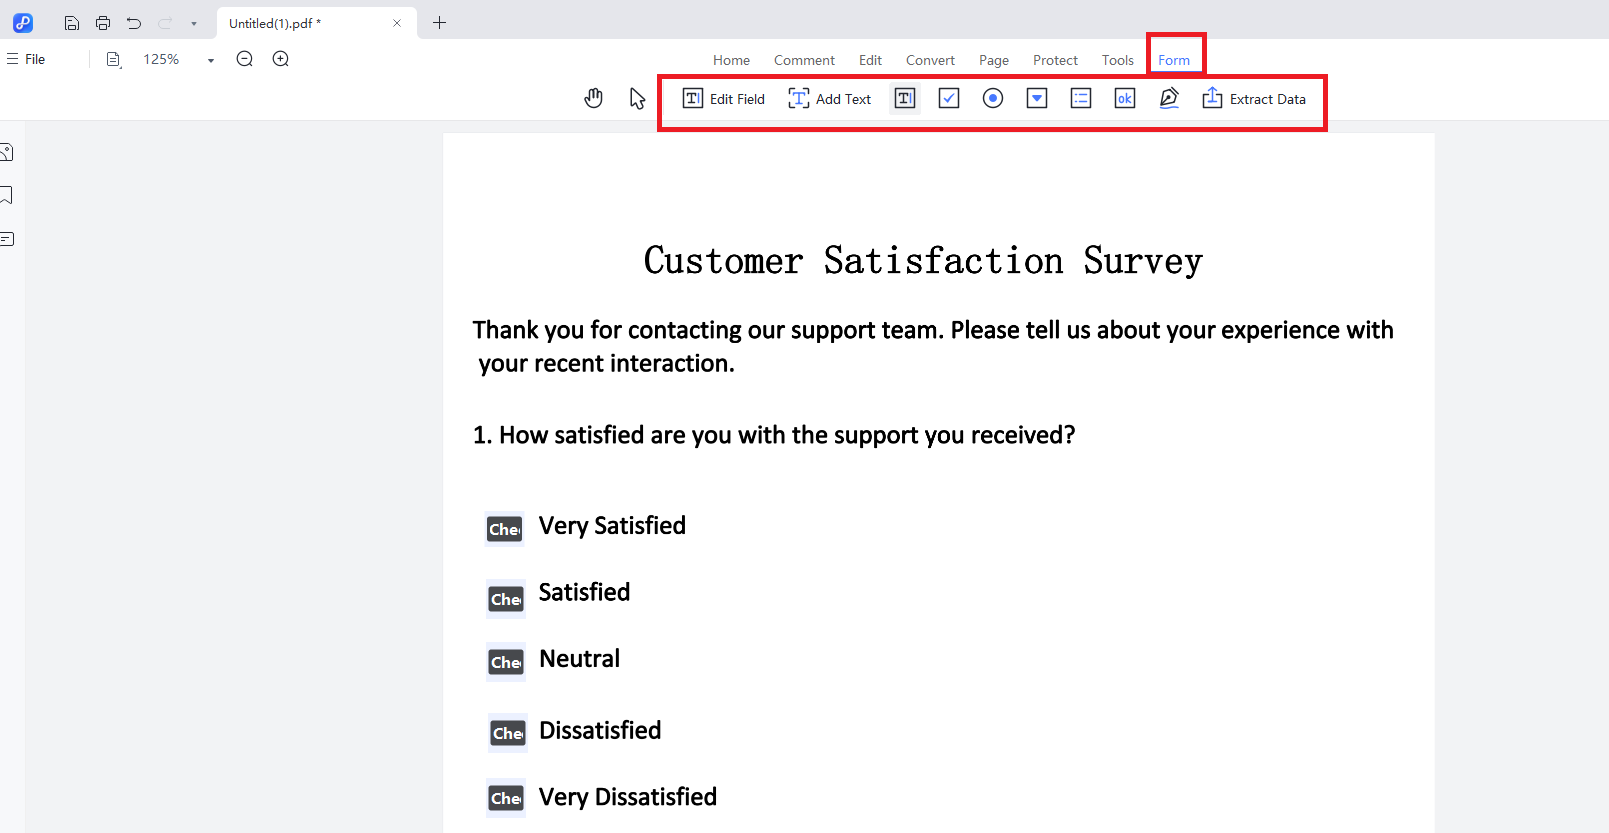
Step 3: After editing the PDF content, navigate to the "Form" tab in the top menu. From the Form toolbar that appears, you can add and customize interactive form elements—such as checkboxes, radio buttons, and text fields.
2. Fill a PDF Form
PDF forms are categorized into two types: interactive and non-interactive. Interactive PDFs contain fillable fields that allow you to input information directly by selecting the highlighted areas. Non-interactive PDFs, on the other hand, are static documents with pre-printed text and lines that cannot be edited digitally.
Here are how to fill in interactive forms:
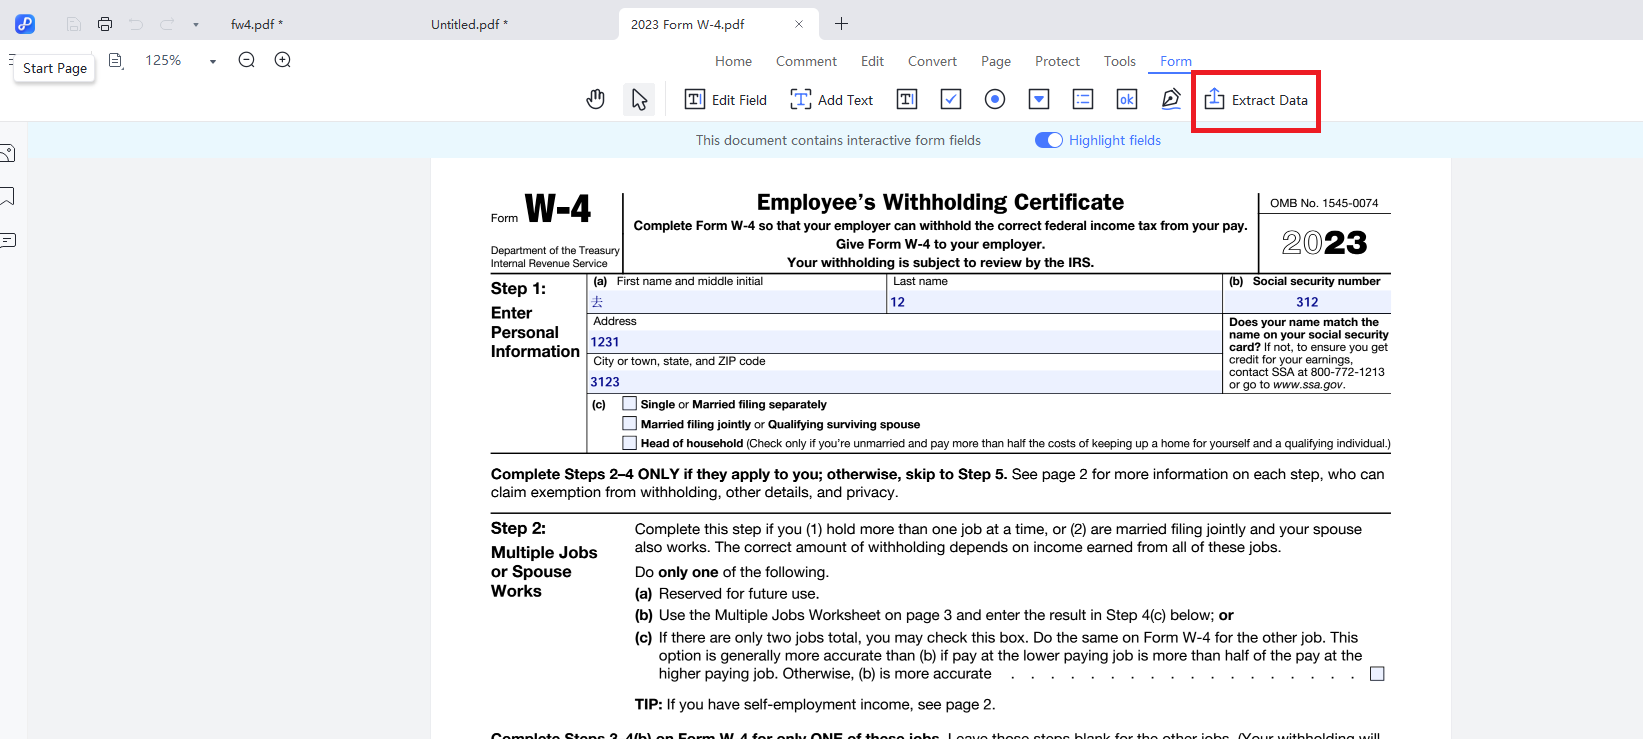
Once you open an interactive PDF form, a blue notice will appear as follows, indicating that fillable fields are available.
- Click on any fillable field and enter the required text.
- Save the completed form using File > Save or the keyboard shortcut Command + S (Mac).
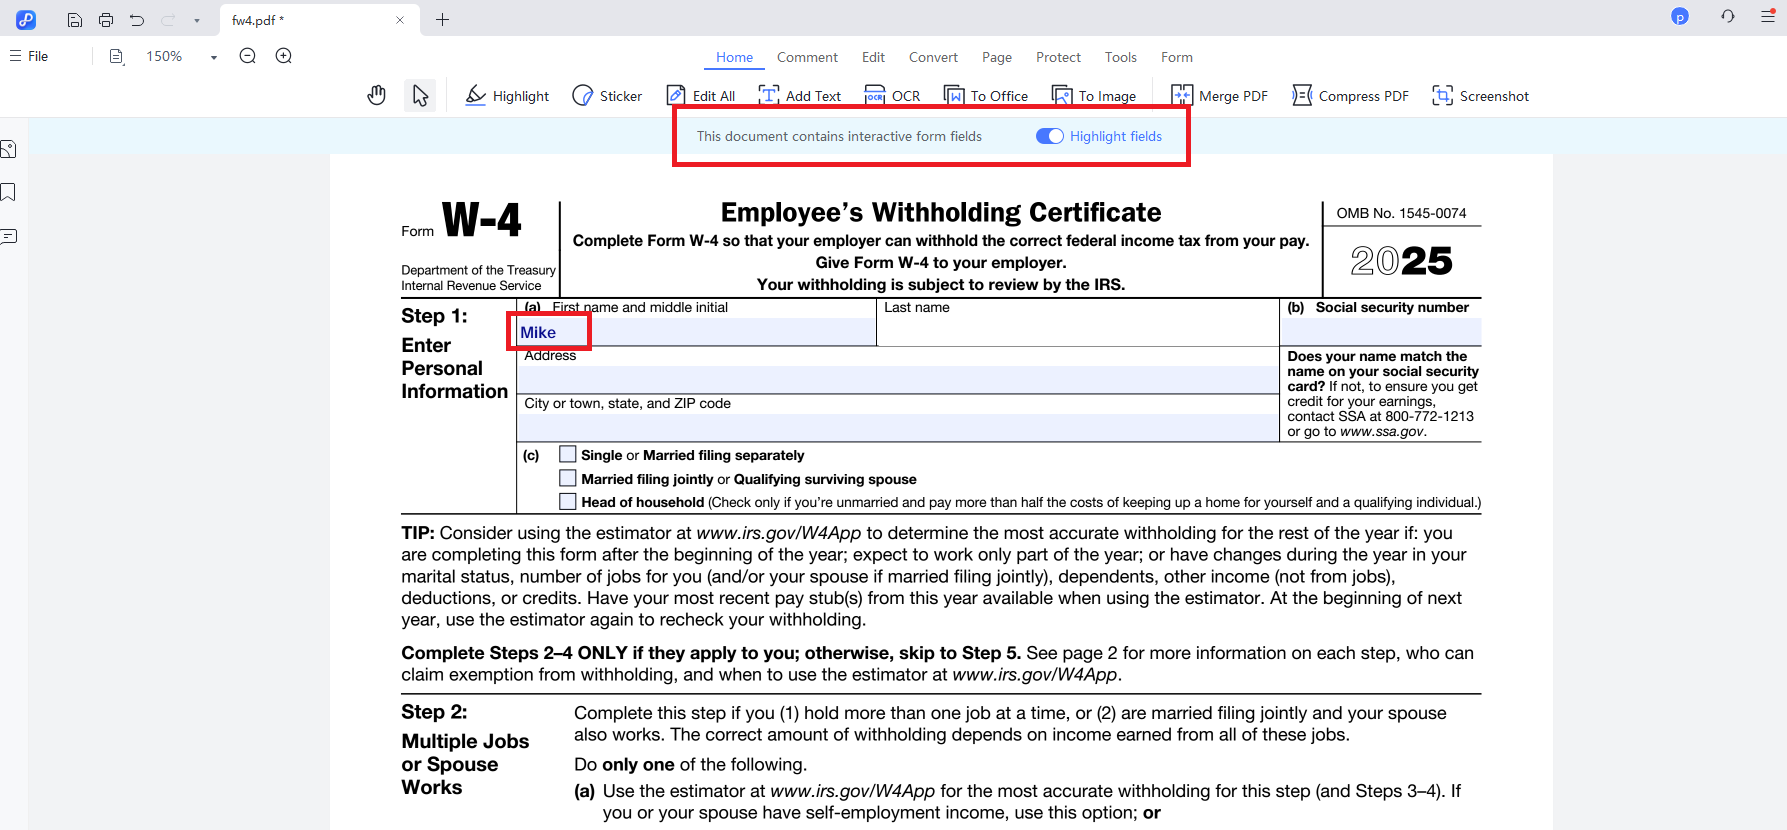
For PDF forms with non-interactive form fields, the "Form" tab provides tools to fill them directly.
Now, we'll walk you through each form function and step to help you fill out and manage your forms with ease. Let's get started.
2.1 Add a Text field
For creating interactive areas or gathering user input, use the Text Field tool to draw and customize fillable form fields.
To add a fillable text field:
- Click the "Text Field" icon in the top toolbar.
- Position your cursor on the form where you want the field.
- Click and drag to draw a rectangle, defining the field's size.
- Release the mouse button to create the field.

To Customize the Field:
- Resize: Drag any of the blue handles along the field's border.
- Reposition: Click and drag the field to a new location.
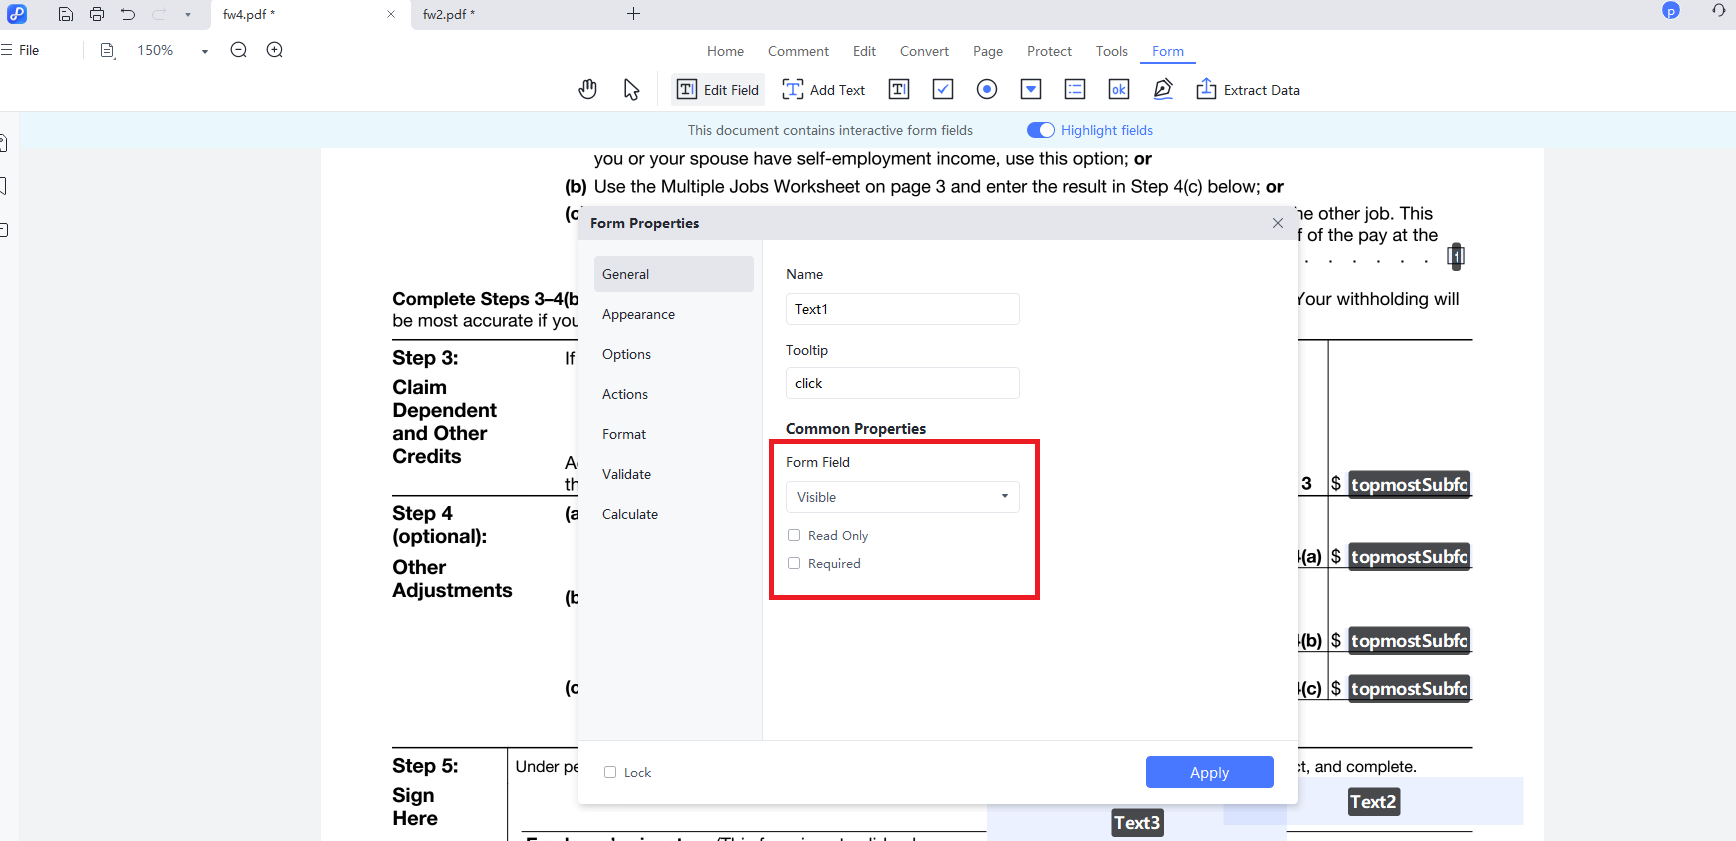
- Edit Properties: Double-click the field to open the "Properties" panel. Here, you can configure its name, appearance (font, color), and actions.

Tooltip: A hint that appears when hovering over a field to show what information belongs there.

Also, you can adjust the field settings as following options:
- Read Only: Prevents users from modifying the field's content.
- Required: The form cannot be submitted until this field is completed.
- Visible: The field is displayed and can be filled in.
- Hidden: The field is not shown to users.
- Visible but does not print: The field appears on screen but not in printed copies.
- Hidden but printable: The field is hidden on screen but included in printouts.
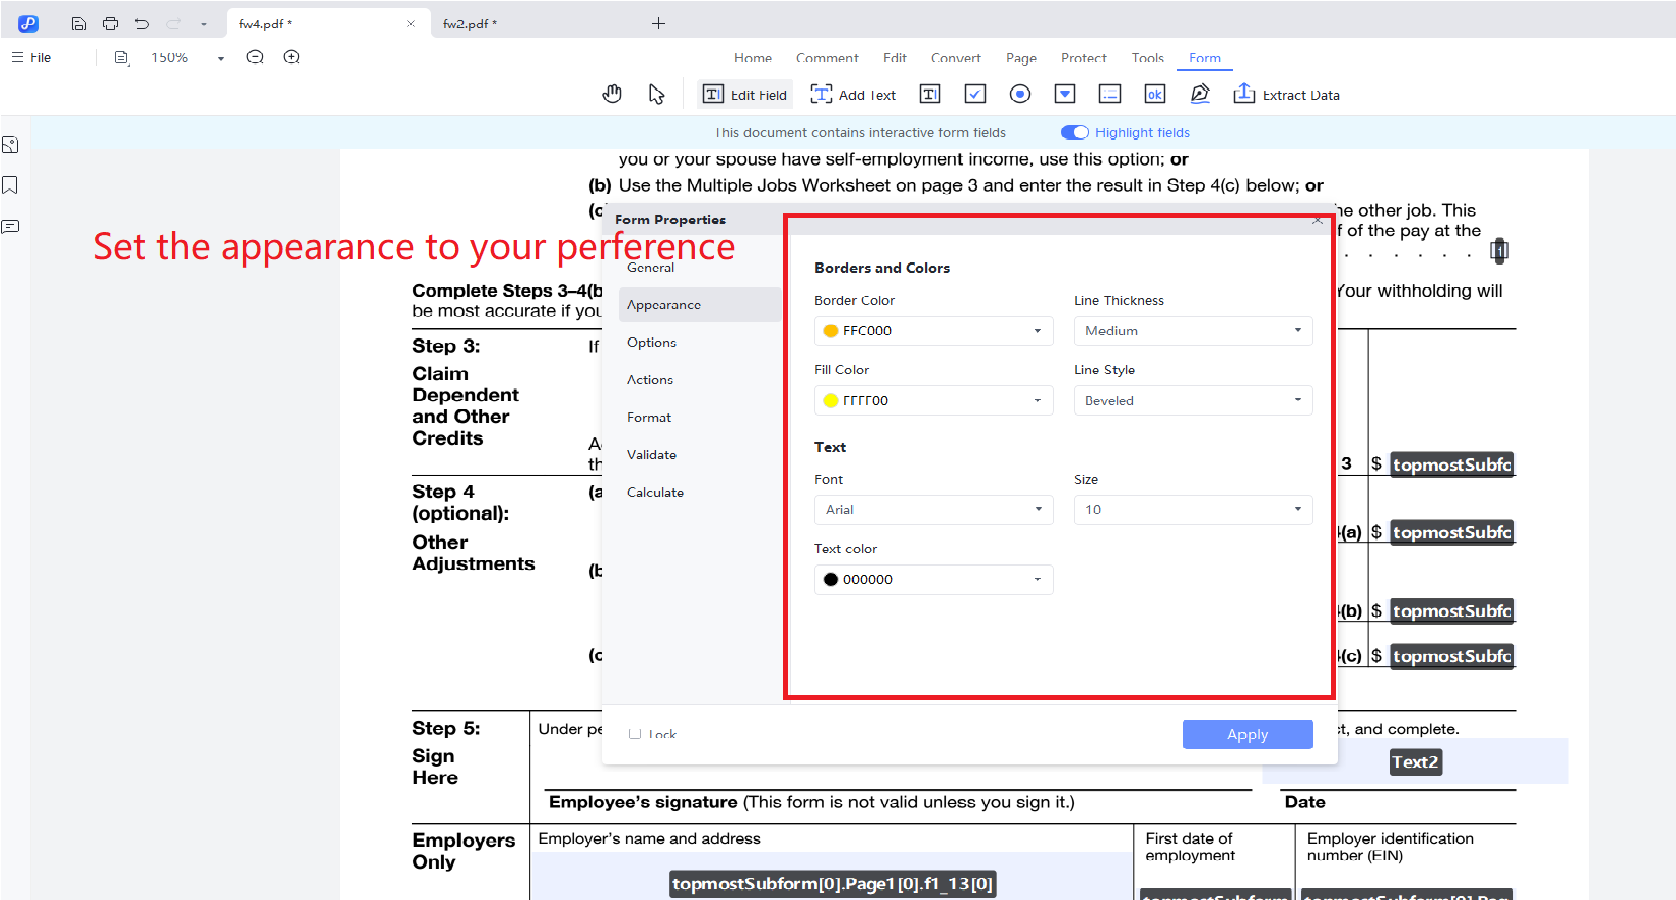
Appearance: Under the "Appearance" section, you can customize the visual style of form fields according to your preferences. This feature allows you to adjust properties such as fonts, colors, and borders, ensuring the form aligns with your brand identity or specific usage requirements.
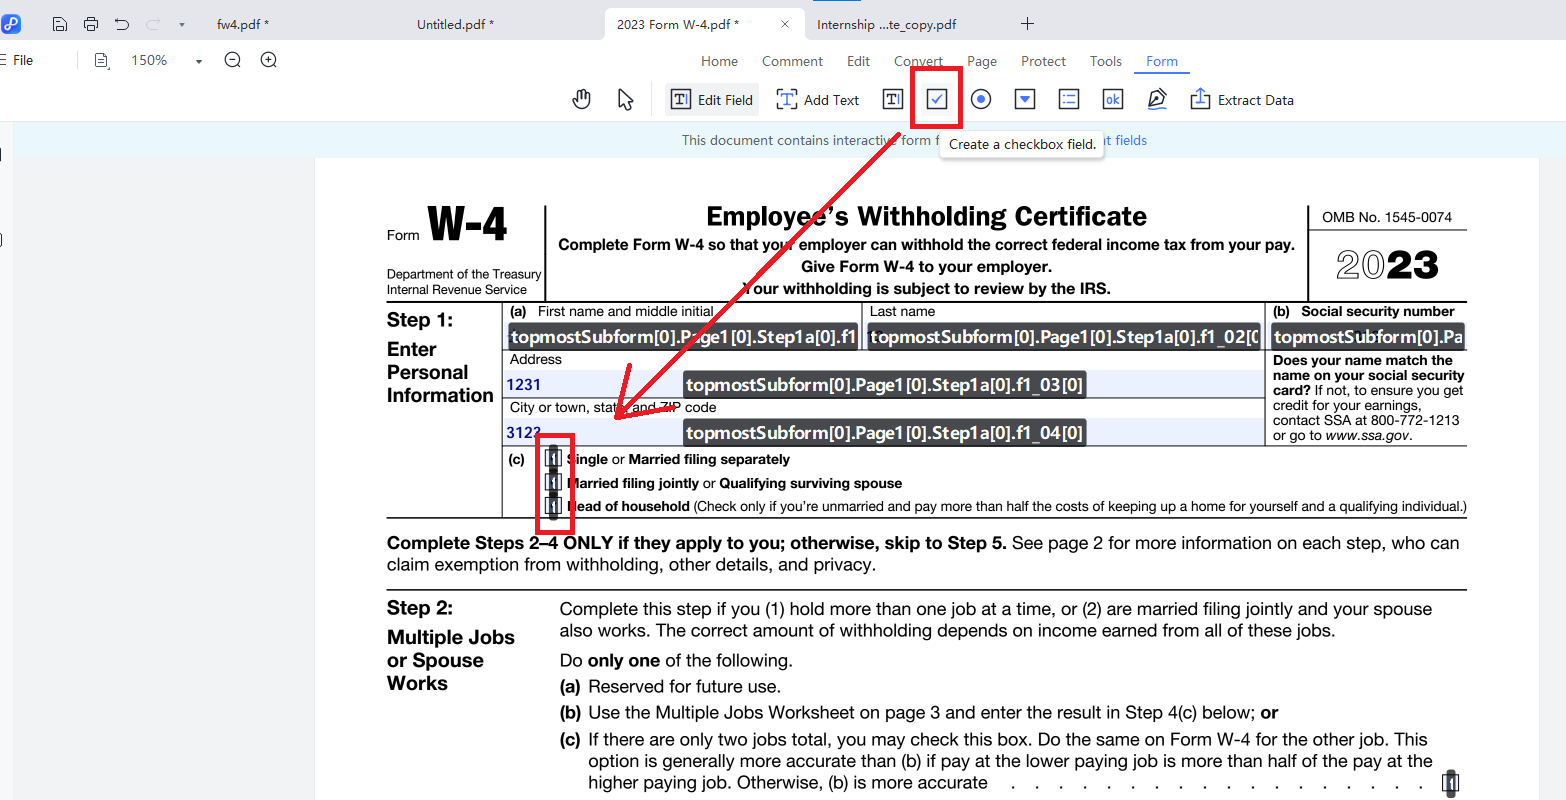
2.2 Create a Check Box Field
In PDF forms, checkboxes enable users to select one or multiple options.
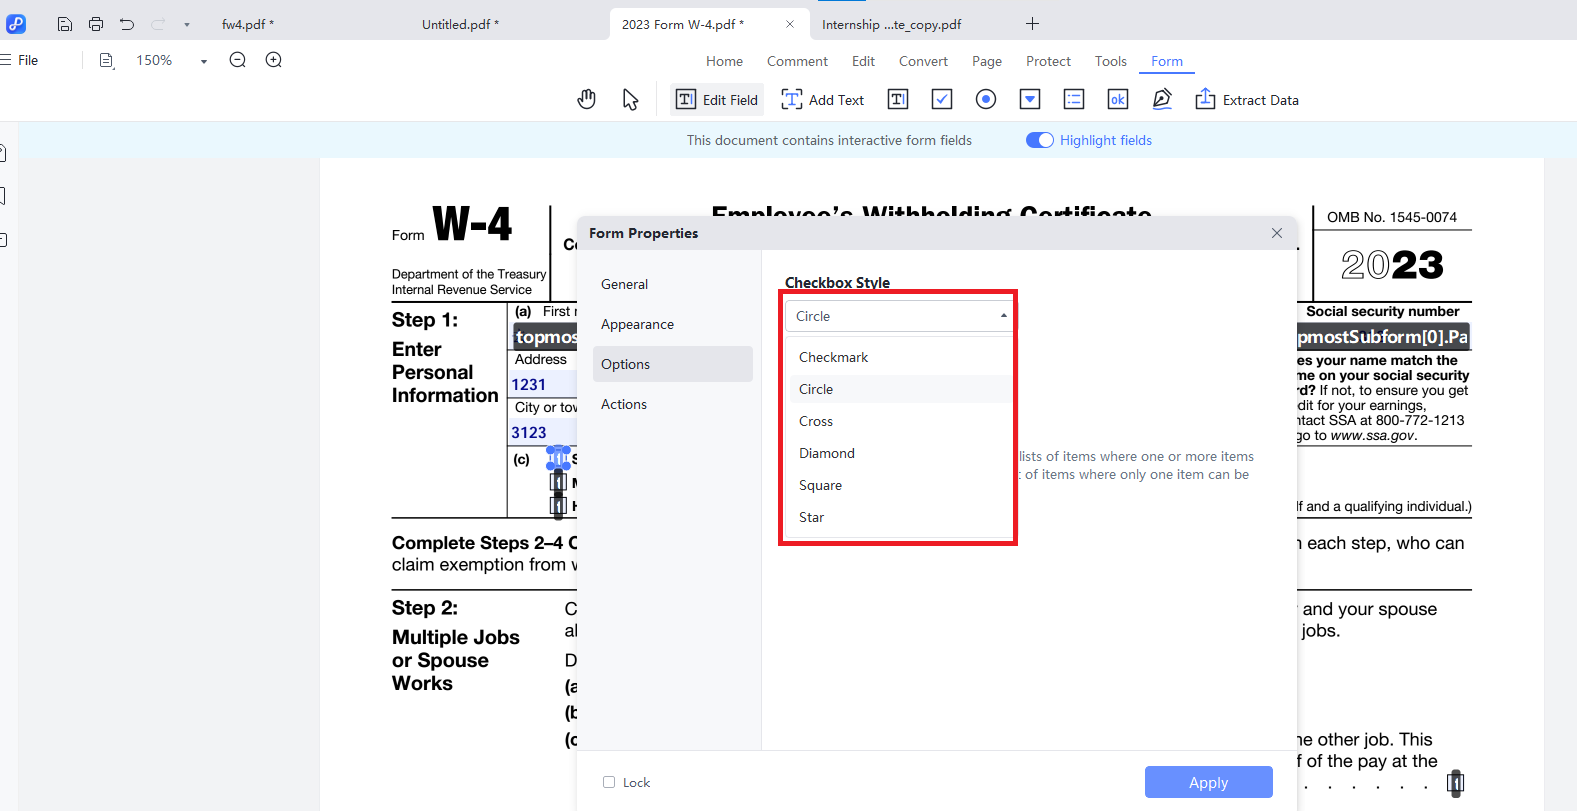
Step 1: Choose the "Create a check box field" button from the top toolbar and draw it onto the form. Double-click the checkbox to access its properties panel, where you can configure the Name, Tooltip, and Form Field settings.
Step 2: Similar to radio buttons, you can customize the button style and define an export value. Additionally, enabling the "Checkbox is selected by default" option will pre-select the checkbox upon form load.
2.3 Create a Radio Button Field
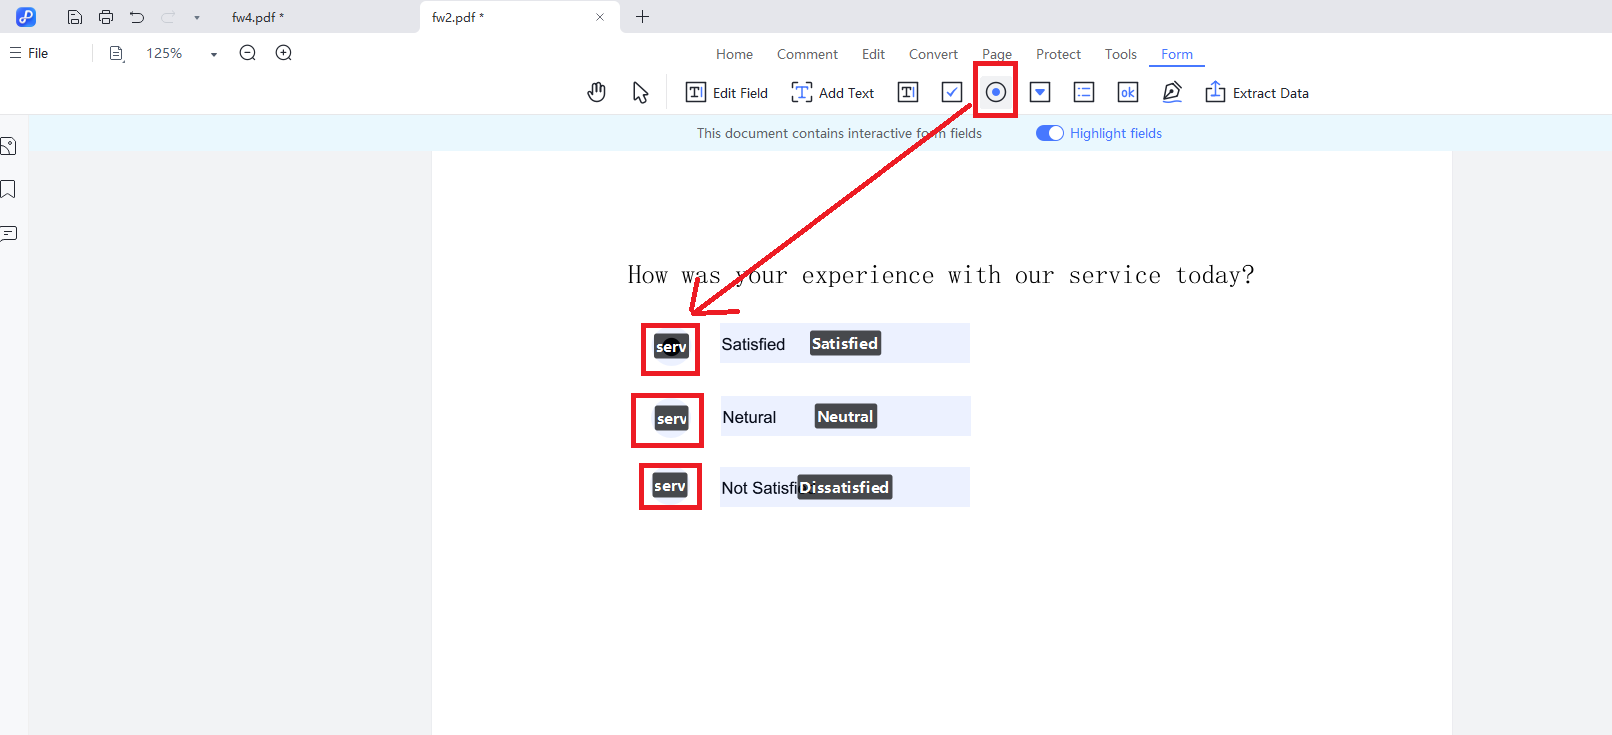
Radio buttons are typically grouped together, enabling users to select only one option from multiple choices—ideal for scenarios like gender selection or single-answer questions.
Step 1: Select the Radio Button tool and draw the number of buttons you need on the page. If you need to create a group of such buttons, ensure they share the same name. When only one option should be selectable, assign identical names to the buttons.
For a radio button group, all buttons must have the same name, but each requires a unique value.
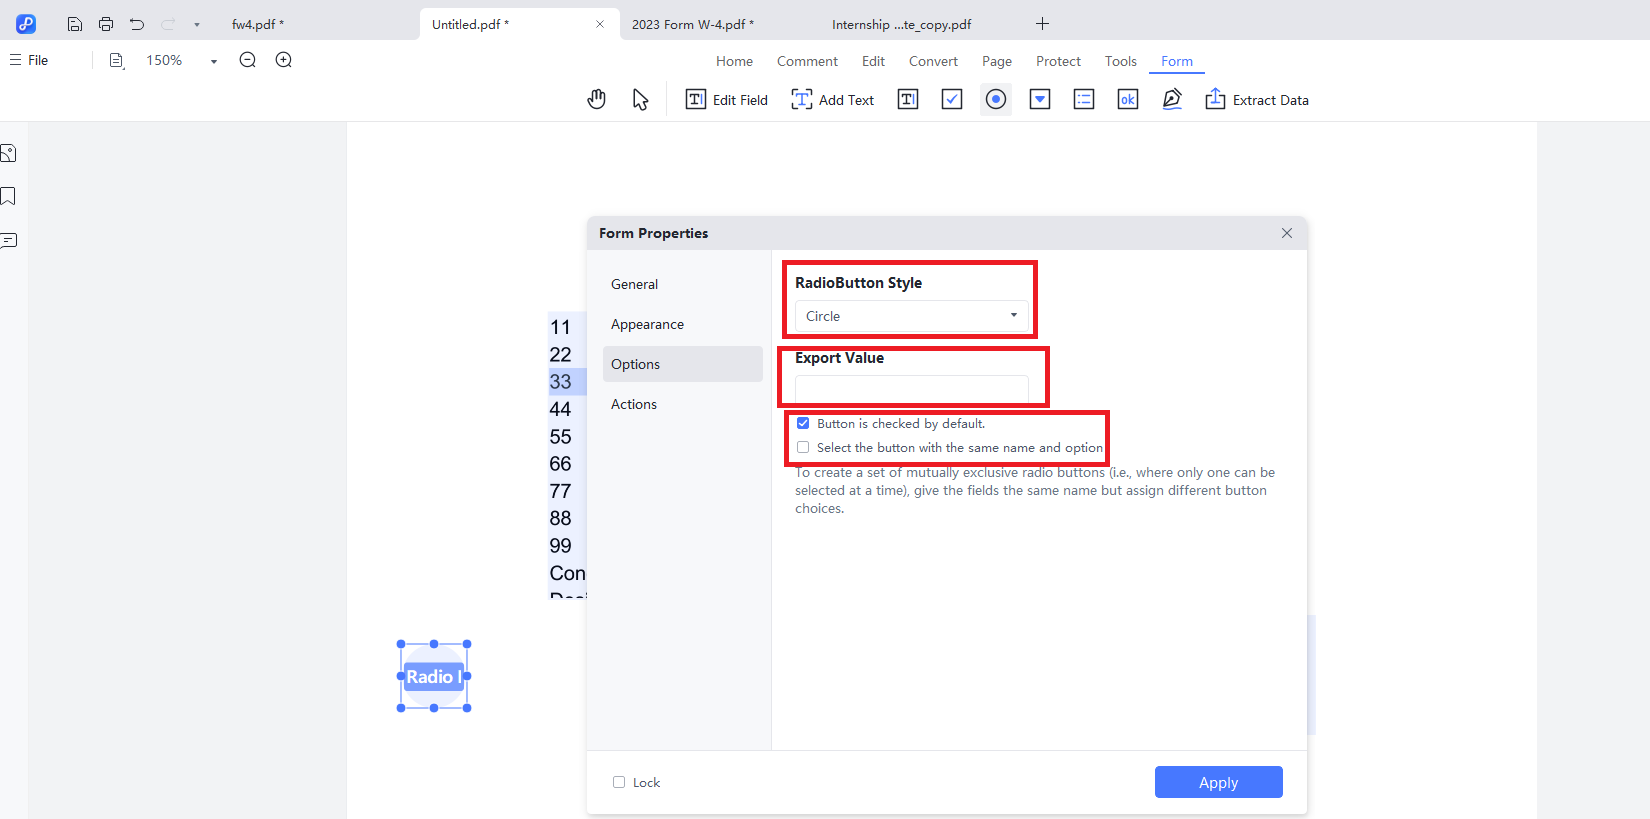
Step 2: You can modify radio button styles and other properties under the "Options" tab.
Below is a detailed introduction to the specific configurations:
- RadioButton Style: Controls the visual design of the radio button (circle, square, etc.).
- Export Value: Specifies the data value transmitted when this particular radio button is chosen.
- Button is checked by default: If activated, the radio button will be pre-selected upon form opening, while remaining editable by users.
- Select the button with the same name and option: Radio buttons sharing identical names but distinct export values create an exclusive group permitting only single selection.
2.4 Create a Combo Box Field
This function allows you to insert a dropdown menu into your PDF form. It provides users with a predefined list of options in a compact format, making it ideal for selecting from multiple choices while saving form space.
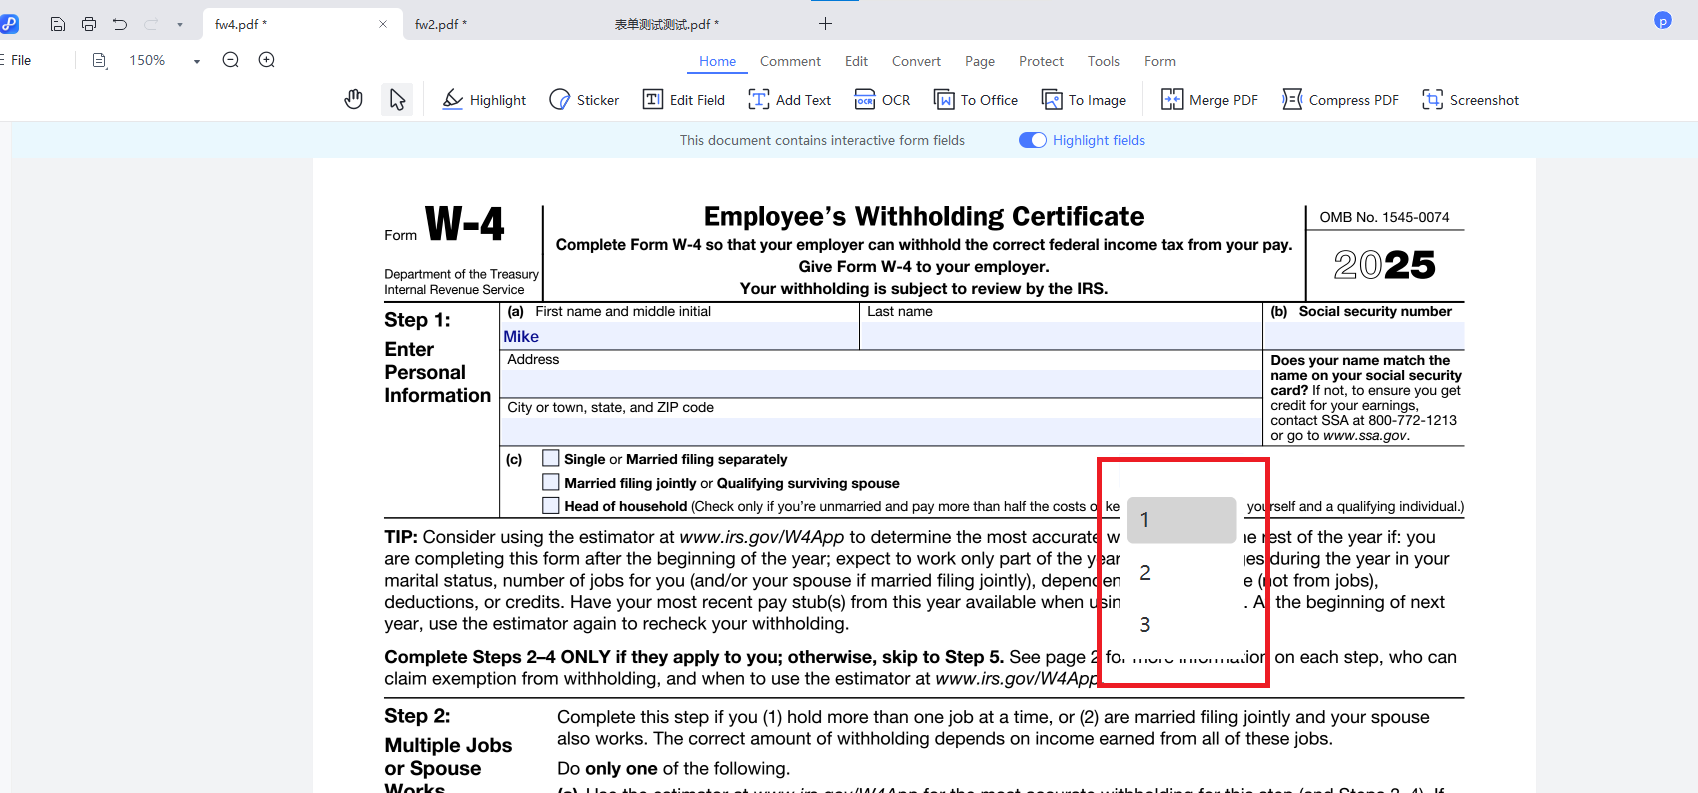
Step 1: Tap the “Create a combo box field” icon on the top, draw to create the dropdown in your PDF form, then, double-click the field. In the Options tab, you can add, reorder, or delete items using the provided buttons.
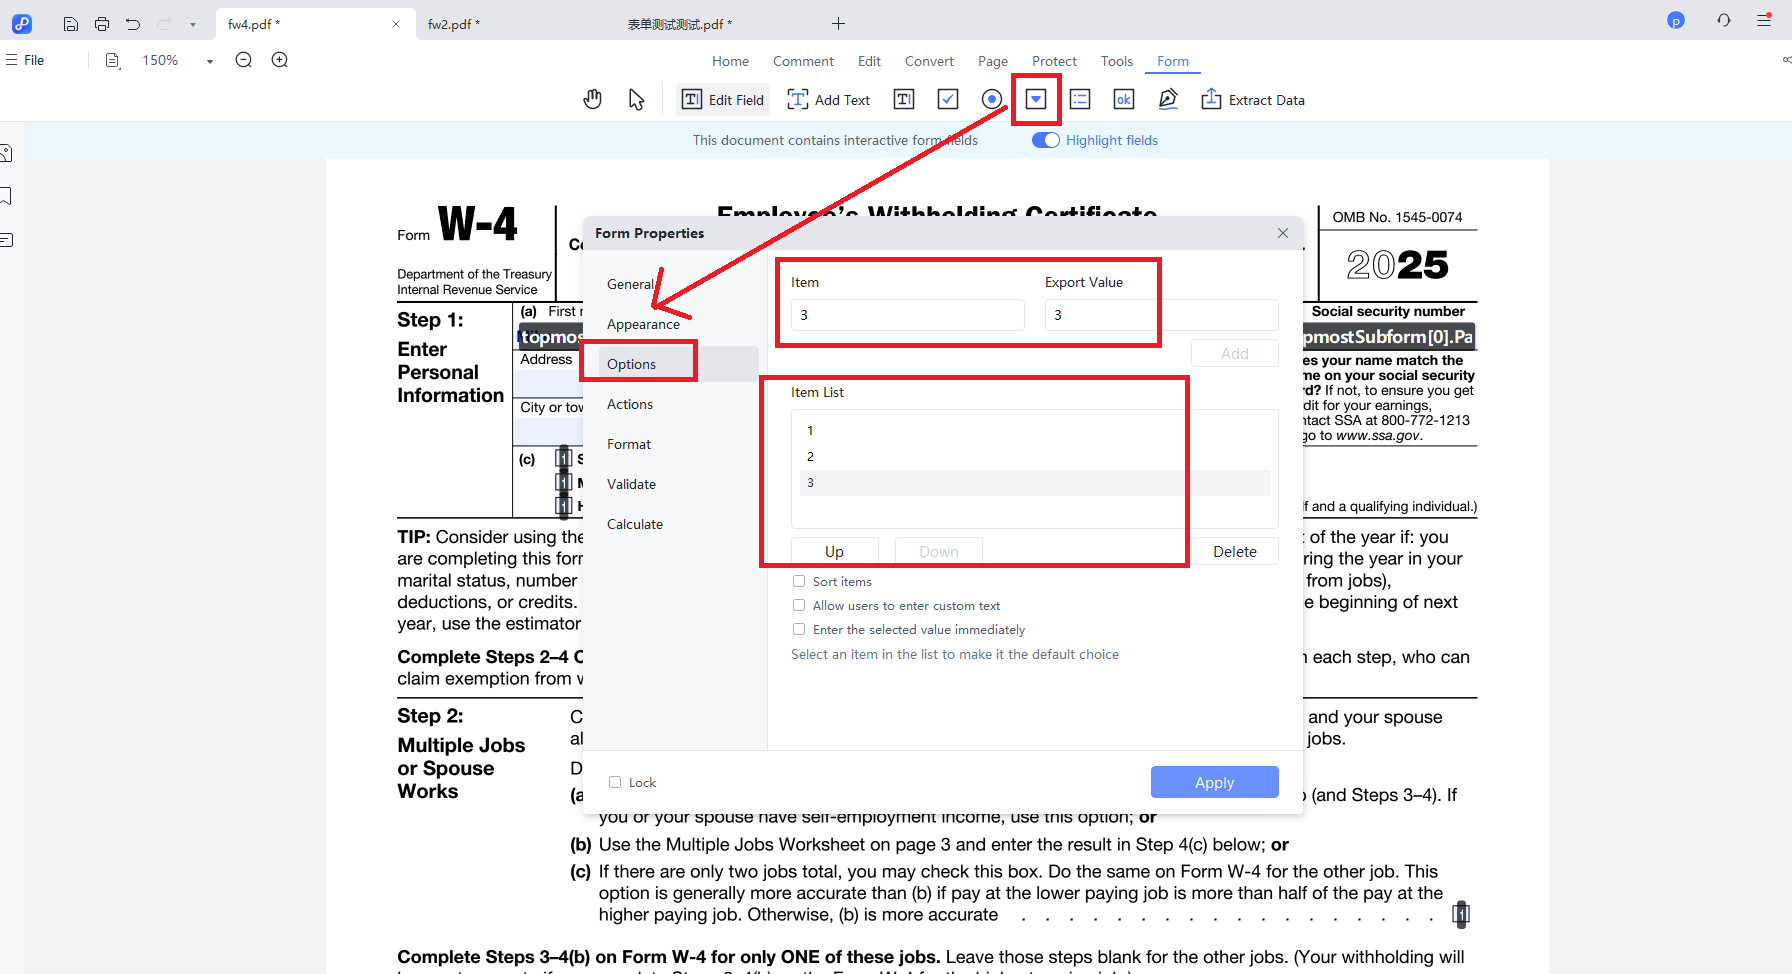
Step 2: Exit Form Editing mode. Then, click the dropdown field to see the list of items you added.
2.5 Create a List Box Field
If you need a PDF form field that displays all options while letting users select one or more, a list box is the ideal solution.
Similar to the dropdown list configuration, input both the display text and its corresponding export value for each option, then use the "Add" button to systematically include all required choices.

Here are the detailed introduction of operations:
- Sort Items: Automatically organizes options in alphabetical order according to the initial character of each entry.
- Multiple Selections: Permits users to select single or multiple options from the list simultaneously.
- Enter the selected value immediately: Applies chosen values instantly without needing further confirmation steps.
2.6 Create a Push Button Field
This feature enables you to add an action-triggering button to your PDF form.
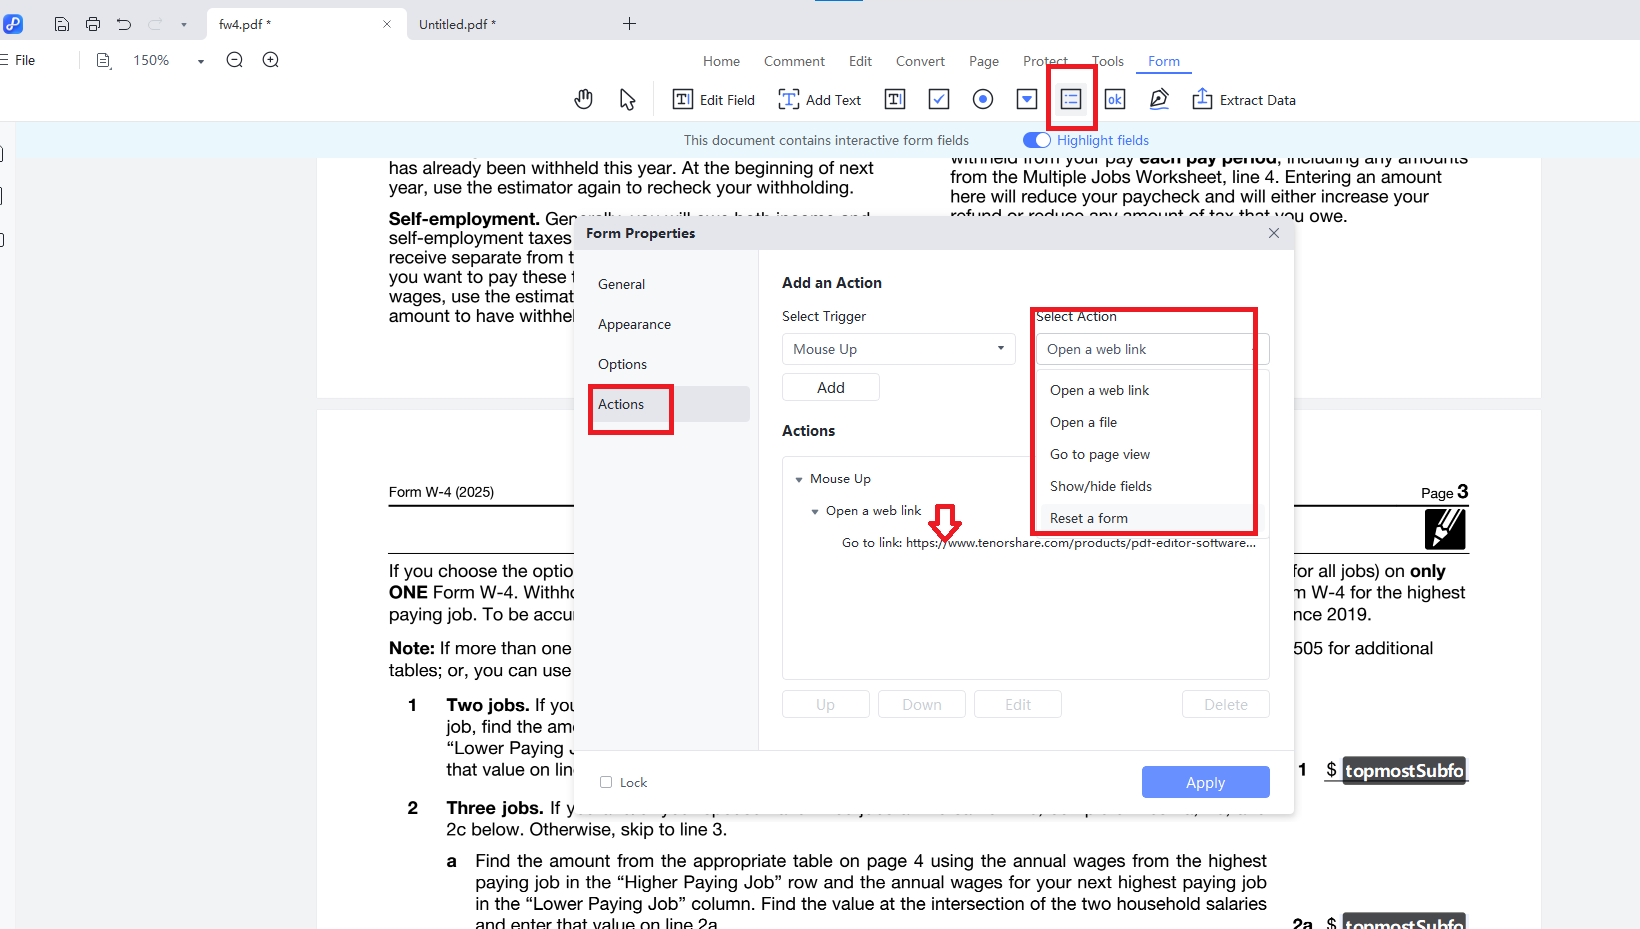
Step 1: Click the "Create a Push Button Field" icon at the top, draw to add the button to your form, double-click it, then select the desired action in the “Actions” tab.
Here are the available actions you can choose from:
- Open a web link: Launches a specified URL in the default browser.
- Open a file: Loads another document stored on your device.
- Go to page view: Directs to a specific page within the current PDF document.
- Show/hide fields: Toggles form field visibility based on interaction logic.
- Reset a form: Clears all user-inputted data to restore the initial blank state.
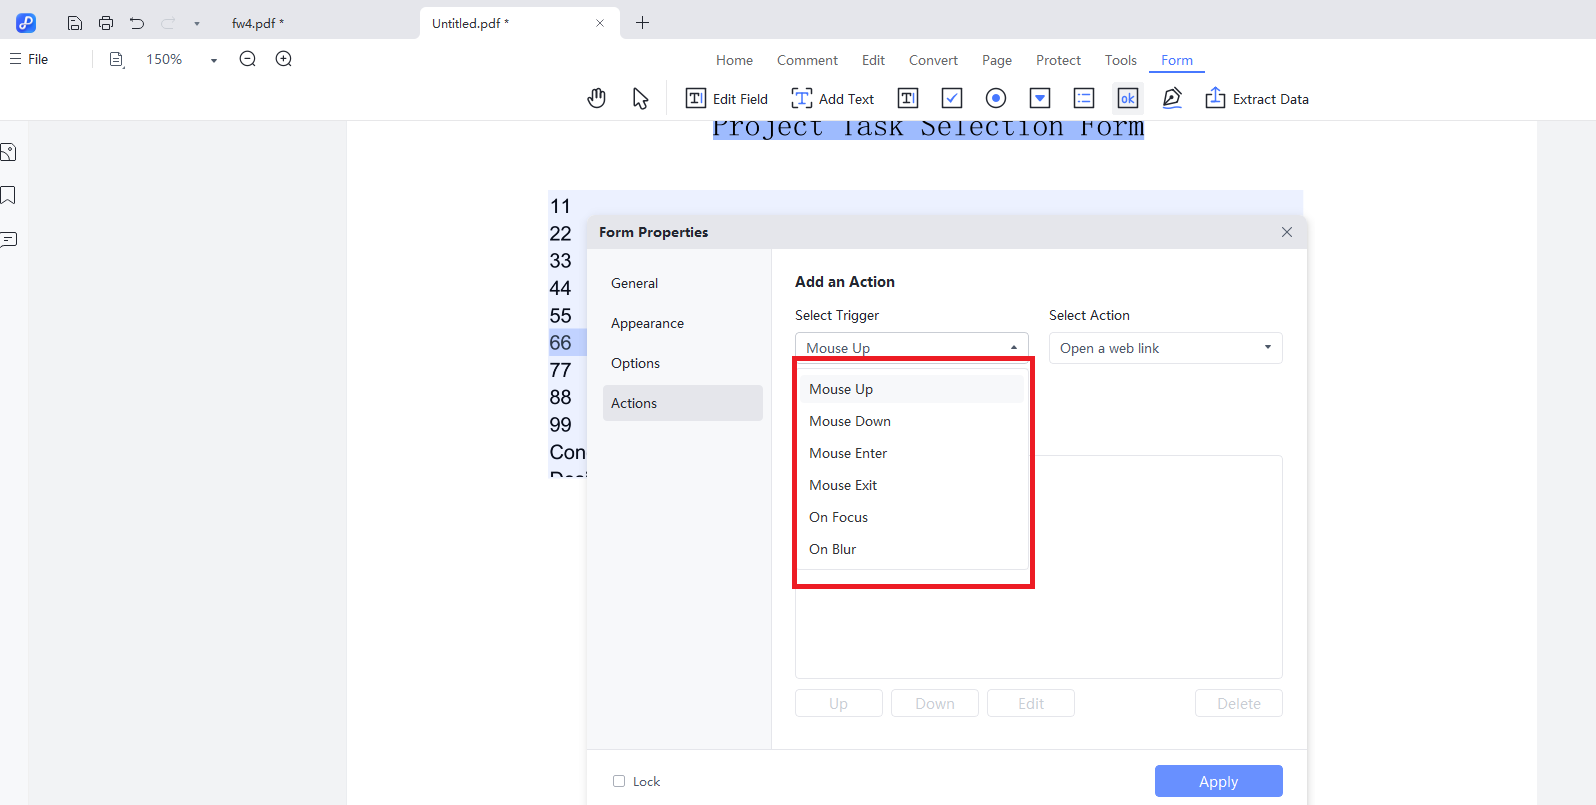
Step 2: Access the configuration by clicking the "Select Trigger" tab and choosing an appropriate trigger event.
Available trigger options respond to different user interactions:
Mouse Up: Initiates when the user releases the pressed mouse button on the form field.
Mouse Down: Activates when the user initially presses the mouse button while the cursor is over the form field (prior to releasing it).
Mouse Enter: Engages when the mouse pointer moves into and begins hovering over the form field area.
Mouse Exit: Responds when the mouse pointer departs from the form field area.
On Focus: Triggers when the form field becomes the active element (typically occurs when a user clicks into a text input field to begin entering data).
On Blur: Activates when the form field is no longer the active element (happens when the user clicks elsewhere or navigates away using keyboard tabbing).
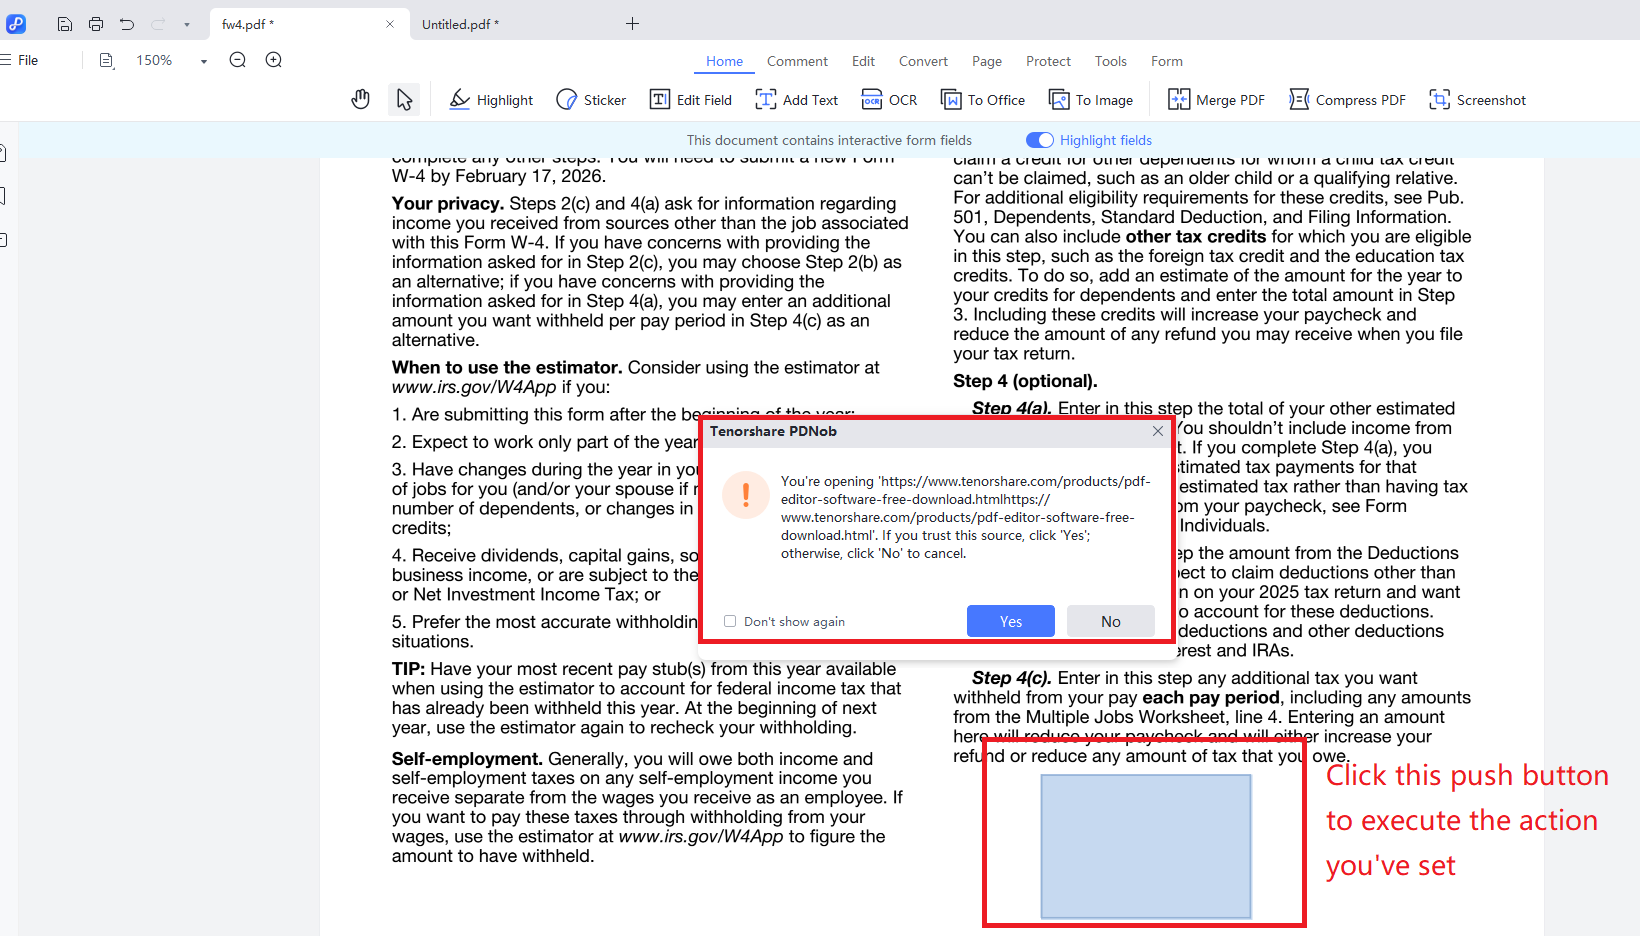
Step 3:Exit “Form” mode, then click the button to trigger your configured action.
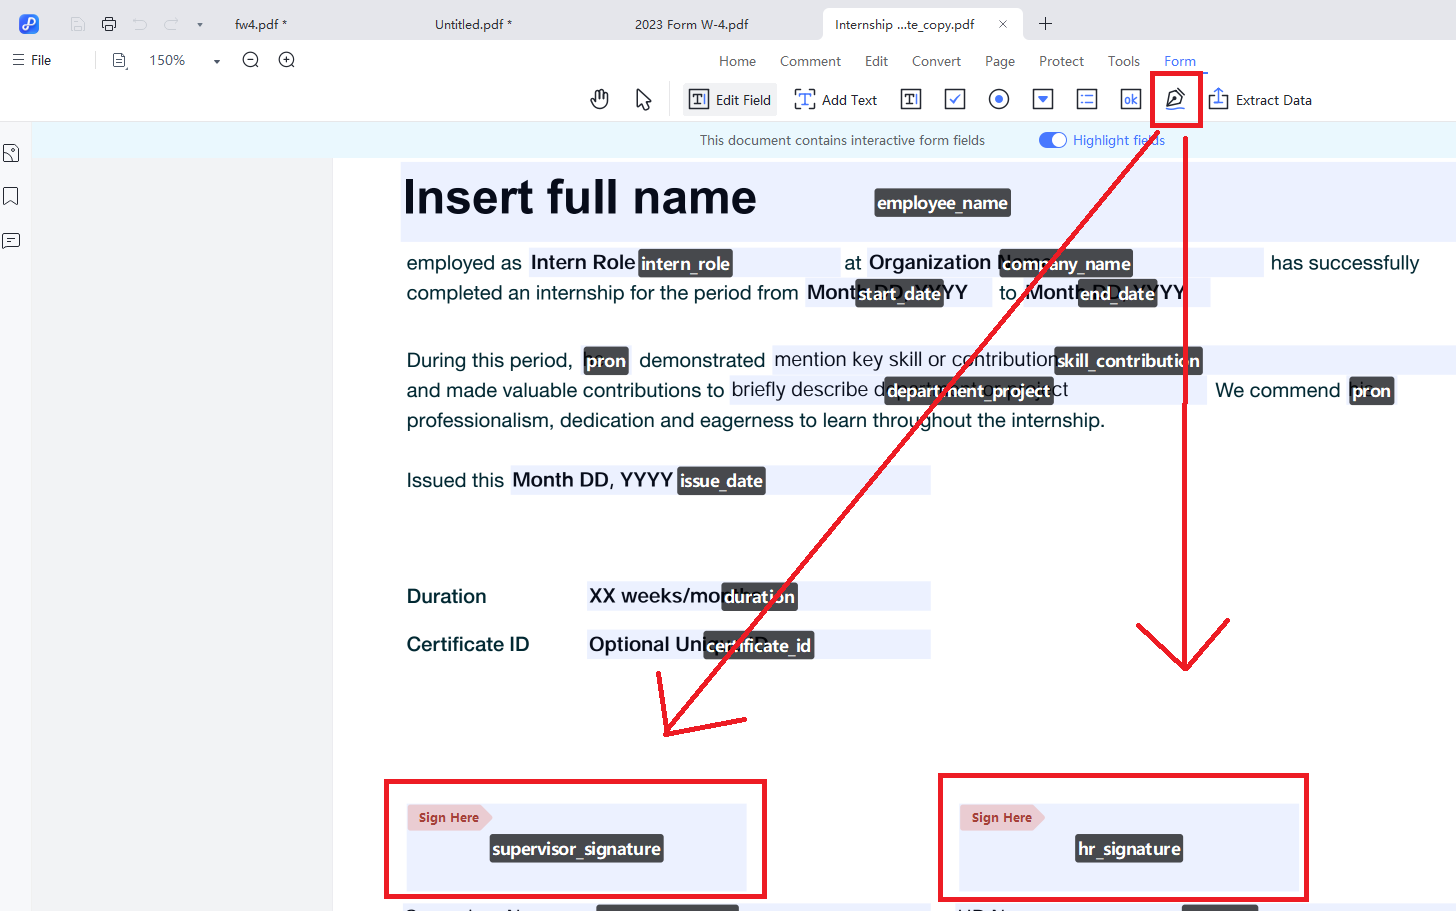
2.7 Create a Digital Signature Field
Digital Signature one of the key elements in a PDF form for establishing the authenticity of a document.
Step 1:click on the Digital Signature icon and draw the signature area. Then double-click to access its properties, where you can handle its basic features, appearance, and various related actions.
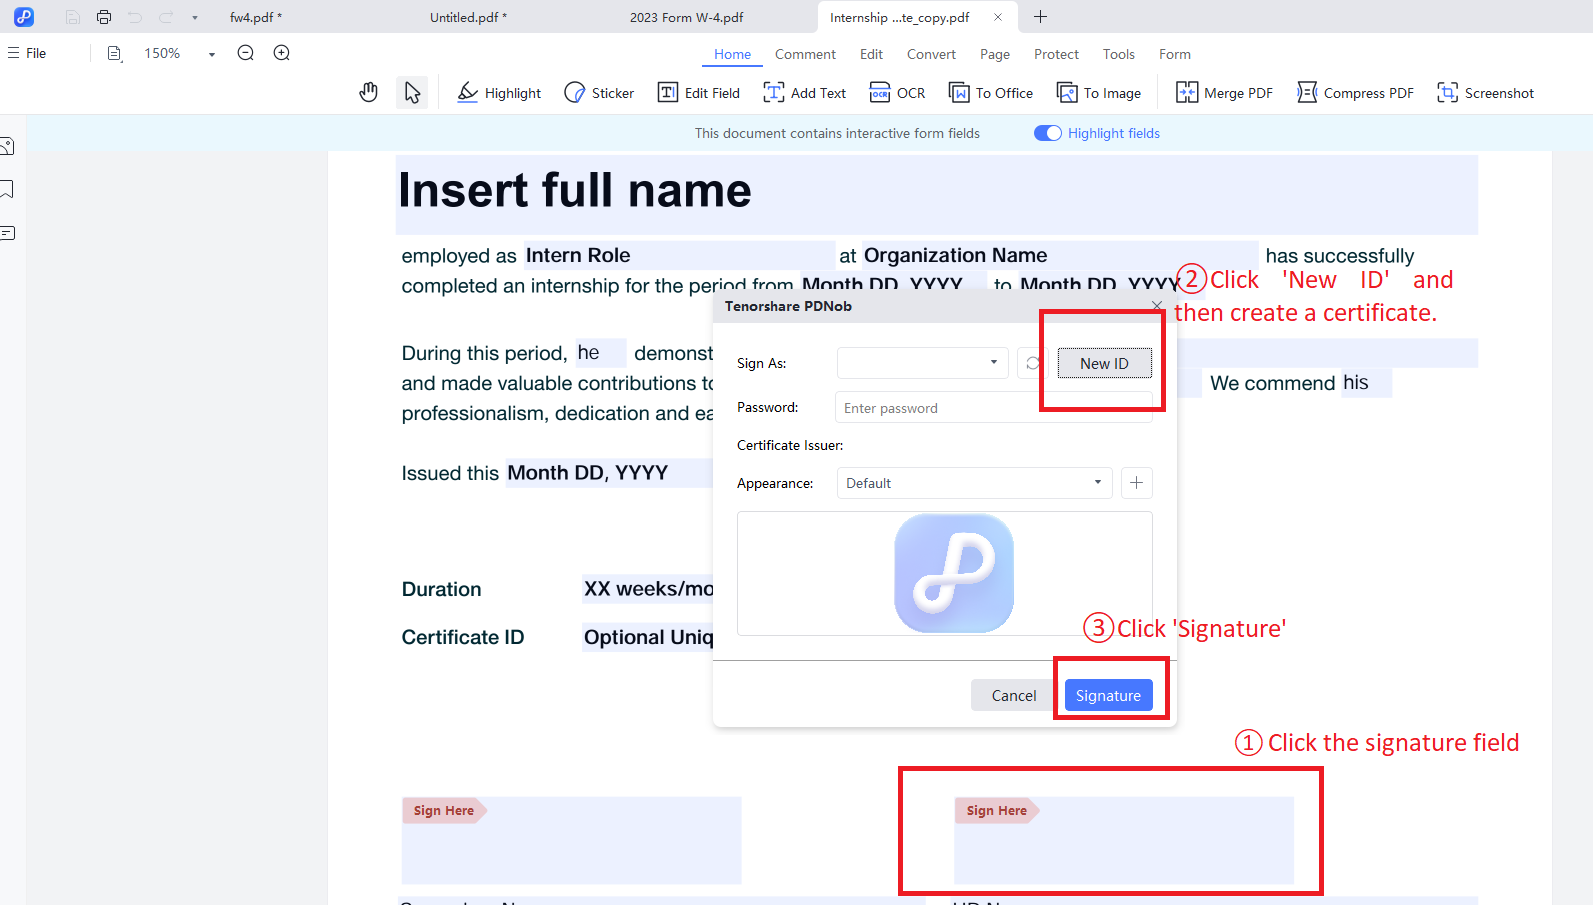
Step 2:Exit “Form” mode. Click the signature field, then tap ‘New ID’ to create a certificate and enter your own signature.
3. Extract Data From PDF Form Field
To extract data from the PDF form, you can simply click the ”Extract Data” button, and then save and open the resulting Excel file with the extracted data.
