[Can't Miss] 5 Easy Ways to Recover Data from Mac that Won't Boot
I have a dead Macbook Pro. As in, it won't even turn on. Is it possible for me to recover files from that computer if it won't turn on, and how? The hard drive is in working condition. Everything else on the computer is in grand working condition as far as I'm aware."
Recovering data from a Mac that works is much easier than to recover data from Mac that wont boot. It is mostly because the built-in macOS tools that you can use to recover data can only be accessed when your Mac works. However, that does not mean you have no way at all to recover data from your dead MacBook Pro.
This guide actually describes multiple ways to recover files from Mac that wont start up. At the end of the guide, you will have recovered your data even when your Mac refused to power on.
- Way 1. The Easiest Way to Recover Data from Mac Won't Start up
- Way 2. Boot into Recovery Mode and Restore from Time Machine Backup
- Way 3. Using Target Disk Mode to Recover Data from Mac Won't Boot
- Way 4. Convert Unbootable Mac Hard Drive into an External Hard Drive and Extract Data
- Way 5. Restore files with macOS Recovery from APFS Snapshot
Way 1. The Easiest Way to Recover Data from Mac Won't Start up
If you do not want the hassle to go through dozens of screens before your data is recovered, you can use a third-party software that gives you the ability to recover your files with the click of a few buttons.
The software is called Tenorshare 4DDiG for Mac Data Recovery , and as the name implies, it allows you to recover lost photos, videos, documents, and more than 550+ file types from your macOS based computers even when their Macs do not boot-up, failed, crashed or dead. Apart from that, if you how to recover files from external hard drive mac, 4DDiG can do this as well.
Watch the video to get how to recover data from unbootable Mac or your can simply refer to the detailed steps below as well.
Recover Data from Crashed or Unbootable Mac in 3 MINUTES!!! [2023 New]
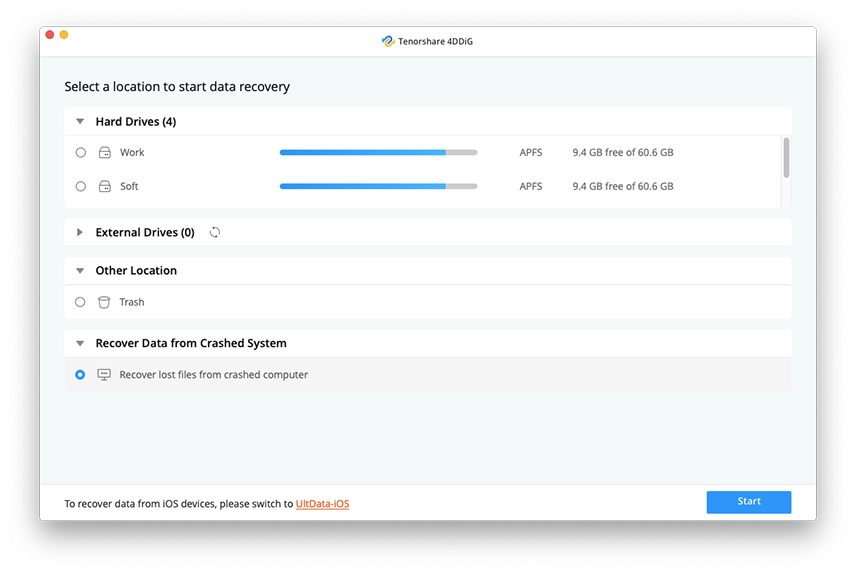
Download the software on a spare Mac and install it. Insert a blank USB drive into your Mac, launch the software, select Recover Data from Crashed System, and click on the Start button.

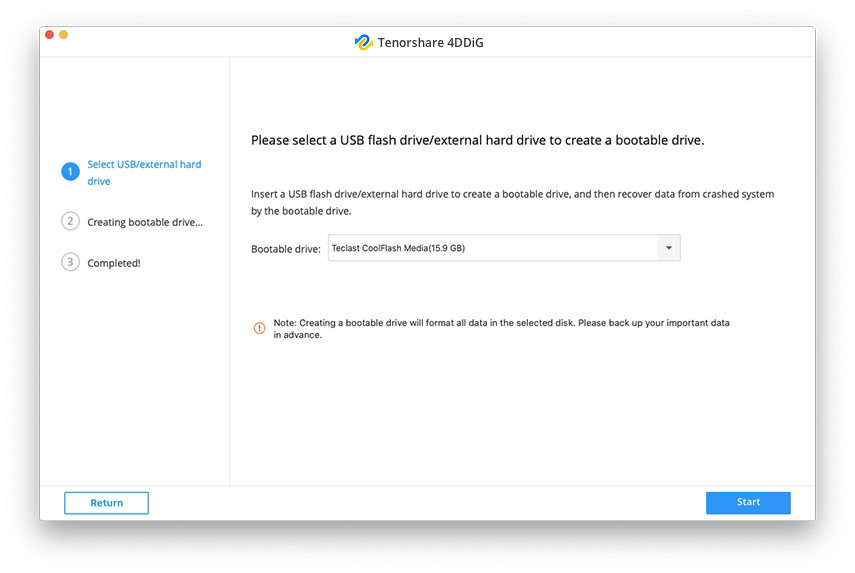
Image 1. select recover data from crashed computer Choose your USB drive on the following screen and hit Start at the bottom.

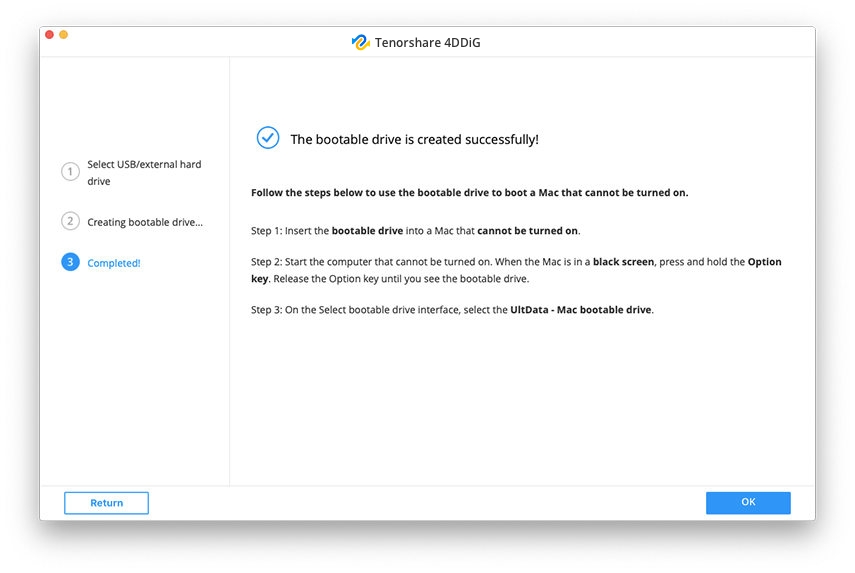
Image 2. select USB drive Click on Format to format your device and make it ready to recover your data. You will see the following when your drive is ready.

Image 3. create bootable drive - Insert your drive into your Mac that denis to turn on, boot-up the Mac and hold down Option, choose your drive, and your Mac will boot from it.
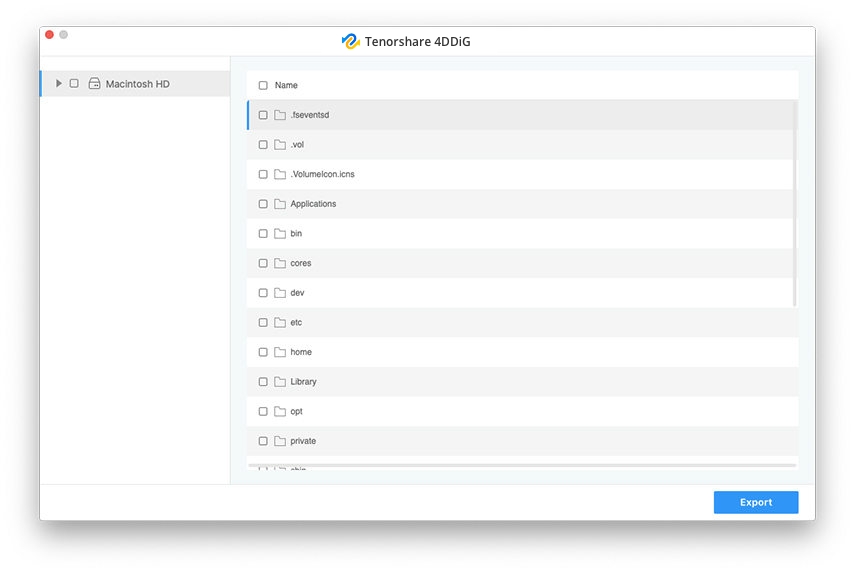
Select the files you want to recover and click on Export. It will recover your chosen files to your selected folder.

Image 4. recover data from MacBook hard drive and save Data
Way 2. Boot into Recovery Mode and Restore from Time Machine Backup
If you have a Time Machine backup created prior to the Mac boot issue, you can actually restore it to fix the issue on your Mac.
- Plug-in your Time Machine backup drive to your Mac. Press and hold down Command + R when your Mac boots-up to reboot into the recovery mode.
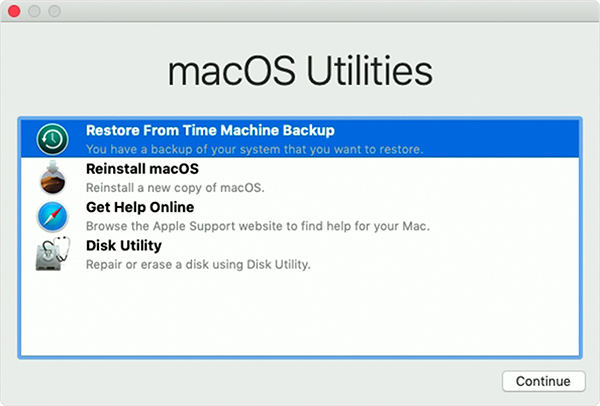
Select Restore From Time Machine Backup in the recovery mode.

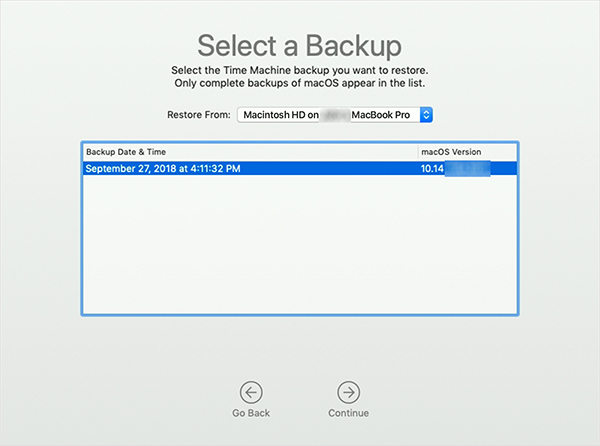
Pic 1. restore time machine Choose the backup you want to restore on your Mac.

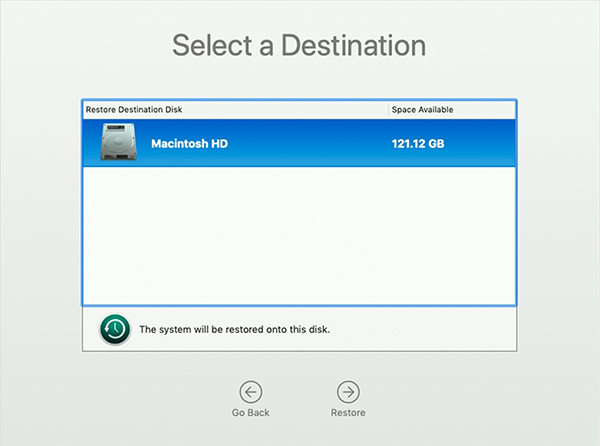
Pic 2. choose the backup Select your destination drive and click on Continue.

Pic 3. select destination drive
Now wait for it to finish restoring your files from your backup. When it is done, your Mac will boot-up without any issues. Also, your lost files should now be available to use on your Mac.
Limitations:
- You must have a Time Machine backup drive.
- The backup must have been created before the issue occurred on your Mac.
Way 3. Using Target Disk Mode to Recover Data from Mac Won't Boot
Target Disk Mode helps you transfer data between two Macs and you can use it to recover data of a faulty Mac to a working one. You'll also need a cable and any necessary adapters like Thunderbolt to FireWire, or Thunderbolt 2 to Thunderbolt 3.
The following is how you recover data from Mac that wont boot using Target Disk Mode:
- Connect both of your Macs using either Thunderbolt or Firewire.
- Turn on your faulty Mac while holding down the T button.
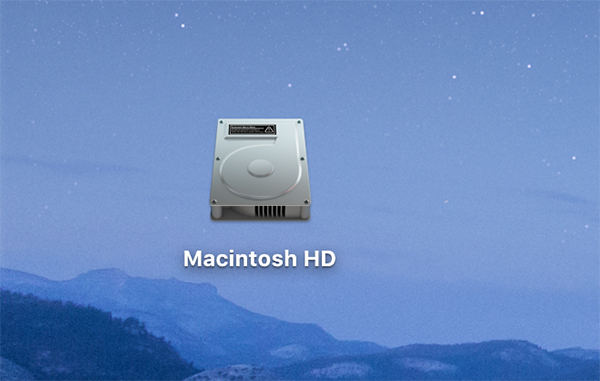
Your faulty Mac's storage will appear as a drive on your working Mac. Copy all the files from that drive to your working machine.

Pic 4. target disk mode
That is how to recover data from broken MacBook Pro using the Apple's default feature.
Limitations:
- You must use either Thunderbolt or Firewire cable to do the task.
- It only works between two Mac machines.
- It only works with a Firewire cable or Thunderbolt.
- Cannot access FileVault-encrypted home directories over Target Disk Mode.
- You'll likely experience problems unless both Macs are the exact same model of Mac with the same hardware.
Way 4. Convert Unbootable Mac Hard Drive into an External Hard Drive and Extract Data
There is a way to mount your internal hard drive as an external one and take data out of it. The following is how you do it.
- Open your Mac and take the internal drive out.
- Get an enclosure if you do not already have one and put your drive in it.
- Connect the enclosure to a new Mac and the storage will show up. Copy the files to that Mac's storage.
Limitations:
- You need expertise in working with the hardware parts of your Mac.
- It is risky and you may end-up damaging your internal drive.
Way 5. Restore files with macOS Recovery from APFS Snapshot
If your Mac is running macOS High Sierra, Mojave, and Catalina whose startup disk is formatted with APFS, you'll be able to use macOS Recovery to recover your machine to a previous state. Here is a step-by-step procedure for using a saved snapshot to restore files from an APFS snapshot taken just before the macOS installation.
- Boot your Mac into the recovery mode by pressing Command + R keys during the boot-up of your machine.
Select Restore From Time Machine Backup.

Pic 5. restore time machine The Restore from Time Machine window will appear. Click the Continue to to select the startup drive with the snapshot you need to restore from.

Pic 6. restore time machine A list of snapshots will be displayed sorted by date and the macOS version they were created with. Select the snapshot you wish to restore from, then click Continue.

Pic 7. select local snapshot - Click the Continue button to restore from the selected snapshot. Once the restore is complete, your Mac will reboot automatically.
Limitations:
- All data created after the snapshot will get lost after the restore.
- Only works for macOS High Sierra and higher.
- Your startup disk must be formatted with APFS.
More FAQs
1. Why won't my Mac go past the loading screen?
The main causes that your Mac stuck on loading screen might be an error in the macOS or issues in software or hardware such as Corrupt OS, Damaged Hard Drive, Unsuccessful System Upgrade, Peripheral Hard Drives or RAM Module Failure.
2. Why does my IMAC take so long to boot up?
Generally, it should take 30 seconds or so for Mac boot up. And if our Mac take so long to boot up, these may be the main causes:
- There are too many Startup Items
- Startup Disk is getting full
- Third-party device connections
- NVRAM issues
- Macintosh disk issues
- Mac hard drive is failing
- You need to update your macOS
3. How do I fix the black screen of death on my iMac?
The possible reasons for the MacBook Pro screen black issue could be: Battery Drain, Display Issue, Incorrect Disk Permissions, Login Items, Bugs in an App, macOS Operating System and Waking from Sleep. For how to fix the issue, refer to How to Fix MacBook Pro Screen Goes Black?
4. How expensive is data recovery?
There are various data recovery softwares in the market. What matters is to find an affordable one with a good chance of data recovery. And that’s why we highly recommend Tenorshare 4DDiG.
Final Verdict
If you ever need to recover files from Mac that wont start up, there are various ways to do it as shown above. We hope it helps you restore your important files on your Mac. It is good to have something recovered than nothing at all. Tenorshare 4DDiG for Mac Data Recovery to recover data from dead/broken/crashed MacBook Pro/Air.
- Recover data deleted, formatted or lost on Mac;
- Restore files from hard drive and external storage devices;
- Recover data from failed/crashed/dead MacBook;
- Fully supported latest macOS 26 Catalina;
Speak Your Mind
Leave a Comment
Create your review for Tenorshare articles


