How to Backup iPhone 7 to Mac with 4 Simple Ways
One of the essential things about using a device like iPhone is to backup its data from time to time. It is true that iPhone has a big storage space that accommodates a lot of data but if something happens you will lose all of it in a single sweep. This is why Apple provided the users the ability to backup their iOS devices through apps like iTunes and iCloud. If you are using iPhone 7, these apps will help you to backup iPhone 7 to Mac and the process is applicable across all iPhones like iPhone 5/6/8/8Plus/X etc. The apps are efficient but not as smart or convenient as the other third-party options that are available now. So, to clear away confusions, all the procedures are listed below for your convenience:
1. iCareFone
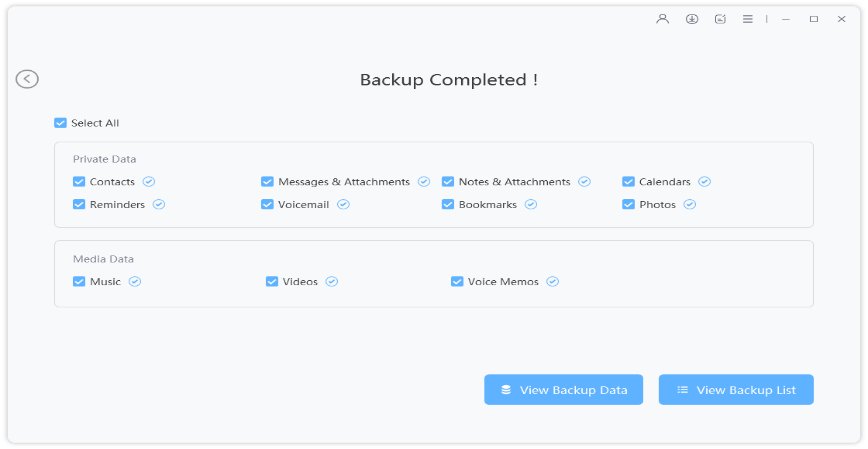
Tenorshare iCareFone is the best option in this article. As per our tests, it is the winner in terms of various aspects. It is a data transfer tool that can backup any type of data with the help of its backup and restore feature. It is designed to help the users to backup their device as a whole or selectively and store it in a safe place. And when the time is right the user can easily restore it as well. You should definitely use this tool to make iPhone 7 backup to Mac. It will be very convenient for you. The user guide for this software is mentioned below:
1. Begin by downloading the iCareFone on your Mac.
2. Now, install Tenorshare iCareFone and then launch it on your Mac.
3. Then, find a USB cable and connect iPhone and Mac together with it.
4. Wait for the “Trust This Computer” message to pop-up on your iPhone then confirm the connection by tapping on that message.
5. Now, click on the “Backup and Restore” option on the main iCareFone window.

6. All the files available on your device will be visible on the next window.
7. All of them will be selected by default but don’t worry you can customize the selection.

8. Now, just change the selection and click on the blue “Backup” button below.

Tenorshare iCareFone is a next-generation tool that can backup your files almost immediately with great efficiency. A few more important details are as follows:
Pros:
- Simple 1-click backup procedure.
- The interface is very user-friendly.
- Support for selective backup.
- Accessible data after backup.
- No Wi-Fi needed.
- No storage limitations like iCloud.
Cons:
- Paid version for more features.
2. iCloud
As one of the best iOS apps, iCloud features some exceptional properties which make it one of the most used apps in the iOS community. Creating backup is one of those properties used by many. Most people like the wireless backup process provided by iCloud and also the procedure is very simple. The only limitation is storage. It offers only 5 GB of free storage space. The procedure is mentioned below:
1. First, connect your iPhone 7 to a strong Wi-Fi network.
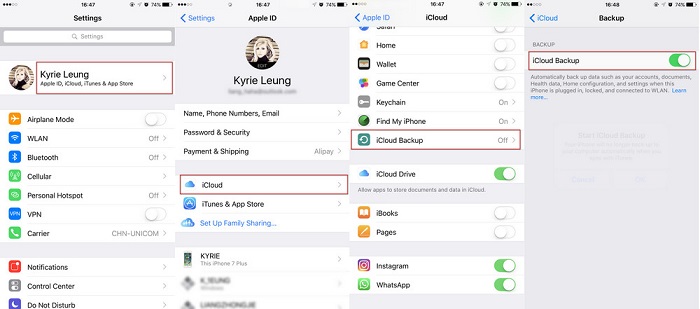
2. Then, go to iCloud from the “Settings”.
3. You have to provide your Apple ID to enter your iCloud account.
4. Then navigate to “Storage” and tap on “Backup”.
5. Now, turn on “iCloud Backup” and then activate “Backup Now”.

Now, you can understand why iCloud is considered one of the best ways to backup your iOS devices, it is reliable and convenient.
Pros:
- It is the official app provided to the users for free by Apple.
- 5GB free cloud storage for all registered users.
- The wireless data backup is really fascinating.
- iCloud provides easy access to your data.
Cons:
- Without a strong Wi-Fi network iCloud will be useless for you.
- The 5GB cloud storage is really small if you consider your iPhone storage. Paid subscriptions are expensive.
- There is the security threat of keeping your data online.
- The data transfer speed is very slow, unsuitable for transferring large files.
3. iTunes
iTunes, also one of the first generation iOS apps, is known for its various functions that help users to manage their iPhones better. It is one of those apps that is blindly trusted by iOS users. But thanks to a complicated working process, most users do not know how to backup iPhone 7 to Mac using iTunes. Don't worry; you just need to go through the following procedure, if you want to backup your iPhone 7 to your Mac via iTunes:
1. Connect your iPhone to your Mac, use a data cable for the process.
2. iTunes will be launched immediately after Mac detects the device.
3. Then go to Device icon and choose your iPhone 7 among them.
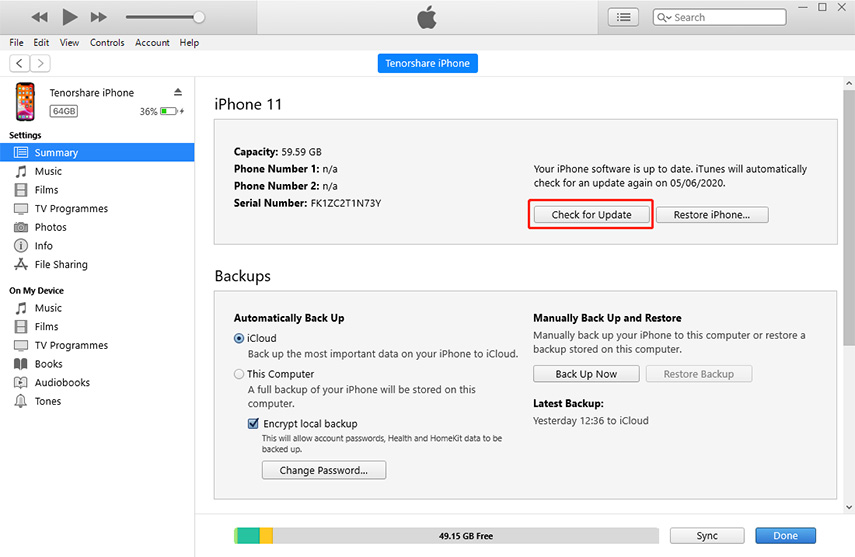
4. Now, go to Summary tab, and find the Backups section inside.
5. Choose “This Computer” option to store a backup on your Mac.
6. Finally, on the iTunes panel select “Backup Now” to backup your files.

iTunes may be the official way to backup files provided by Apple but you should always remember that everything has its strengths and weaknesses, and they are mentioned below:
Pros:
- iTunes is a free app provided by Apple, available to all users.
- Performs well with iOS devices.
- The backup file is heavily encrypted. It cannot be hacked by a third-party.
Cons:
- The first problem with iTunes backup is that the app is seriously slow.
- Due to poor maintenance, the app has developed a few glitches recently.
- Loss of data or data corruption during the transfer or backup occurs frequently.
- Finally, the encrypted backup file is useless unless you can restore it properly.
4. Other Cloud Service like Dropbox
Another alternative option to backup your iPhone is to use the services of Dropbox. Launched in 2007, Dropbox provides a cloud service which has become a big success. First of all, Dropbox is very different from other cloud services you know, like iCloud or iTunes. The free services of Dropbox include 2GB of storage space but it can get increased up to 500GB with paid registration. Now, the question is how to backup iPhone 7 to computer using the cloud service of Dropbox, the steps are mentioned below:
1. You need to install the app on your iPhone and run it.
2. The app has a quick upload process, so just get into your Dropbox account by providing your password and ID.
3. Now, select the files, go to the three dots and upload them to your Dropbox cloud account.

4. Now, open your Mac.
5. Dropbox has a desktop app, launch it and enter your Dropbox account. It consists of a dedicated Dropbox folder containing all your files stored safely.
6. Now, download the required files on your Mac.

The Dropbox app provides a quick and simple data transfer procedure for the users. It is very convenient and it is loved by users all over the world. The various properties of the apps are as follows:
Pros:
- The interface is very user-friendly.
- The cloud storage is expandable.
- Selective file synchronization.
- And finally, the app is able to recover deleted files.
Cons:
- One of the biggest disadvantages of using the app is that the administrators of the app have the right to delete data from your account. It means that if you leave the account idle or if you have a free account within a few months your data will be deleted.
- There are also security concerns about the app, as there have been a few successful attempts at hacking the security measures of the Dropbox server.
- Limited backup files.
Conclusion
All four of them are very effective and feasible options for users but there is still the question of which one to use. Look, no matter what anyone says, the official ways are iTunes and iCloud, both of them are acceptable and reliable. But it is also a fact that recently there have been several reports regarding the efficiency of iTunes and iCloud. They are just simply very slow and won’t work without a strong Wi-Fi network respectively. Now, the third-party option Dropbox is also a cloud service but of a different sort, you can transfer the data to your Dropbox account and then download it on another device when it is convenient for you. Lastly, Tenorshare iCareFone, also a third-party tool, can create selective backups of your data and store them on your computer really fast and effectively. We highly recommend you to go for iCareFone as it is simply the best!
Speak Your Mind
Leave a Comment
Create your review for Tenorshare articles

Tenorshare iCareFone
Best Free iPhone Transfer & iOS Backup Tool
Easily, without iTunes


