How to Recover Photos from iPhone after Sync
"Hi, I am completely flustered since yesterday the moment I synced iPhone and lost photos. I connected my iPhone to my PC yesterday morning and launched iTunes. I started syncing my device with iTunes and after that I found that all my photos are erased and gone and I can't find them in my camera roll. I can't afford losing them. Can I recover deleted photos from iPhone after sync?"
Have you synced iPhone and lost photos? We agree that this is the most annoying situation. Well! Tragedies happen and can happen to anyone. We are not denying the fact that your photos are really dear to you and their loss means the loss of some of very precious moments. For some, their photos are everything to them and for those who love to upload every other picture on social media, the situation can be very disheartened. Before your dejection goes to another level, we'd suggest you to throw your worries and read this article. We will make you understand the best way to recover iPhone photos after sync.
Taking this problem into concern, we have written this post and brought the fix for the problem. You have landed at the right place and we would like you to scroll down to get the best solution to this problem.
Retrieve Lost Photos from iPhone after Sync using Tenorshare iPhone Data Recovery
UltData iPhone Data Recovery is one-stop solution to recover deleted photos from iPhone 17/16/15/14/13/12/11 after sync. It is free to download and one can use it on their Windows as well as Mac computers. Moreover, there is full security assured with Tenorshare and it recovers your deleted data irrespective of the reason behind losing it. Let us now get the guide for using this tool to get the photos back.
Step 1 – Download Tenorshare iPhone Data Recovery in your computer and launch it to make use of it. Now, take your USB cable and make a connection between PC and iPhone. You will find on the navigation bar that 'Recover Data from iOS Device' tab is selected by default. Your device will be recognized positively by Tenorshare.

Step 2 – When your iPhone and PC connects successfully, you will get into the next interface where you will find the file types in a categorized way. From the file types, you need to select photos as you want to recover only photos here. In case of recovering everything, you are required to choose 'Select All' button at the bottom left on the screen.
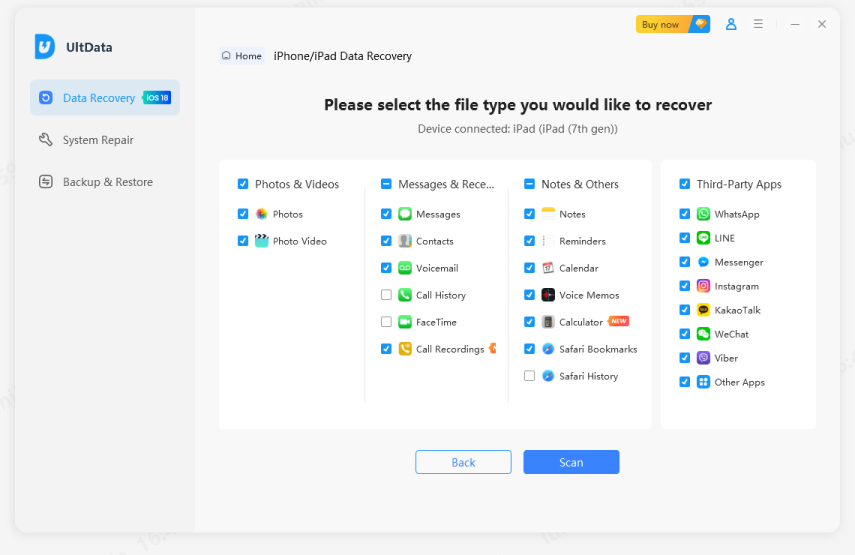
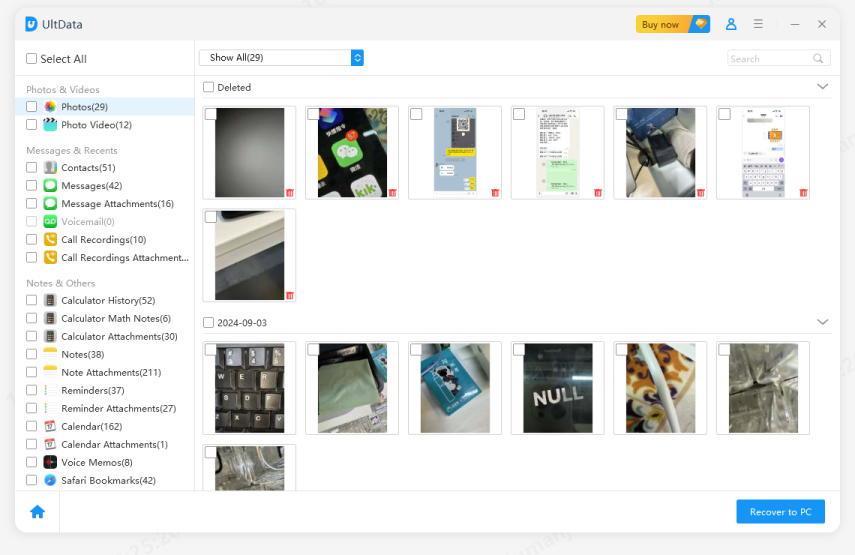
Step 3 – After choosing, just hit on 'Start Scan' button at the bottom center with the help of which, your photos will begin to scan. When they get scanned, the resulted window will provide you the data types in categories. You can now preview your photos. To preview them in full size, you can double click on it. After previewing, click on 'Recover' option and your lost photos will get your photos that got disappeared from iPhone after sync.
Extra Tip: How to Sync iPhone Photos to Computer
Step 1 – Get the latest version of iTunes and open it in your PC. With the help of USB cable, connect your iPhone to your computer.
Step 2 – Enter the main interface and hit on the device icon available at the top.
Step 3 – In the left panel, look for 'Photos' option and click on it. Subsequently, check the box next to 'Sync Photos' on the right panel.
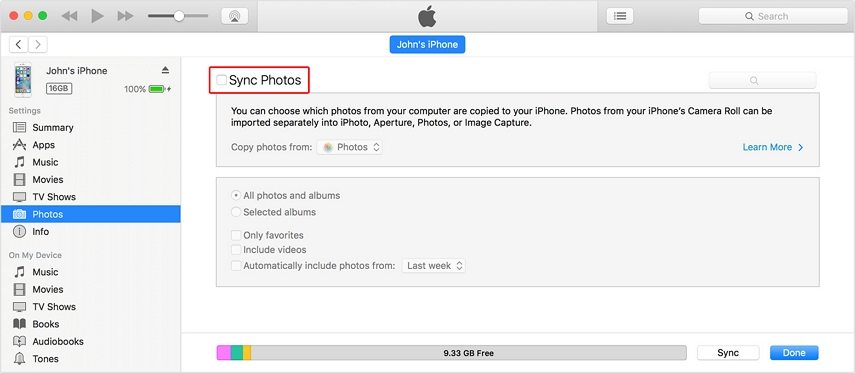
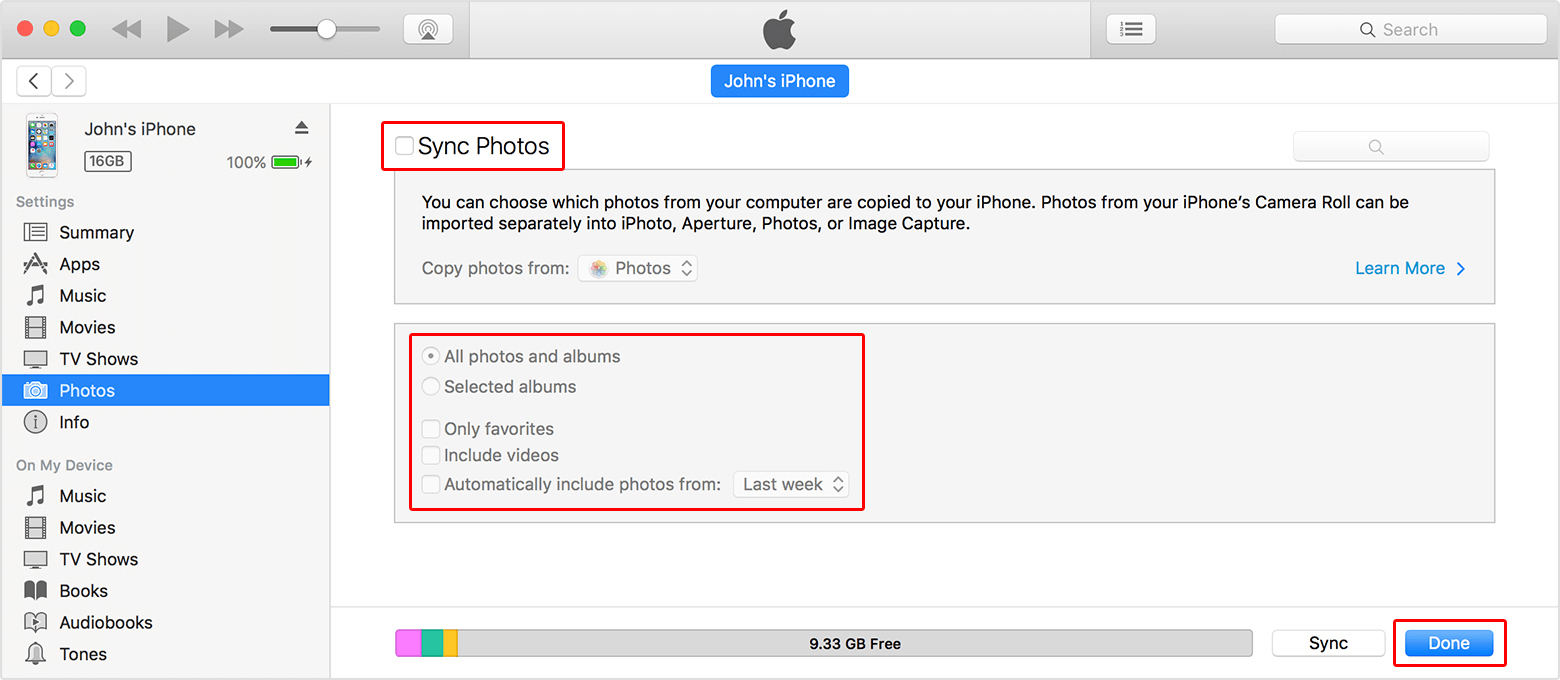
Step 4 – Next, you need to select the app or folder which you wish to sync. Just below it, you will find some options which are 'All photos and albums', 'Selected albums', 'Include Videos'. You can choose what you want and if you want to sync videos, you can choose the last option as well.
Step 5 – In the end, click on 'Done' button to end the process.
Verdict
No matter you use an iPhone 11/12 or be it the latest device i.e. iPhone 17/16, you are completely able to get back your photos disappeared from iPhone after syncing with the way we introduced above. We provided you the best solution available in the market that you can take help of when your photos get lost after syncing your iPhone. To conclude, we would be glad if you would share your experience with us by dropping the comments below. We hope this article provided you sound help you needed. Thanks for reading folks!
Speak Your Mind
Leave a Comment
Create your review for Tenorshare articles
