A Detailed Guide about How to Set Up and Activate New iPhone 12//8/8 Plus
Whether you are iPhone beginners who use Android phones a lot before or have been familiar with Apple’s products for years, the first thing to do with you new iPhone X, iPhone 8/8 Plus/7s is to set it up. Honestly, setting up and activating new iPhone is easy, buy you will face a lot of options then. Below you can find a detailed to-do list on how to get started with iPhone X, iPhone 8/8 Plus/7s/7s Plus setup the right way.
- Part 1: Preparations before iPhone X, iPhone 8/8 Plus/7s Setup and Activation
- Part 2: How to Set up and Activate New iPhone X, iPhone 8/8 Plus/7s?
- Part 3: Possible iPhone X, iPhone 8/8 Plus/7s Activation Problems When Set up and Fixes
- Part 4: How to Activate iPhone X, iPhone 8/8 Plus/7s without SIM Card and Using iTunes
Part 1: Preparations before iPhone x/8/8 Plus Setup and Activation
There are a couple of things that need doing before you setup and activate iPhone X, iPhone 8/8 Plus/7s to avoid potential issues.
• Make a backup of your old device first.
3 ways you can take to make a backup so that you won’t lose any data when switching to a new iPhone.
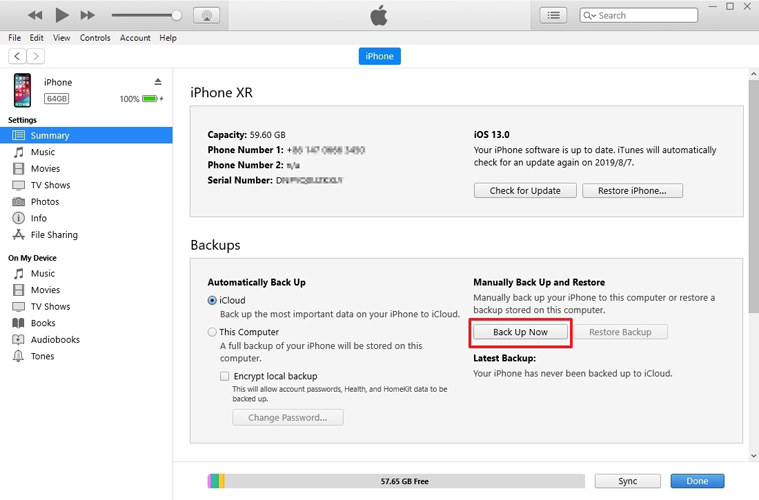
- 1) Backup wit iTunes
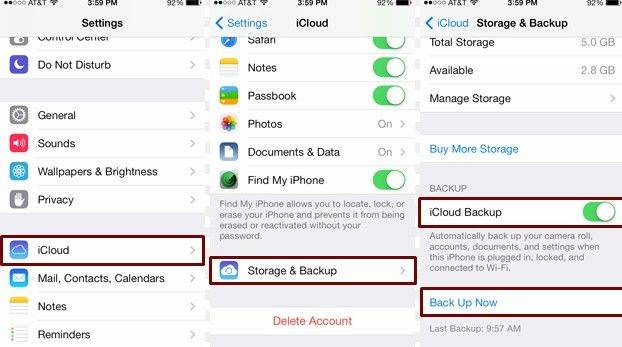
- 2) Backup with iCloud
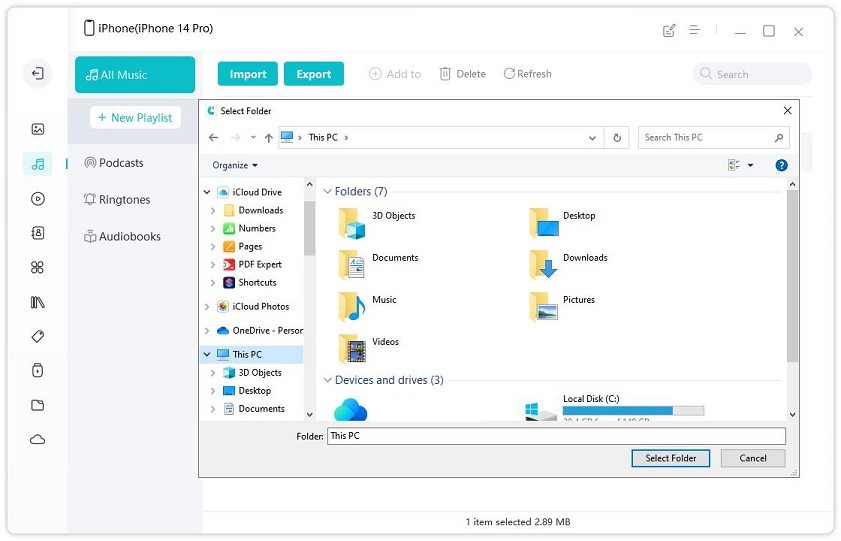
- 3) Backup with Tenorshare iCareFone
Connect your old iPhone with iTunes and click the device icon. Under Summary panel, choose Back Up Now.
In your old iPhone, go to iCloud > Storage & Backup > iCloud Backup > Backup up now.
Connect your previous iPhone with Tenorshare iCareFone, and navigate to Backup & Restore then select file types to be backed up.

• Check whether Wi-Fi connection is available whether you active iPhone X, iPhone 8/8 Plus with WiFi or cellular network.
• Ensure the SIM card is inserted if performing out-of-the-box setup.
• Verify your new iPhone has sufficient charge.
Part 2: How to Set up and Activate New iPhone X/8/8 Plus?
Now everything is ready, let’s get right to the point today: How to Activate iPhone X/8/8 Plus.
- 1. Turn on your new device and press Home button to unlock it.
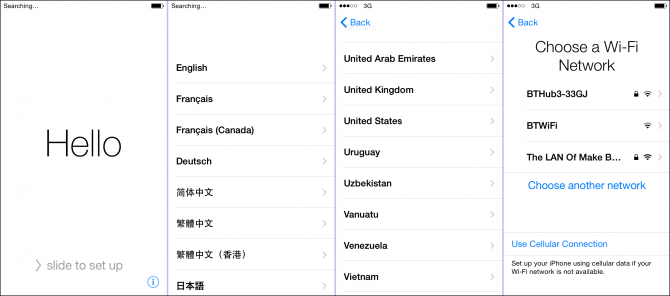
- 2. Slide to enter set up interface. Choose the language, country and region according. This will determine some policies related to iPhone purchases, like music, apps, iBooks.
- 3. Choose a Wi-Fi network and enter the password to join in. If you want to try Over-the-air method, tap Use Cellular Connection below.
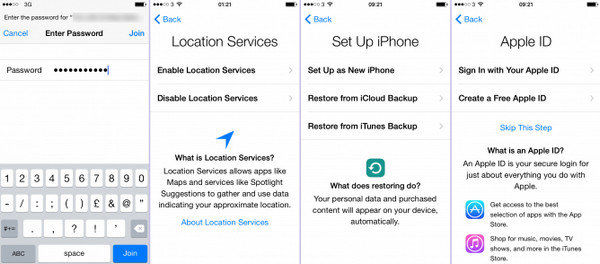
- 4. Decide whether to enable or disable location services.
- 5. Set up Touch ID with your finger as directed.
- 6. Enter a 6 – digit passcode to protect your iPhone X/8/8 Plus.
- 7. Choose to restore from iCloud/iTunes backup or set up as new iPhone.
- 8. Choose to sign in with previous Apple ID or create a new Apple ID if you are non-iPhone users before.
- 9. Read the Terms and Conditions and tap Agree.
- 10. Add Apple Pay card information immediately or later in Wallet.
- 11. Get Siri recognized your voice by saying required sentences. You can also do it later in Settings > Siri.
- 12. Adjust touch ID vibrate response by pressing the screen.
- 13. Decide whether to share Diagnostics and App Analytics information with Apple developers.
- 14. Choose how you want to view your new iPhone: Standard or Zoomed.
- 15. Tap Get Started and till now new iPhone setup and activation have been finished.
Part 3: Possible iPhone X/8/8 Plus Activation Problems When Set up and Fixes
During the setting up process, only a small number of users will unluckily encounter iPhone 8/7s activation errors. If you are one of them, don’t worry, try below methods.
Cannot Activate iPhone X/8/8 Plus
- 1. Check whether Wi-Fi connections are available.
- 2. Check whether your SIM card is damaged or properly inserted
- 3. Check whether the Carrier is not supported.
- 4. Wait for the Apple Server to respond.
- 5. Restart your new device.
- 6. Set up New iPhone X, iPhone 8/8 Plus/7s with iTunes.
iPhone Stuck in Activation Screen
- 1. Restart your iPhone X, iPhone 8/8 Plus/7s and try to set up again.
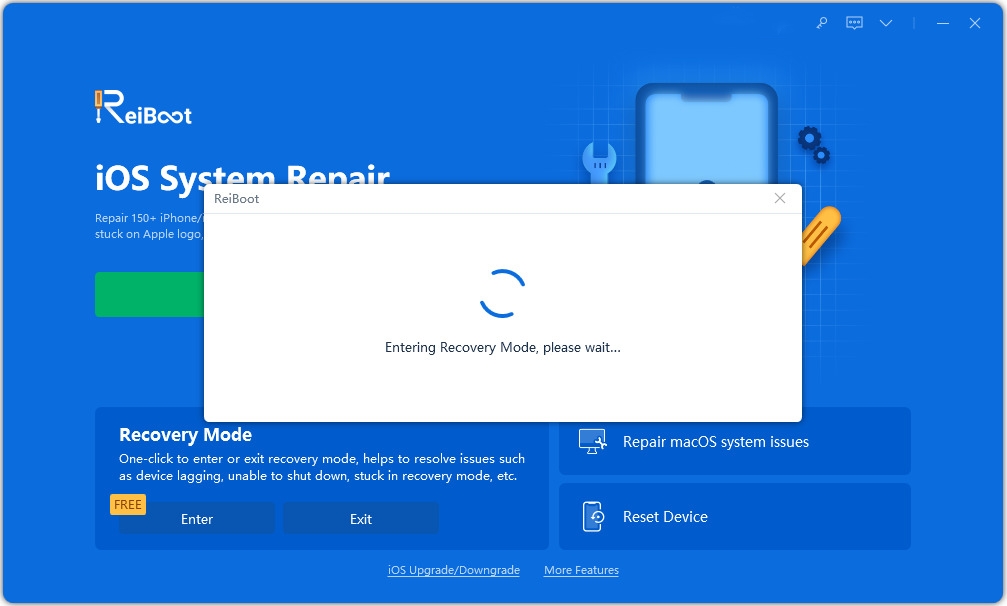
- 2. Enter and exit recovery mode with free Tenorshare ReiBoot.
Cannot Restore Backup from iCloud When Set up
- 1. Wait for Apple Server to respond.
- 2. Make sure you are under steady Wi-Fi environment.
- 3. Check whether the iOS shipped with iPhone X, iPhone 8/8 Plus/7s is the same version with your older device you used to backup. Downgrade the iOS 11 to same version.
- 4. Skip iCloud restoring and use iCarFone or iTunes to extract backup files. Compared with iTunes, one dominant advantage with Tenorshare iCareFone is you can preview the files and selectively restore back to your new iPhone X, iPhone 8/8 Plus/7s.
- 5. Call Apple Support for help

Part 4: How to Activate New iPhone X/8/8 Plus without SIM Card
So if you don’t have a SIM card in hand right now or the SIM is not supported, you can use iTunes to activate the device. It may not work when the network is locked by carrier.
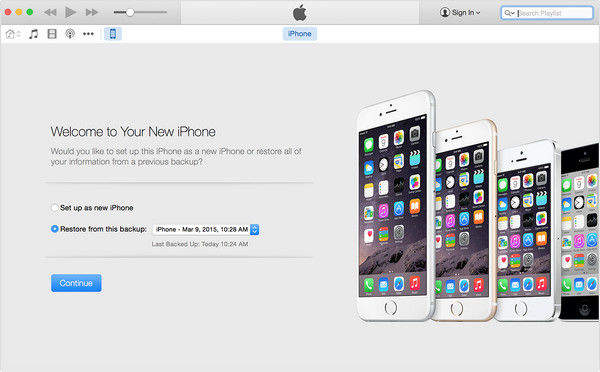
- 1. Connect your new iPhone X, iPhone 8/8 Plus/7s with iTunes and it will automatically recognize your device.
- 2. Choose Set up as new iPhone from the pop-up screen and click Next to move on.
- 3. Follow the instructions to setup and activate you device. Similar with Part 2.
However, if you receive the message “There is no SIM card installed in the iPhone you are attempting to activate” from iTunes, sadly, this means your iPhone is locked. You can either borrow a SIM card from friends to activate it, or contact your network provider to unlock your iPhone, or even jailbreak it.
That’s all about how to set up new iPhone from old iPhone, including iPhone X/8/8 Plus and earlier devices. Now enjoy your device freely!


Speak Your Mind
Leave a Comment
Create your review for Tenorshare articles

Tenorshare iCareFone
Best Free iPhone Transfer & iOS Backup Tool
Easily, without iTunes


