
then write your review

iCareFone - Free iOS Backup tool & Easy Data Manager
Backup/Transfer/Restore/Manage iOS Data with Simple Clicks
Backup/Manage iOS Data Easily
Backup/Manage iOS Data in Clicks
You're on vacation and you take a ton of great photos with your camera. Upon returning home, your SD card is full and you're itching to share your photos with your friends. Luckily, Apple's Photos app makes importing your photos to the Mac easy; all you need to do is plug your SD card into your computer and follow a few simple steps.
In this tutorial we'll show you how to import photos from your camera's SD card to your Mac including macOS High Sierra using the Photos app. This tutorial does not require any additional software, but does require a Mac with an SD card slot or a USB SD card reader.


Like its name suggests, the Import All New Items button will import all photos on your SD card that haven't already been imported to your computer. The second option—Import Selected—will import only the photos you've selected; you can select images by clicking on them.
Finally, to clear up space on your SD card, check the box next to the Delete After Import option. When turned on, your photos will be erased from your SD card after being imported to your Mac.
View Video on How to Transfer Photos from SD Card to Mac
If you're an iPhone or iPad user, chances are you know how limited iTunes is. It's great for managing music, but it will wipe all current music files in your device after syncing. I will recommend an iPhone to Mac transfer – iCareFone for Mac. It enables you to transfer 9 types of data from iPhone to/from Mac without replacing current data.


Run iCareFone on Mac, there are 6 function sections, please select File Manager and you'll see the 9 types of data. Select Photos to start moving photos from iPhone to Mac.
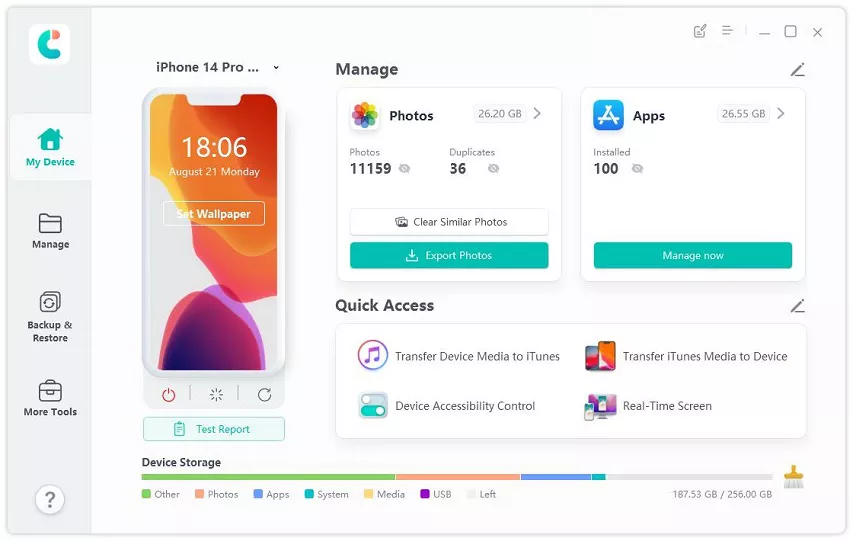
This program will display all photos in your iPhone. And you can click Import to add photos from Mac to iPhone, or click Export to transfer photos from iPhone to Mac.

then write your review
Leave a Comment
Create your review for Tenorshare articles

Best Free iPhone Transfer & iOS Backup Tool
Easily, without iTunesiCareFone - Free iOS Backup tool & Easy Data Manager
Backup/Transfer/Restore/Manage iOS Data with Simple Clicks
Backup/Manage iOS Data Easily
Backup/Manage iOS Data in Clicks
By Jenefey Aaron
2026-06-30 / OS X