


ReiBoot - No.1 Free iOS System Repair Software
Fix 150+ iOS Issues without Data Loss & Safely iOS 26 Upgrade/Downgrade
ReiBoot: No.1 iOS Repair Tool
Fix 150+ iOS Issues, No Data Loss
Are you looking for free ways to enter DFU Mode on Mac and fix all the problems your Mac device is facing? This article is your ultimate guide! Hope inside this article, as we explain all that you should know about the DFU Mode and the multiple free ways to enter it.
No matter what Mac issues you met, use ReiBoot to fix without data loss in One-Click.
DFU (Device Firmware Upgrade) mode is an advanced recovery mode used to fix firmware and system-level issues. In this mode, your iPhone stays powered on but the operating system doesn’t load, allowing it to connect to a computer or iTunes for restore or update.
DFU mode helps resolve problems like being stuck on the Apple logo or unresponsive devices. It’s also used for jailbreaking, un-jailbreaking, or upgrading/downgrading iOS versions.
Entering DFU mode requires precise steps, but following a clear guide makes it easier to do.
Here is your ultimate guide on entering DFU mode on Mac with Apple Silicon:
Keep pressing the power button, press and hold the following three buttons for about 3 seconds: Right Shift + Left Option + Left Control.

These steps are only valid for MacBook Air (M2, 2022), and MacBook Air (M1, 2020).
While pressing the power button again, press these three buttons for approximately 10 seconds: Right Shift + Left Option + Left Control.

Note: This guide is functional for:
1. Disconnect the iMac from the power source.

2. Connect the iMac to the power source and keep pressing the power button for approx. 3 seconds.
Step 1: Disconnect the Mac Mini from power for at least 10 seconds.
Step 2: Connect the two Mac computers after plugging in the USB-C cable (with any desired converter).
Step 3: Reconnect the power while pressing the power button.
Step 4: Release the power button.
1. Detach the Mac mini power cable for at least 10 seconds.
2. Connect the two Mac computers after plugging in the USB-C cable (with any desired converter).
3. Reconnect the power while pressing the power button.
4. Release the power button.
This guide can be used for entering Mac Studio (M1 Max, 2022) and Mac Studio (M1 Ultra, 2022).
Let’s now have a look at detailed step-by-step guides on how to enter DFU Mode on Intel-based Mac.
While pressing the power button, press and hold the following three buttons for about 3 seconds: Right Shift + Left Option + Left Control.

This guide is only for MacBook Air (Retina display, 13-inch, 2020), MacBook Air (Retina display, 13-inch, 2019), and MacBook Air (Retina display, 13-inch, 2018).
1. Press the Sleep/Wake button for approximately 5 seconds to turn your Apple laptop off.
2. Plug the USB-C cable into the front Thunderbolt port on the left side of your Apple laptop.
3. While pressing the power button, press and hold the following three buttons for about 3 seconds: Right Shift + Left Option + Left Control.
Note: This guide is functional for:
Step 1: Disconnect the iMac from the power source.
Step 2: Proceed with plugging the USB-C cable into the Thunderbolt port nearest to the Ethernet port.
Step 3: While pressing the power button, connect your iMac Pro or iMac to the power source and continue to press the power button for about 3 seconds.
1. For at least ten seconds, disconnect the Mac mini from power.
2. Move on with plugging the USB-C cable into the Thunderbolt port closest to the HDMI port.
3. While pressing the power button, connect the Mac mini to the power source and continue to press the power button for about 3 seconds.
Step 1: Disconnect the Mac Pro from the power source and move on to performing one of the following steps:
Step 2: If you have a desktop Mac Pro, plug the USB-C cable into the Thunderbolt port most distant from the power button.
Step 3: While pressing down the power button, connect the Mac Pro to the power source and continue to press the power button for approximately 3 seconds.
1. Disconnect the Mac Pro from the power source and move on to performing one of the following steps:
2. If you have a rack-mount Mac Pro, plug the USB-C cable into the Thunderbolt port nearest to the power button.
3. While pressing the power button, connect the Mac Pro to the power source and continue to press the power button for approximately 3 seconds.
Tenorshare ReiBoot is a helpful tool that can help you fix various issues on your Mac. If your Mac won't boot up or is stuck on the Apple logo, ReiBoot can help.
ReiBoot offers a "Repair macOS system issues" option that can help to fix more serious problems. This option will reinstall the macOS system files without affecting your personal data, which can help to fix issues like a corrupted operating system or a non-responsive Mac.


Download and install ReiBoot on your normal mac computer. Launch ReiBoot and connect it to the computer that needs to be repaired. Once the device is recognized, click 'Repair macOS system issues'.

In the below interface, select 'Standard Repair' and read the note below to avoid repairing process failure. If you're ready, click 'Standard Repair'.

Select the model of the mac computer you need to be repaired and follow the instructions on the screen. Make your device enter into DFU mode.

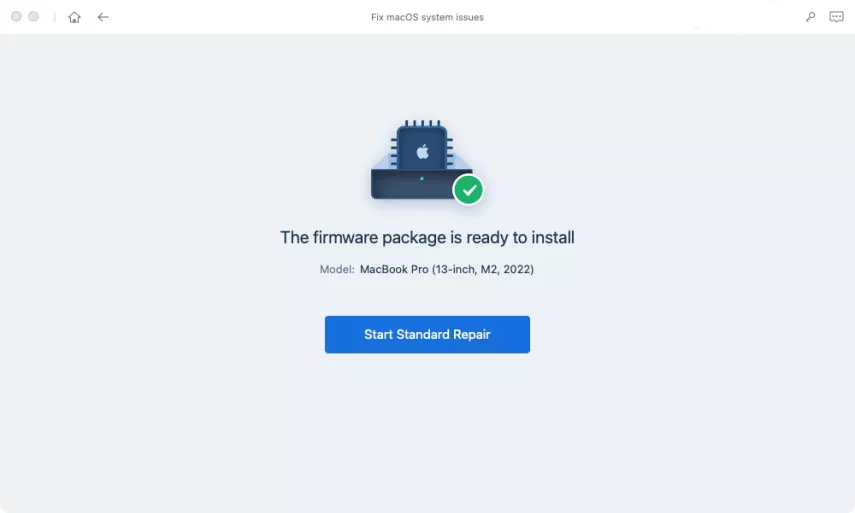
Click 'Download' to download the latest firmware package. It will take some time.

Once the firmware package is downloaded on your computer, you can click 'Start Standard Repair' to start system recovery.
The whole repair process will take a few minutes, please wait patiently. After the repair is done, your macOS device will automatically reboot and all your data will not be erased.

After going through multiple guides on how to enter DFU mode on Mac, you must wonder how to exit DFU mode on Mac. Just press and hold the power button until you see the Apple logo and/or hear the startup chimeand that’s it!
Q1: What's the difference between DFU mode and recovery mode on Mac?
The similarity between these modes is that both are used to recover an unbootable Mac without loading system. But do they work the same way? The answer is no.
In short, MacOS Recovery is a part of the operating system that helps you repair your internal disk, restore your files from Time Machine backups, reinstall macOS and more. On the contrary, DFU mode users can enter the state without loading the operating system. Since macOS is not running, you can fix bugs and even backups and restore your Mac to working condition.
Q2: How do I know if my mac is in DFU mode?
It's hard to tell whether your Mac devices are in DFU mode. In most cases, it will turn to be black screen. If you still not sure about it, you can use Tenorshare ReiBoot to free check. If you successfully enter into the firmware download page under the Standard Repair mode in the "Repair macOS system issues" features, your Mac device is in DFU mode.
This comprehensive guide covers multiple guides on how to enter DFU mode on Mac free of cost. Be sure to follow the guide specific to your Mac device; otherwise, you won’t be able to enter DFU Mode. Hope you find this info helpful. Stay tuned for more informative, detailed guides. Besides, Tenorshare ReiBoot is always be your best bet.

Tenorshare ReiBoot - Fix iOS Issues


then write your review
Leave a Comment
Create your review for Tenorshare articles

ReiBoot - No.1 Free iOS System Repair Software
Fix 150+ iOS Issues without Data Loss & Safely iOS 26 Upgrade/Downgrade
ReiBoot: No.1 iOS Repair Tool
Fix 150+ iOS Issues, No Data Loss
By Sophie Green
2026-06-08 / Mac OS