3 Best Ways to Find Mac Library
by Jenefey Aaron Updated on 2020-03-31 / Update for OS X
The Library folder contains a lot of sensitive files and applications, so, it makes sense why Apple has chosen to hide this particular folder from the users. Just make sure that you do not change unknowingly or accidentally which is the main reason why Apple chose to hide it. The visibility option on the Library is always turned off by default because Apple wants it protected. So, if by any chance you need to access the Library files from the ~/Library folder for modifications or some specific changes to settings then, first, you have to make sure that the Library folder is visible. So, if you wish to know how to find Library on Mac, read the 3 best methods mentioned below so that you can do it without any problems.
- Way 1: How to Open Library on Mac with Go Menu
- Way 2: How to Access Library on Mac with Terminal
- Way 3: How to Get to Library on Mac with Funter
- Extra Tip: How to Permanently Unhide Library Folder on Mac
Way 1: How to Open Library on Mac with Go Menu
The shortest way to make the Library folder visible is to use the “ Go Menu ” from the Finder app. It is the most efficient way to get access to Library files. Want to know how to access Library on Mac through the “ Go” Menu, read below:
1. Run Finder on Mac.
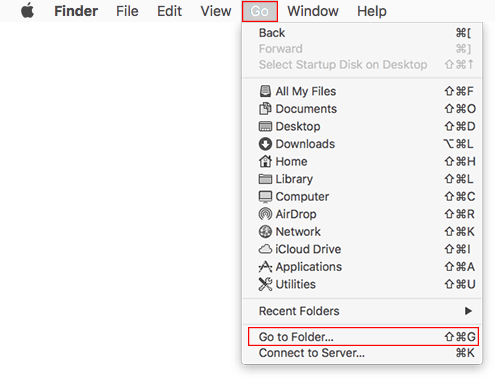
2. Now, find the Go option on the menu bar and tap to open a drop-down menu.
3. Choose “ Go to Folder ”.
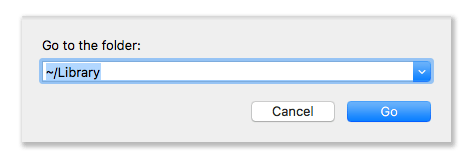
4. A new dialog box will open up, enter “ ~/Library ” and tap on “ Go ”
It will show you the Library and you can directly access the Library from here.
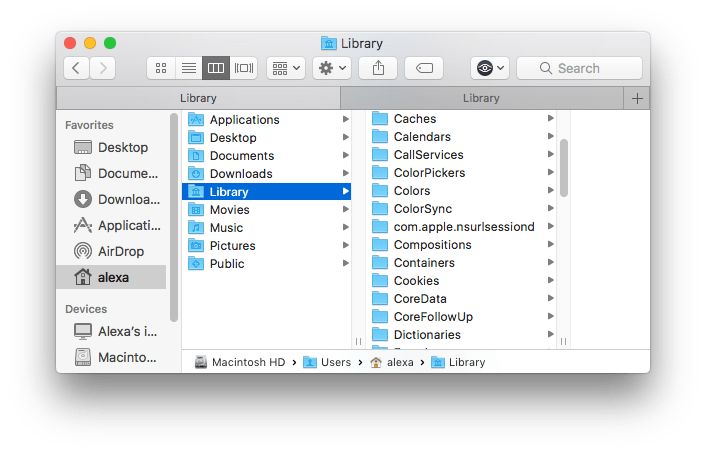
So, this is how to get to Library on Mac. It is basically the easiest way if you do not know where to find Library on Mac. Another great thing about this method is that if you have visited Library multiple times through this method, the Library option will be visible on the “ Recent Folders ”, and this will make your work easier.
Way 2: How to Access Library on Mac with Terminal
The Library folder contains all the system and settings files of the device. So, Apple always hides that particular folder on any Mac device. Unfortunately, there are times when you may want to access the Library folder to change few settings for your work. So, if you want to know how to access Library folder on Mac, read the following steps:
1. Open your Mac.
2. Find Terminal which is located at the “ Utilities ” folder in “ Applications ”.
3. Now, launch Terminal on the Mac.
4. The Terminal Prompt will be opened and you need to type the following command in there…
“ chflags nohidden ~ /Library/ ”.5. Now, press “ Enter ”.
6. As the command has been executed you can exit the Terminal window.
7. Now, you will be able to see the Library folder in Finder.
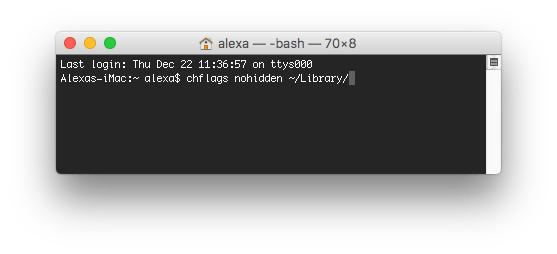
After your work is done with the Library folder, you may want to make the folder hidden again. If you want to do it, then just type the following command:
1. “ chflags hidden ~ /Library/ ”.
2. Lastly, press “ Enter ” to execute the command.
So, now you know how to go to Library on Mac using Terminal.
Way 3: How to Get to Library on Mac with Funter
Aside from Terminal, there are other ways to make the Library folder visible. One of them is Funter. Funter is an app designed by Apple simply to make the hidden files visible. This app will also provide you a quick access to the Library files. Be sure to remember that this app will not only make the Library files visible but also all the other hidden files in the Mac as well. So, if you want to know how to find Library folder on Mac with Funter, read the following steps below.
First of all, Funter is specially designed so that the app will integrate with Finder the moment it is launched. So, you will be able to change the file view from the Finder window.
1. Now, before all that you have to download and install the Funter app.
2. Run the app on your Mac.
3. The Finder window will be opened. You need to click on the Funter icon and tap “ Show Hidden Files ” to make the files visible.
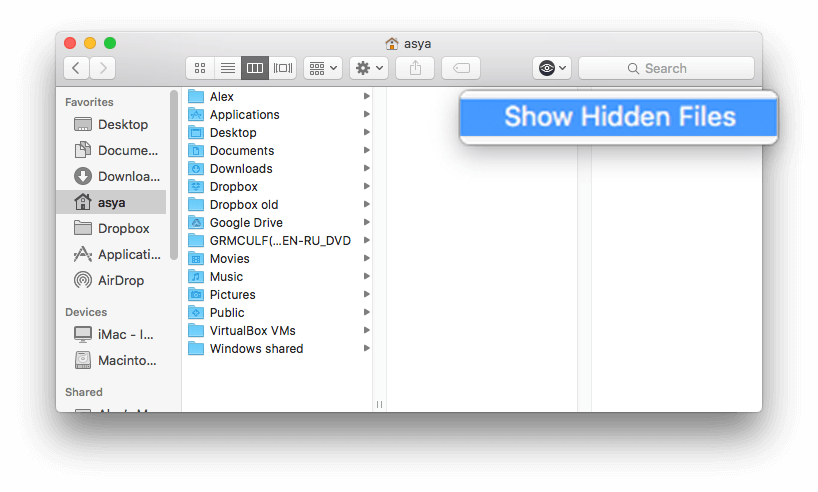
After the process is completed, the Finder app will be launched automatically again, and all of the hidden files will be visible on the window. After you are done with the Library files if you want to hide it, just repeat the process again from the Finder window and tap “ Hide Hidden Files ” to make them hidden again.
Extra Tip: How to Permanently Unhide Library Folder on Mac
The methods to go to Library mentioned above on this article are excellent and it would be very easy for you, but what if instead of going through the same method every single time, you make the Library visible, permanently. It would be more efficient for you to access Library that way. So, now let’s look at how to open Library on Mac permanently.
1. You need to launch Finder on your Mac.
2. Then go to your Home folder.
3. After that, you need to go to “ View ” and click on the “ Show View Options ”.
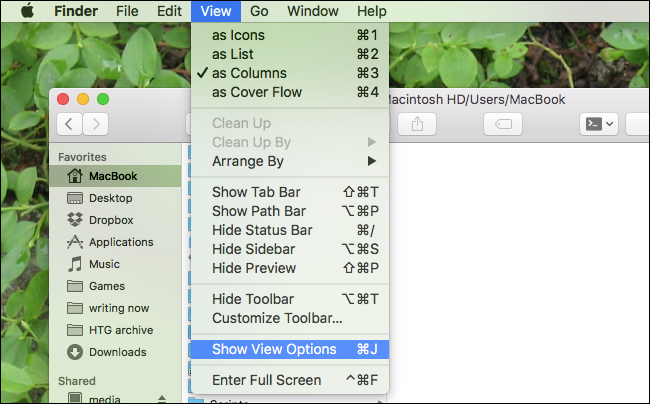
4. After this, a new window will be opened.
5. You just have to make sure that the box beside the “ Show Library Folder ” is checked.
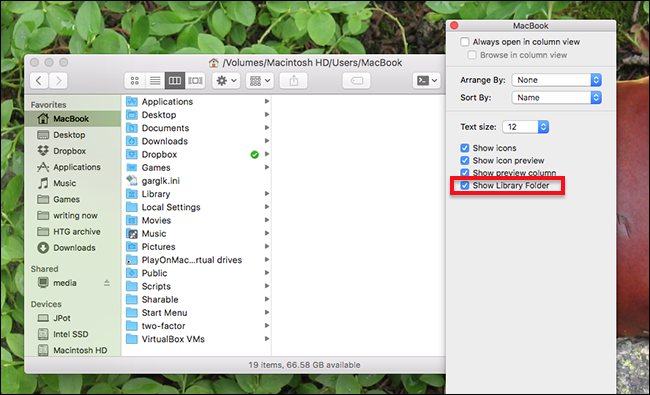
6. Now, you just have to close the window and Library folder will be permanently visible.
If you are a kind of user who likes to change settings constantly to suit your needs then leaving it permanently visible is the most logical choice. But you need to remember that after you go through this process the Library won’t be a hidden folder anymore, it will be visible until you change the settings again.
Conclusion
More or less you do not have to go through any trouble to find the hidden Library files if you know how or where to find it. Just be careful when you are accessing the Library files as it contains a lot of sensitive files. If you use any of the methods mentioned above, it will be easier for you to find Library or simply make it visible permanently. Unfortunately, if you have deleted anything from the Library folder, you can use Tenorshare Any Data Recovery for Mac app to recover that lost data. It is a versatile data recovery tool that can recover lost/deleted files from your devices in no time. We highly recommend this software for all your data recovery quests.
- Recover data deleted, formatted or lost on Mac;
- Restore files from hard drive and external storage devices;
- Recover data from failed/crashed/dead MacBook;
- Fully supported latest macOS 10.15 Catalina;
If you like this article, do share and comment!!
