9 Easy Ways to Fix Windows 10 File Backup Not Working
"Windows 10 Pro File History not working. File History is on and apparently running 'File History is saving copies of your files', however, days later there are still no files on my backup drive. I opened the event logs and there are numerous errors and warnings: 'Unable to scan user libraries for changes and perform backup of modified files for configuration C:\Users\sibij\AppData\Local\Microsoft\Windows\FileHistory\Configuration\Config'."
"File History Stopped Working... get the following error message in a popup window: 'We can't copy files to your file history drive' 'Failed to initiate user data backup'(error 80070005)"
"'We cannot copy your files to this location', 'Your current File History drive is disconnected. Reconnect the drive and try again'. "
It is very sad and frustrating that when you are trying to back up files on your Windows 10 computer, you are getting error messages or the feature is not working altogether. The described case is not the only complain by the users. There are several types of issues generated due to the use of this feature. But don't worry, there are ways to fix file history Windows 10. Just read the article below. You will get acquainted with all the necessary details.
- Part 1. Common Windows 10 File Backup Not Working Issues
- Part 2. 9 Easy Ways to Fix Windows 10 File Backup Not Working
- Part 3. The Final Resort: Backup Windows 10 with File History Alternative
Part 1. Common Windows 10 File Backup Not Working Issues
Backing up your files is a great decision to protect your files from data loss or corruption. Windows 10 is the latest version of the said OS and the most advanced one yet.
1. Unable to Backup Files
Windows 10 backup has stopped backing up files, altogether. Every time users are trying to use this feature, they are getting either an error or the system is simply not working.
2. Windows 10 Backup Keeps Stopping Working
Many users have also reported that the Windows 10 backup has stopped working while it was making the backup. This is quite disappointing, they had to start from the beginning.
3. File History Not Running Automatically
Most of the users generally use scheduling to back up their files on a daily basis. Some users have claimed that after properly running for a few months, the Windows 10 backup system has stopped working altogether.
4. File History Doesn't Recognize This Drive
Quite a few users have complained about this issue. The Windows 10 backup is failing to recognize my connected backup drive after it is launched.
5. Windows 10 Backup Fails to Back up All Files
The Windows 10 backup is supposed to back up the files you have selected for it. But users have claimed that very frequently the system is skipping files while making the backup of a large number of files.
Part 2. 9 Easy Ways to Fix Windows 10 File Backup Not Working
So, if Windows 10 file history backup has stopped working properly, you can use the following methods to make it work properly, again. These are simple fixes, advanced technical knowledge is not required for the executions if you just follow the detailed steps very carefully.
- Method 1. Make Sure "Automatically back up my files" is Turned On
- Method 2. Turn off File History and Turn It on
- Method 3: Enable File History Service and Windows Search
- Method 4: Disable and Enable System Protection
- Method 5. Reset File History
- Method 6. View Recent Errors in the Event Viewer
- Method 7. Reconnect the Drive
- Method 8. Stop Using This Drive and Change to another Disk
- Method 9. Keep Saved Versions to Forever
Method 1. Make Sure "Automatically back up my files" is Turned On
You also have to make sure that "Automatically back up my files" option on Windows 10 File History is turned on by going to Settings > Update & Security > Backup. If that option is not turned on, Windows will not make scheduled backups of your files.
Method 2. Turn off File History and Turn It on
The very first method you can try to fix Windows file history on your Windows 10 computer is by turning the File History feature off and then turning it on, again. Use the steps detailed below.
Step 1: Go to the Settings of your Windows 10 PC and click on "Update & Security".
Step 2: Now, in the following panel you will find the "Backup" option at the left side of the panel.
Step 3: Click on it and you will see the "Automatically Back Up My Files" option at the right side of the screen. Click on the switch and turn off the said option if it was turned on.
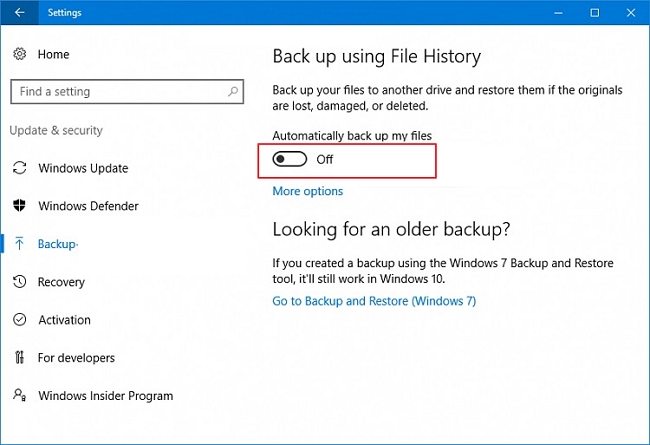
Step 4: After that, you can you the same method to turn on the "Automatically Back Up My Files" option.
File History option on your Windows 10 has been activated. You can click on "More Option" and make changes to the settings.
Method 3: Enable File History Service and Windows Search
If that didn't work for your computer, then enable the File History Service and Windows Search on your computer. The steps are pretty simple, they are detailed below.
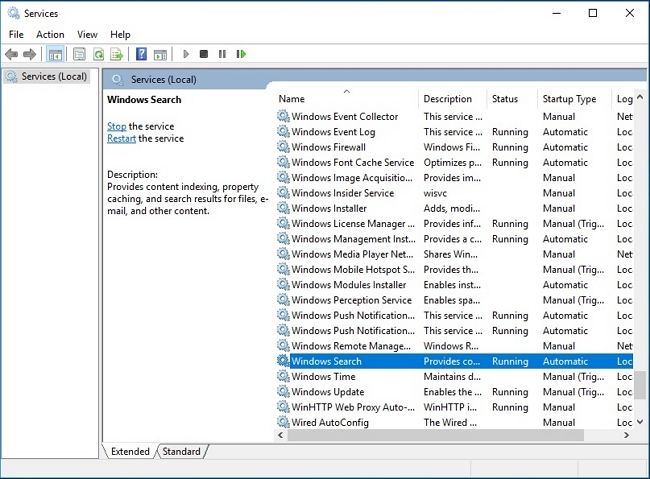
Step 1: You need to click on the Search bar and type "service.msc" and click on "Services" from the results.
Step 2: Then, look for "File History Service and Windows Search".
Step 3: Upon finding it, you need to check if "Automatic Startup" is enabled on these services.
Step 4: If not, double-click on these services and change the "Startup Type" to "Automatic".
Method 4: Disable and Enable System Protection
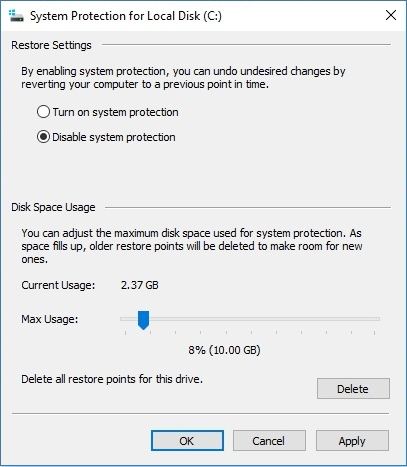
You can try to disable and then enabling the System Protection on your Windows PC. Some users have reported that after disabling and enabling the System Protection, they have found Windows 10 File History working in perfect order.
Step 1: Simply, go to the "Control Panel" of your Windows 10 PC and click on "System & Security".
Step 2: Then, navigate to "System" and click on "System Protection".
Step 3: Now, select a particular drive and click "Configure".
Step 4: Lastly, click "Disable System Protection" and after a few seconds click "Turn on System Protection".
Method 5. Reset File History
Even if that, didn't work and File History is still not working; you can try and reset the File History. First of all, turn off the File History feature, and then follow the steps.
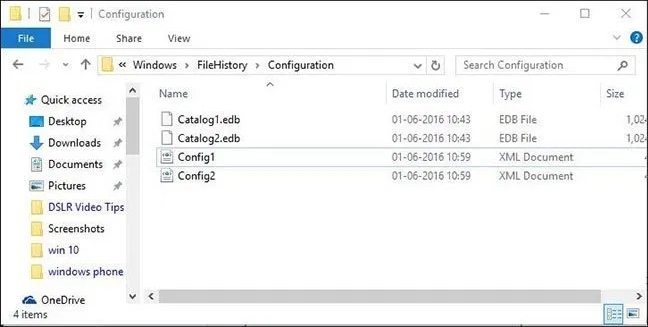
Step 1: Go to delete the configuration files for File History. Just go to the following:
C:\Users\<username>\AppData\Local\Microsoft\Windows\FileHistory\Configuration
Step 2: Now, turn on File History, following the procedures described in "Method 1". You also need to select to use the same backup drive as before.
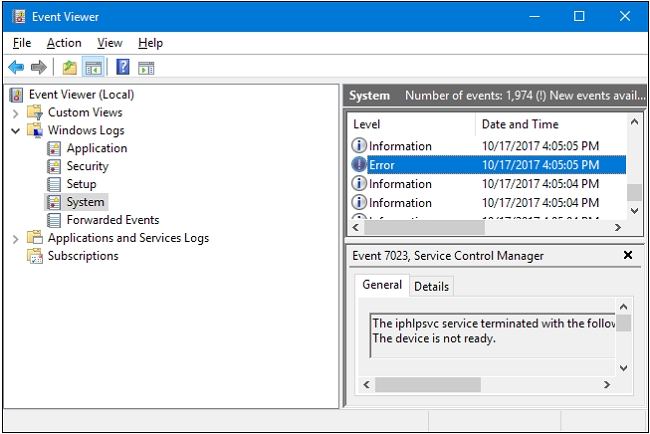
Method 6. View Recent Errors in the Event Viewer
Most of the time, we don't get to know the type of error affecting the performance File History on your Windows 10 OS. It is possible that viewing the recent errors will point out to a possible solution, resulting in a fixed File History. So, in order to do that, you have to go to "Event Viewer". The steps are pretty simple and they are detailed below.
Step 1: Click on "Start" and navigate to "Programs".
Step 2: After that, click on "Administrative Tools" and then click on "Event Viewer".
Step 3: On the following panel, make a right-click on the proper log file. Immediately a list of events will be displayed on the screen.
Step 4: Here, you can click on the specific events and the panel will show you intricate details regarding that specific event.
Method 7. Reconnect the Drive
If file History is unable to connect the backup drive, where you keep all your files backups for Window 10. Then, simply eject the connected drive and connect the drive back again.
Now, Windows 10 File History may detect the presence of a connected drive.
Method 8. Stop Using This Drive and Change to another Disk
On the other hand, if your connected drive is not getting by File History, then it is probably the fault of the drive itself. As mentioned earlier, you can reconnect the drive but if you are using an old external drive to store your back up files, then there is a huge possibility that the drive got damaged.
It will be very easy for you to figure out the issue, just stop using drive and add another drive for file history.
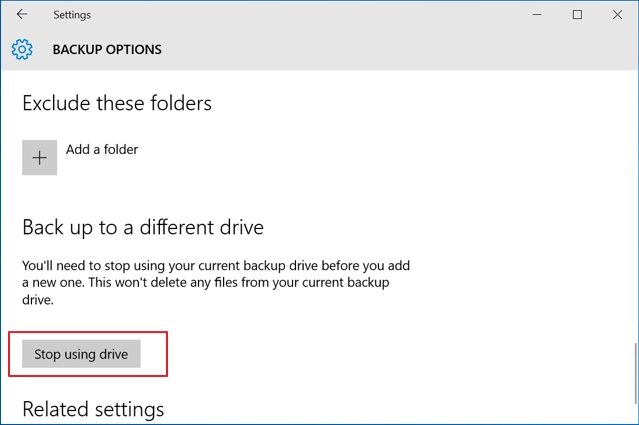
Step 1. Go to Settings > Update & security icon > Backup > More options on the right side.
Step 2. Click on Stop using drive under Back up to a different drive.
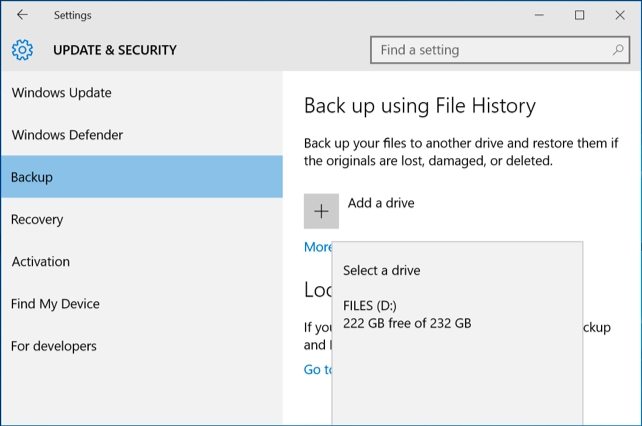
Step 3. Click on the back arrow at the top left corner and click on Add a drive on the right side to add a File History drive.
Method 9. Keep Saved Versions to Forever
There is a possibility that changing the setting of File History, may change the disruption you are getting with File History. Just follow the steps below;
Step 1: Just go to the "Control Panel" on your computer and click on "System & Security".
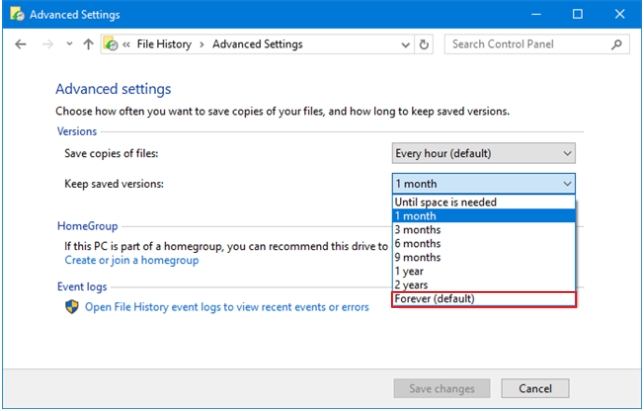
Step 2: Then, find "File History" and look for "Advanced Settings".
Step 3: Inside advanced settings you will find the option "Keep Saved versions". There will be a drop menu beside it, click on it and select "Forever".
Part 3. The Final Resort: Backup Windows 10 with File History Alternative
Even though all these fixes are great and they are capable of fixing File History on Windows 10, there are actually better options available for backing up your Windows 10 files. We are referring to 3rd party programs that can be used to back up your files effectively. They will not present with any such error and complete the task efficiently and with ease.
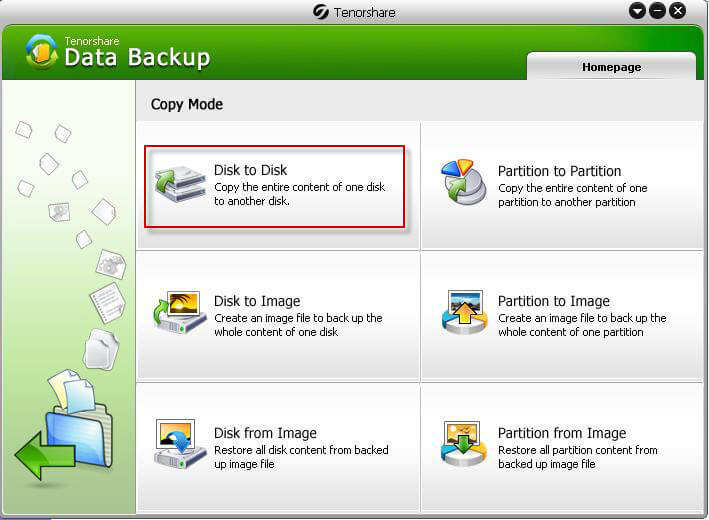
The program we have chosen for this task is called Tenorshare Free Data Backup. This is a quite popular data backup software for Windows users and also very simple to use. Let's have a look at the steps below;
Step 1 Download and install the said program on your computer and launch it. There are several options available on the program interface. Here we take Disk to Image for example.
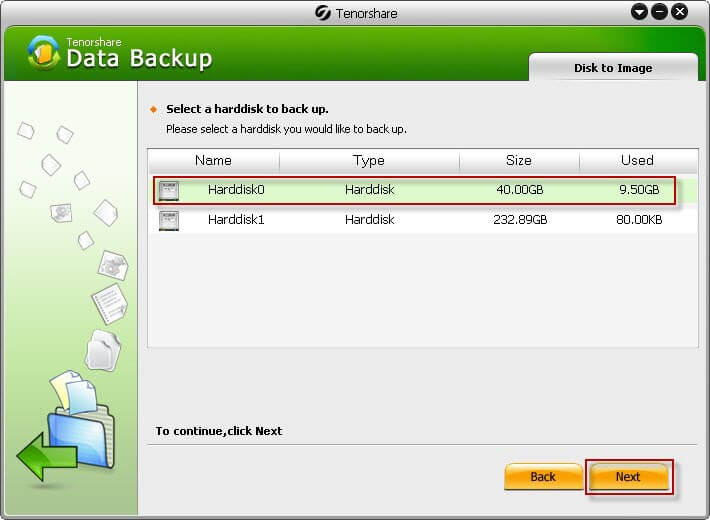
Step 2 On the following screen, select the disk you want to backup and click on Next button.
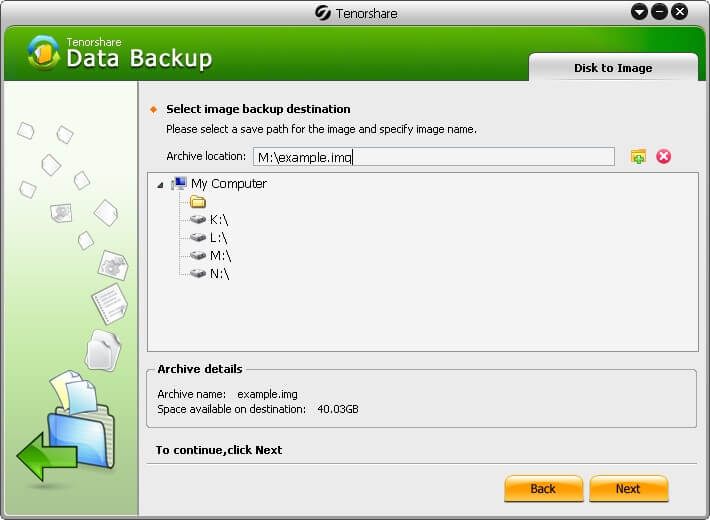
Step 3 Then, choose the target partition or drive where the cloned disk will be saved. Select a hard drive and click on Next to continue.
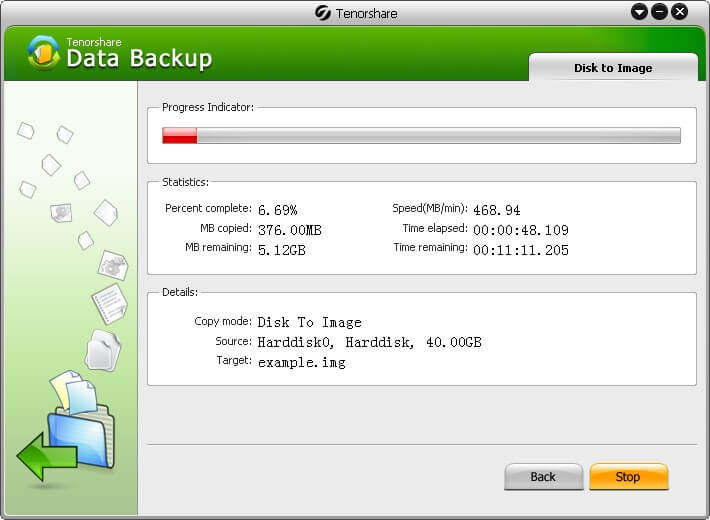
Step 4 Choose a compression level and click on Next to start backing up your data on your computer.
Summary
Therefore, if you are facing issues with your File History on Windows 10, you will be able to fix the issue very easily using the 9 very effective methods mentioned in the article. But it will be better for you to use Tenorshare Free Data Backup for making backups for your files, as it works more efficiently and does not cause any issues.
Speak Your Mind
Leave a Comment
Create your review for Tenorshare articles


