How to Back Up iTunes Library by Copying to External Hard Drive
There are various ways to back up iTunes library. Backing up to an external hard drive is a safe way as when your internal hard drive crashes, you can still restore from the external hard drive. To backup iTunes library to an external hard drive, you will have to do the 3 steps below:
- Step 1: Consolidate iTunes Library
- Step 2: Copy iTunes Folder to External Hard Drive
- Step 3: Restore iTunes Library Backup
TIPS: Still want an easier way? Maybe you could try to use iAny Transfer which allows you to backup and restore iTunes library as well as playlist with several clicks.
Step 1: Consolidate iTunes Library
This is a feature of iTunes that makes sure that all files in your iTunes library are stored in the same folder. When you backup your library, you'll be moving just one folder and you don't want to accidentally leave behind any files that stored somewhere else. By consolidating, you can stop worrying about this.
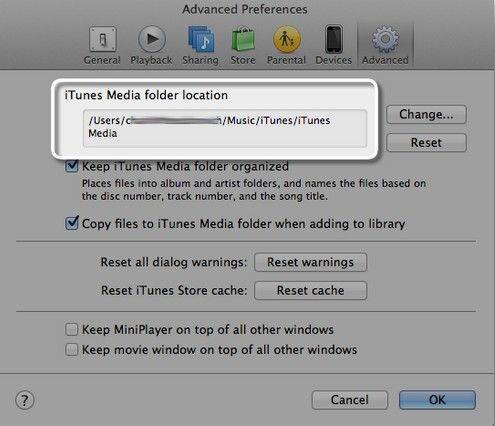
- 1) Launch iTunes and go to Edit -> Preferences on Mac. (On Windows, go to Edit -> Preferences.) Then click Advanced tab. Check both Keep iTunes Media Folder Organized and Copy Files to iTunes Media Folder.
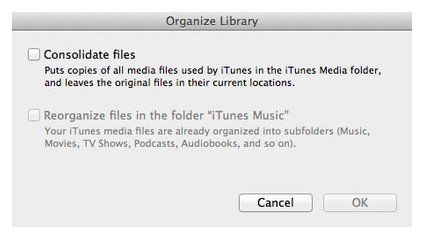
- 2) Choose File -> Library -> Organize Library if using iTunes 9 or later. If you're using iTunes 7 or iTunes 8 for Mac, choose File > Library and then Consolidate Library.
- 3) From File menu, check Consolidate Files, and then click OK.
 Note: The consolidate option leaves the original files in their current locations, thus those files will take up twice the space. When the backup finishes, you can delete these files. If you are looking for ways to clean up iTunes library, check the post How to Clean Up iTunes Library.
 - 4) Your iTunes Library files are in the iTunes folder. Find your iTunes folder and copy it to your hard drive.
- 5) After the folder has been copied, locate this folder to the place where iTunes folder should be.
Step 2: Copy iTunes Folder to External Hard Drive
Before you copy iTunes library, plug the external hard drive into your computer. Make sure the external drive is big enough to store the entire iTunes library.
- 1) Once the drive appears on your computer, launch iTunes.
- 2) Choose iTunes > Preferences.
- 3) Click Advanced. The location of your iTunes folder will be listed in iTunes Media folder location box.

- 4) Drag the iTunes folder to your external hard drive. This can take a while if you have a lot of items.
- 5) When the transfer is complete, your iTunes Library will be copied to your external hard drive.
Step 3: Restore iTunes Library Backup
Next you can stop iTunes and restore iTunes library from the backup that you copied to the external hard drive.
- 1) Locate the external hard drive which has your iTunes library backup.
- 2) Drag the iTunes folder from your external hard drive to whatever location on your internal hard drive. It is recommended that you choose the default location for the iTunes folder, which varies on different OS:
| Mac OS X: | /Users/username/Music/iTunes/ |
|---|---|
| Windows XP | C:\Documents and Settings\username\My Documents\My Music\iTunes\ |
| Windows Vista | C:\Users\username\Music\iTunes\ |
| Windows 7 | C:\Users\username\My Music\iTunes\ |
| Windows 8 | C:\Users\username\My Music\iTunes\ |
- 3) Open iTunes while holding down the Option key (Mac) or Shift key (Windows).
- 4) In the resulting dialog, click the Choose Library button and select the iTunes folder you just moved to the internal hard drive.

- 5) On Mac OS X click Choose; On Windows click Open. Then choose the iTunes Library file inside.
With all these done, iTunes will open and your iTunes Library will be restored.
Speak Your Mind
Leave a Comment
Create your review for Tenorshare articles


