Can you fake your location on iPhone/Android? Actually, it's not easy to change location on both iOS and Android due to the strict restrictions on iOS/Android system and the traditional method is to jailbreak your iPhone or root your Android.
However, Tenorshare iAnyGo is able to change GPS location on your phone without jailbreak and root. Beyond that, it supports to simulate GPS movement with customized route. It supports the latest iOS 18 and Android 14 and allows you to control multiple devices at the same time.
Part 1. How to Change GPS Location on iPhone/Android with 1 Click
If you want to spoof location on mobile devices for entertainment or security purpose, the best choice is with the help of Tenorshare iAnyGo. Follow the steps below to change the GPS location on your devices.
Video
Step 1 Launch Tenorshare iAnygo
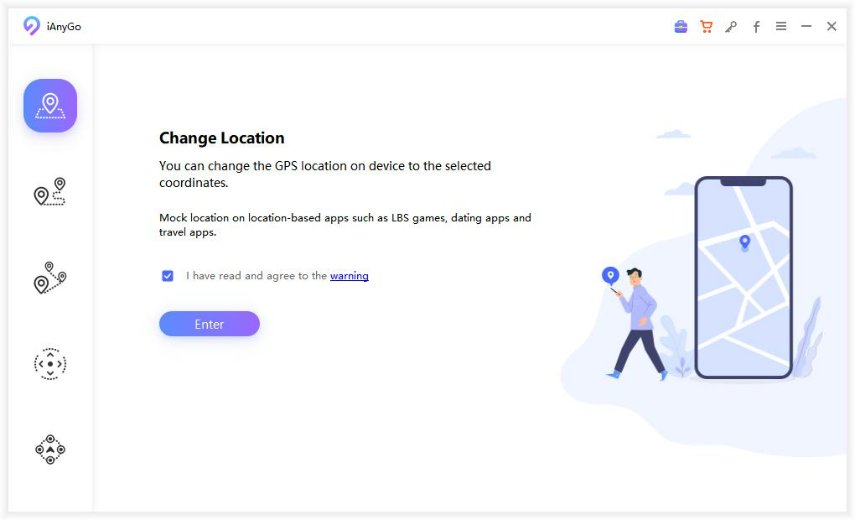
Launch the program on your computer, the default mode is ‘Change Location’.
Step 2 Connect iPhone to Computer
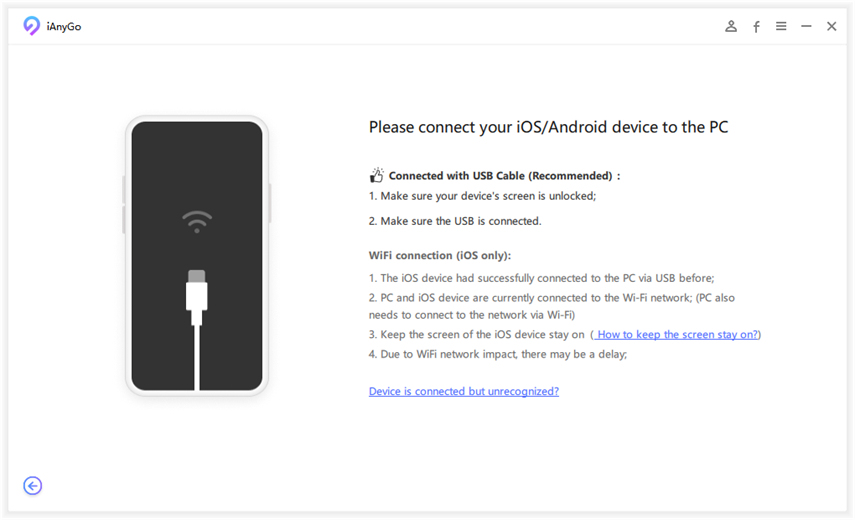
Method 1: Connect your iPhone/Android to the computer via USB Cable. Then, unlock your device. Next, click the "Enter" button to get started. For Android devices, you need to Enable USB Debugging first before using iAnyGo.
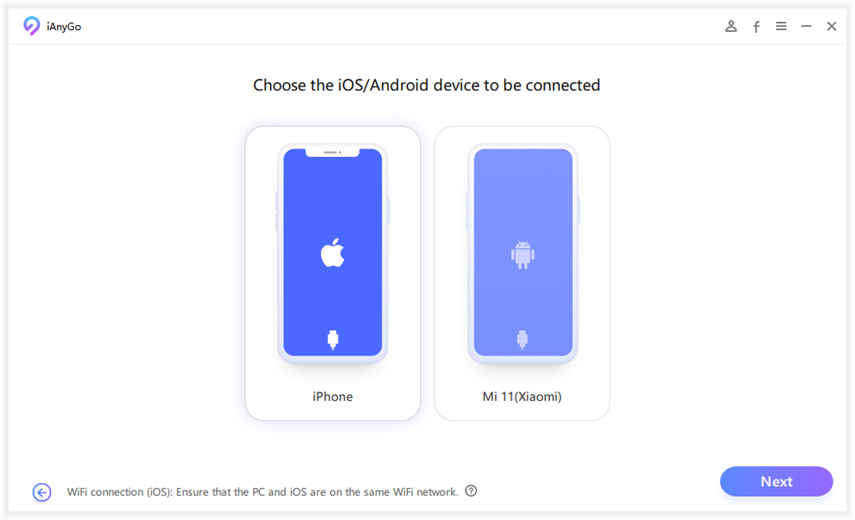
Select the device to modify its GPS location.
Method 2: Connect your devices to the computer via Wi-Fi. The following are required to use Wi-Fi connection:
- The device had successfully connected to the PC via USB before.
- PC and device are currently connected to the Wi-Fi network. (PC also needs to connect to the network via Wi-Fi)
- Keep the screen of the device stay on. (How to keep the screen stay on?)
(Tap "Trust" on iPhone if your iPhone pops up a message asking you to trust this computer.)
Note:
iAnyGo will detect all the devices connected to PC successfully. Choose the device (up to 15 devices) you want to be used in iAnyGo and click Next button. (The latest iOS 18 is also supported.)
Step 3 Select A Location on The Map
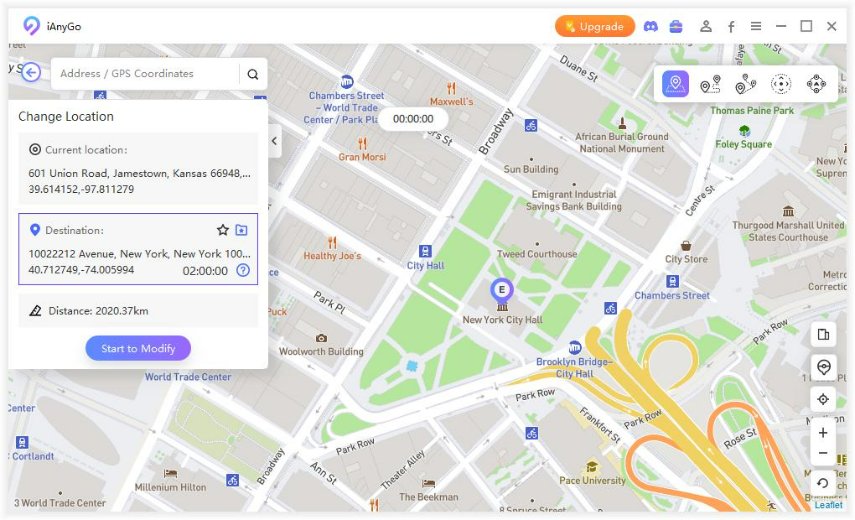
Enter the address/GPS coordinate you want to teleport to in the search box, let's take New York City as an example, and click "Start to Modify".
Done! Your location will be changed at once. All location-based apps on your iPhone will be changed to the fake location as well.
Note:
1. To keep the account safe, the cooldown timer is specially designed for Pokemon Go players to remind them not to change GPS location too frequently! If you don't need to use this feature, you can turn it off.
To make the cooldown timer reappear, you need to turn on the function again in Settings manually.
2. If you want to view your actual location, simply click the back button on the bottom right corner.
3. The address you have ever used will be collected in Historical Records. For your convenience, you can add the place to your favorites by clicking the Star button, which is also available in other movements.
- Store your bookmarked data in the cloud to synchronize it across all your devices.
- Organize and name folders to suit your personal preferences.
- Filter saved information by route type, such as utilizing the Multi-Spot Movement option for searches.
Part 2. Simulate GPS Movement along A Route between Two Point
With iAnyGo, you can simulate the GPS movement without leaving the home. Let's take a look at how to plan a route step by step by using this program.
Video
Step 1 Choose Single-Spot Mode
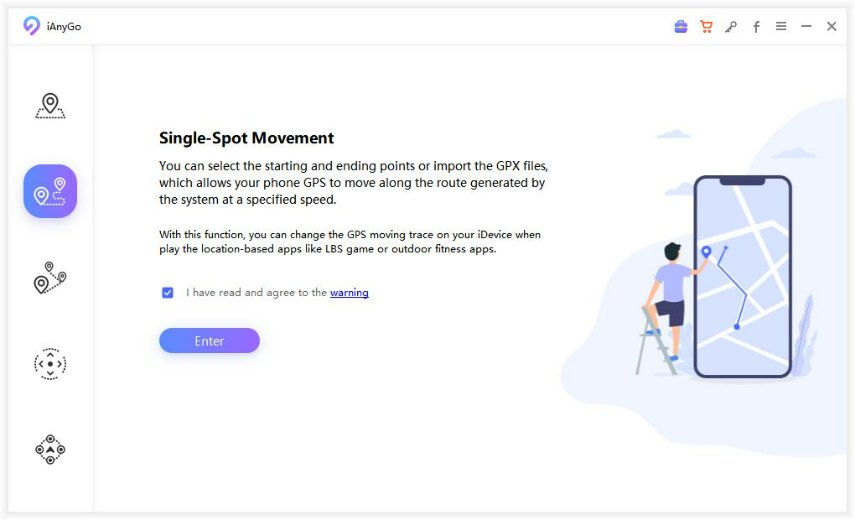
Switch to the ‘Single-Spot movement’ mode on the main interface, then click the ‘Enter’ button to get started.
Step 2 Plan Two-Spot Route on The Map and Start Navigation
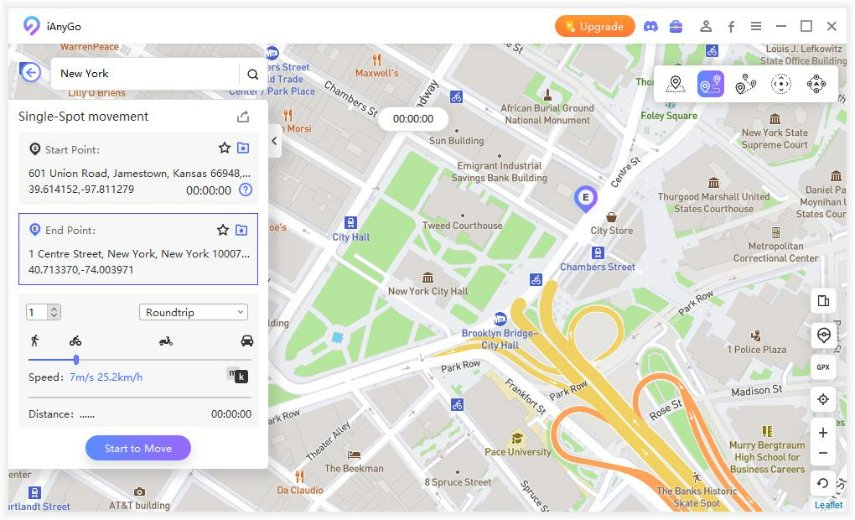
By default, the starting point is your actual location. All you need to do is choose the destination by clicking on the map or enter the address/coordinates in the search bar.
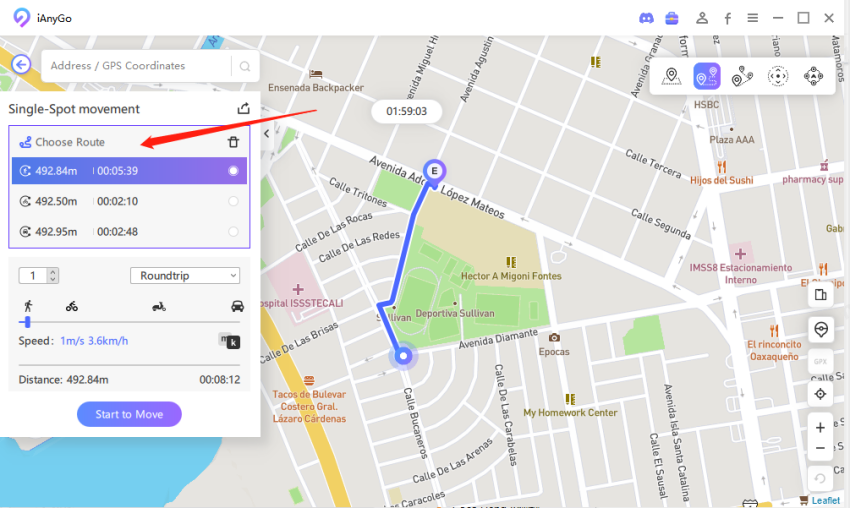
Step 3 Choose Route
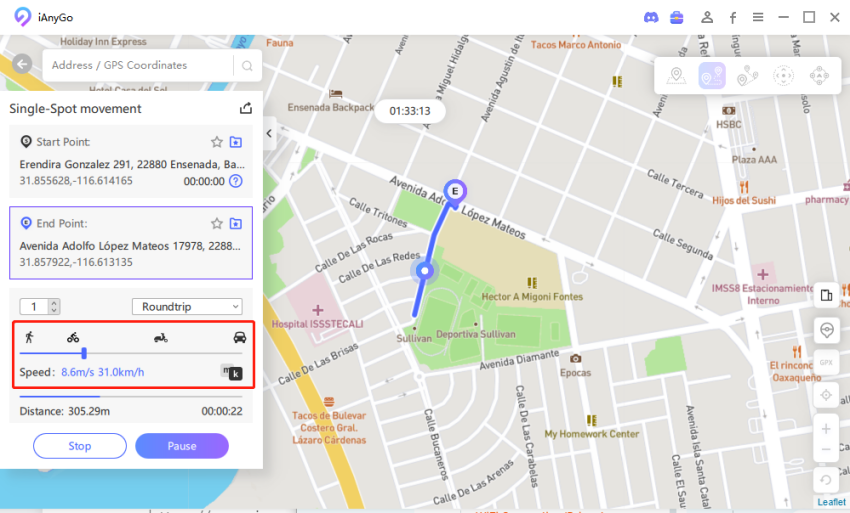
The single-point movement function supports multiple route navigation options of walking, cycling and driving.
Step 4 Start to Move
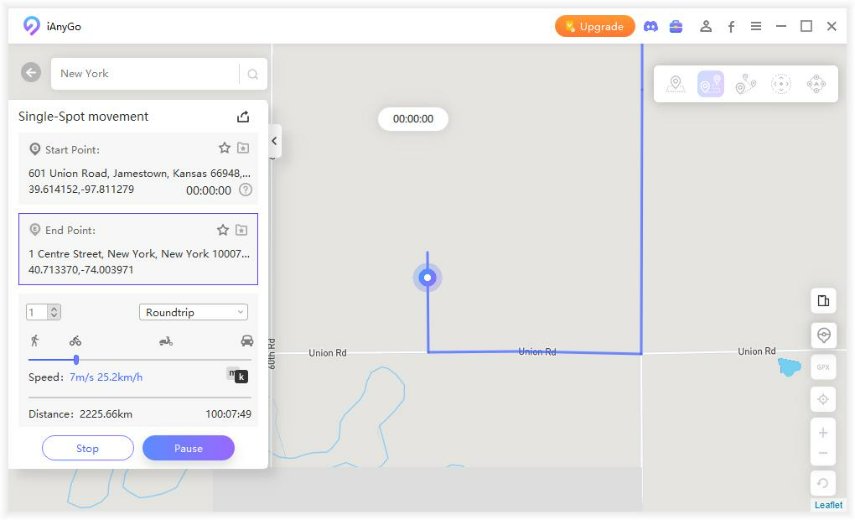
Set up the number of moves and adjust the movement speed by dragging the speed bar. After setting, click “Start to move’ button to travel back and forth between two points.
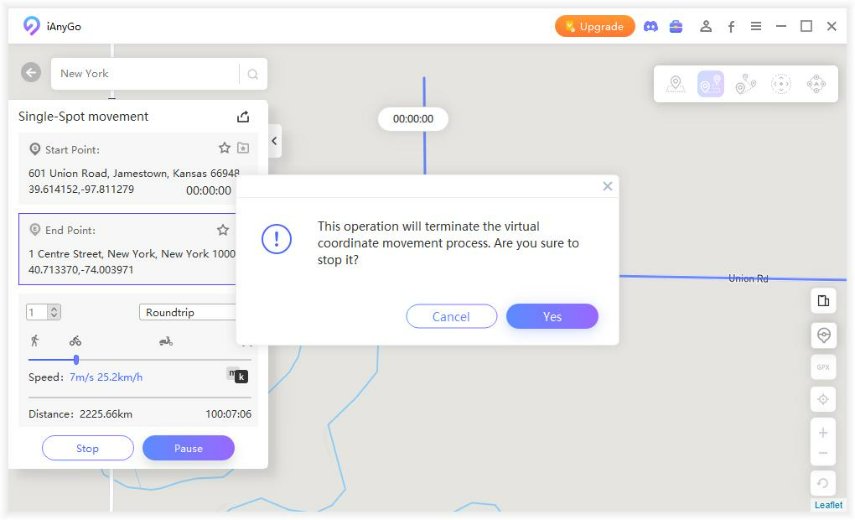
You can pause and continue the movement anytime.
You can change speed during movement to make simulated scenarios more realistic.
GPX How to Use GPX file on iAnyGo
You can import GPX file to start an already arranged route between the start and the end. iAnyGo can detect different routes in the GPX file you imported. You can also export your favourite routes as GPX file, in this way can you quickly use it another time.
How to import GPX file on iAnyGo:
1. Click the GPX button and import the .GPX file from your PC to iAnyGo.
2. GPX files imported successfully, the imported route will show up on the map. And then the process is the same as how to start a single-spot movement. You can pause the movement halfway. If you want to import the GPX file again or import another GPX file, you need to stop the movement and enter again.
3. You can also scroll the mouse wheel to zoom in on the map.
How to export GPX file on iAnyGo:
You can also export your designed route with multi spots to GPX file on iAnyGo.
1. After starting a Single-Spot movement, click the button to export your route as GPX file and save it on your PC.
2. On the Multi-Spot movement, design the routes on the map and click the button to export your route as GPX file and save it on your PC. The GPX file only can be used on Single-Spot movement.
Part 3. Simulate GPS Movement along A Route with Multiple Points
Not satified with the single route? Well,‘Multi-Spot Movement’ mode can meet your need to plan a complex route. Let's start our route planning!
Video
Step 1 Choose Multi-Spot Movement
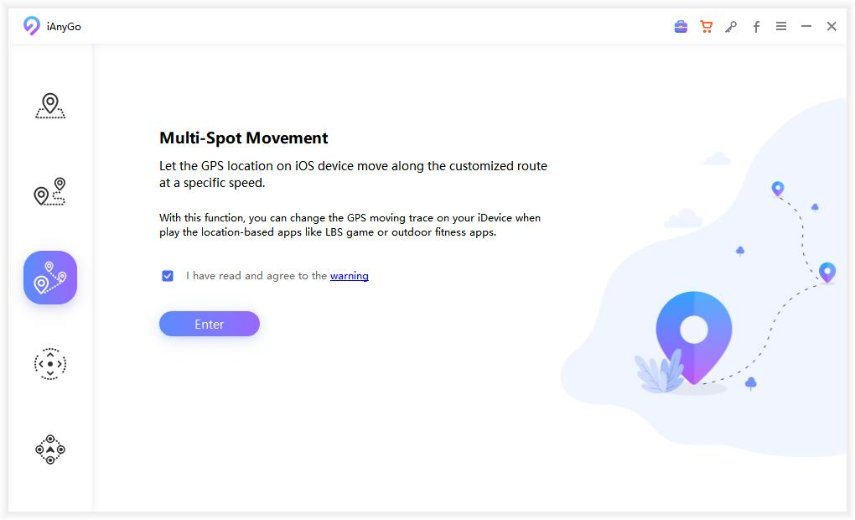
Select Multi-Spot Movement from the home screen (the 3rd one) and click ‘Enter’ button.
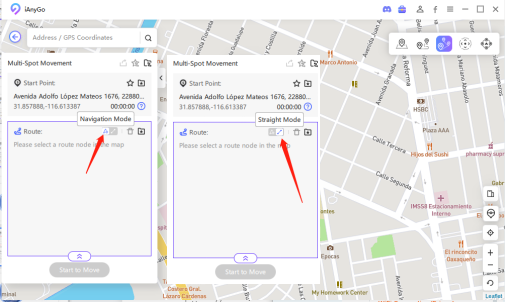
Step 2 Choose Navigation Mode or Straight Mode
Option 1 Navigation Mode: Follow the GPS navigation route, adjusting according to road conditions for a more realistic experience.
- When the total straight-line distance between route nodes is less than 1000 kilometers, the walking route is used by default; when the distance is greater than 1000 kilometers, the cycling route is used.
- The maximum number of route nodes for this method is 24.
Option 2 Straight Mode: Travel in a straight line according to the set route. The maximum number of route nodes is unlimited.
Step 3 Customize Your Mult-point Route
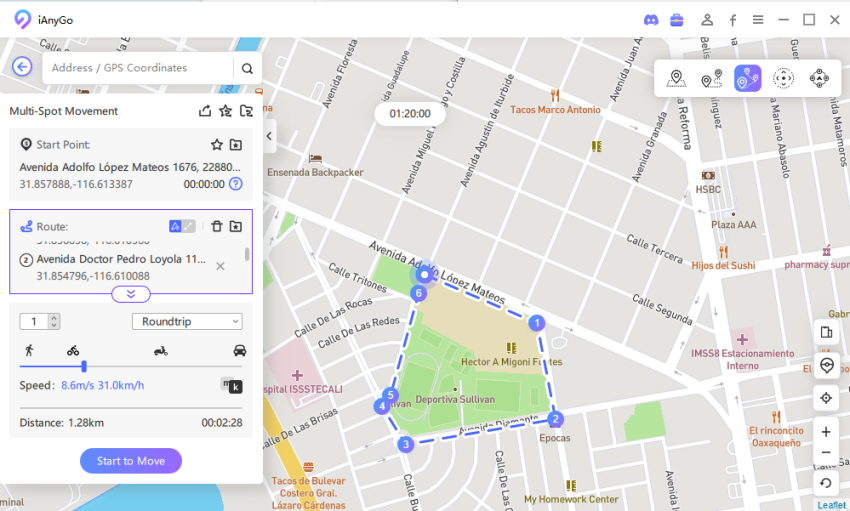
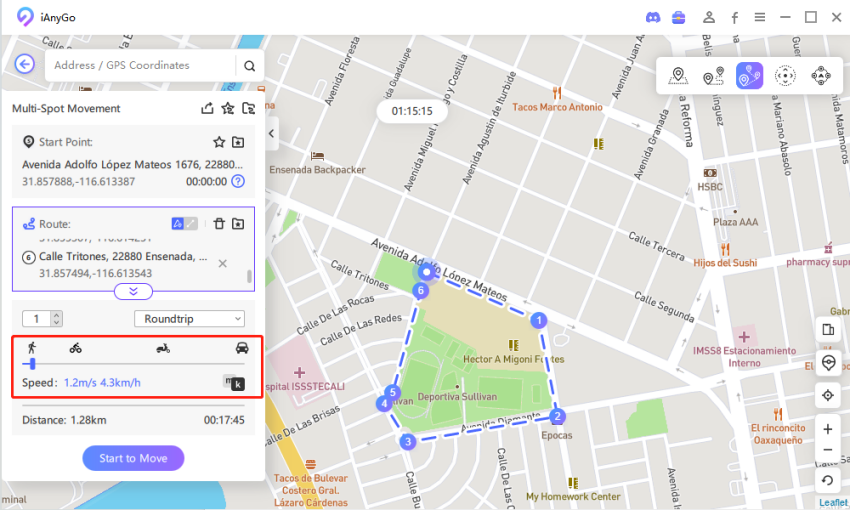
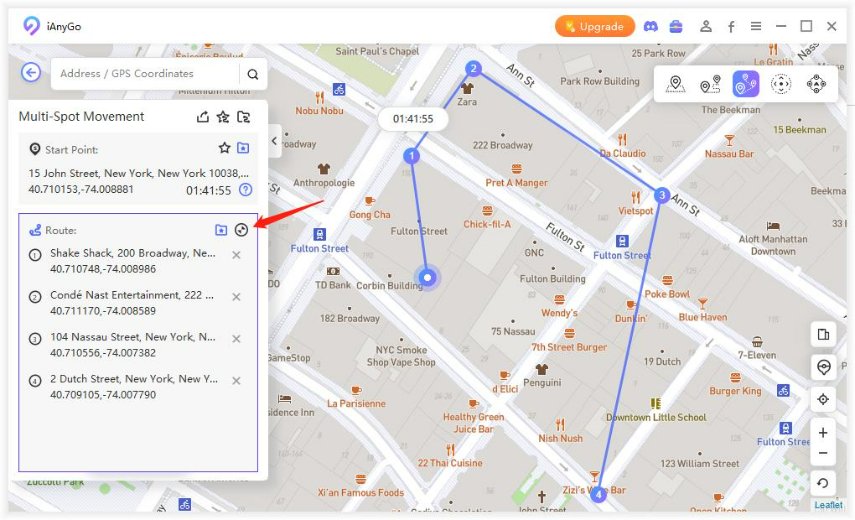
Select more than one location on the map, and set up the speed as well as the number of round trips. After that, click “Start to Move” to simulate the GPS movement at the customized speed.
You can change speed during movement to make simulated scenarios more realistic.
Note:
Drag the mouse pointer in the map to adjust the location .You can expand or collapse the Route option by clicking the button (as shown).
Part 4. How to Control Movement Direction with Joystick or Keyboard
Now Tenorshare iAnyGo has integrated the Joystick feature to flexibly control the GPS movement. The joystick allows you to easily change the direction at any time. Here is a simple step-by-step tutorial for your reference.
Video
Step 1 Choose the “Joystick Movement” Mode
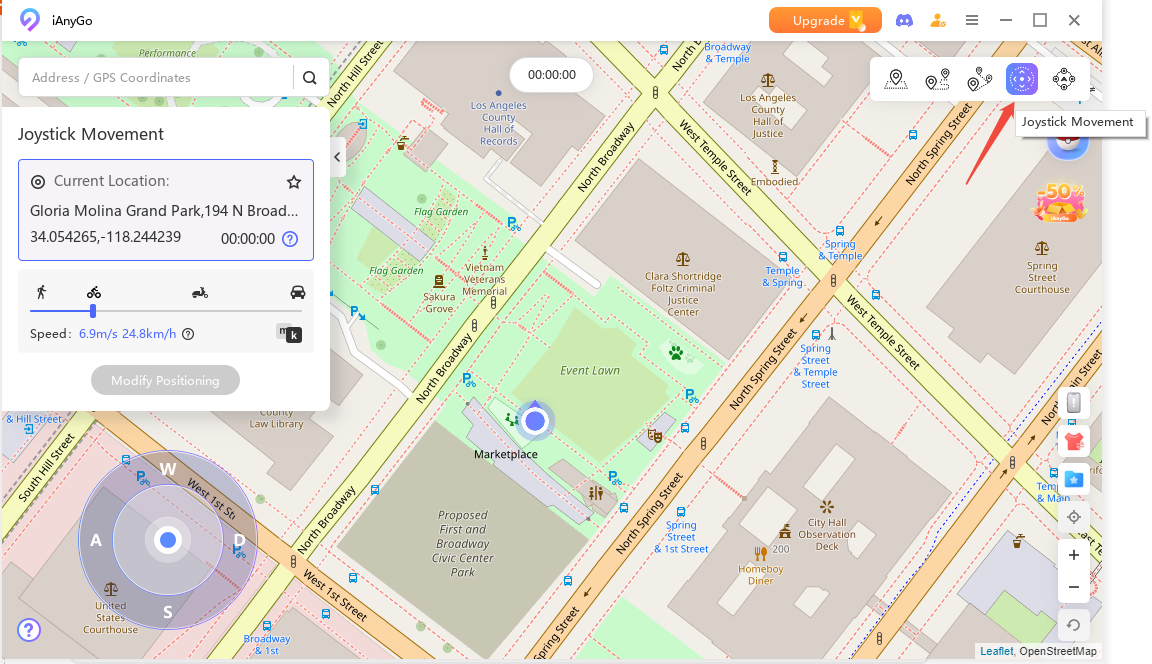
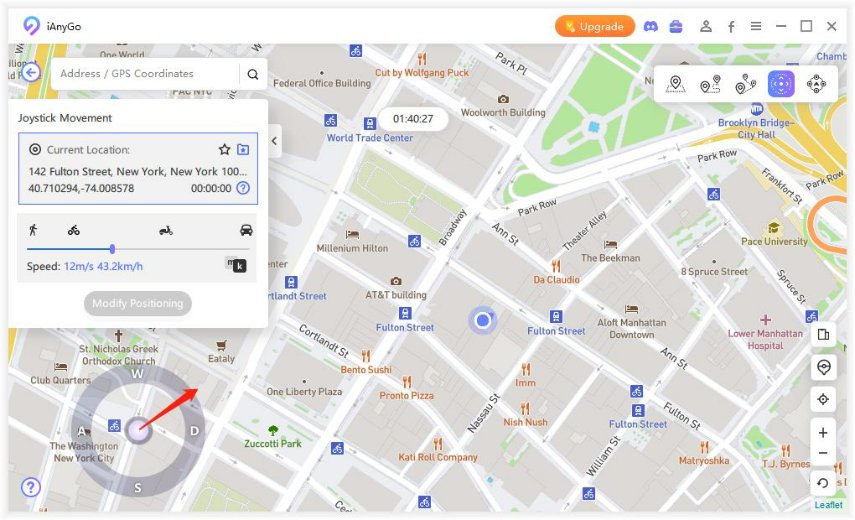
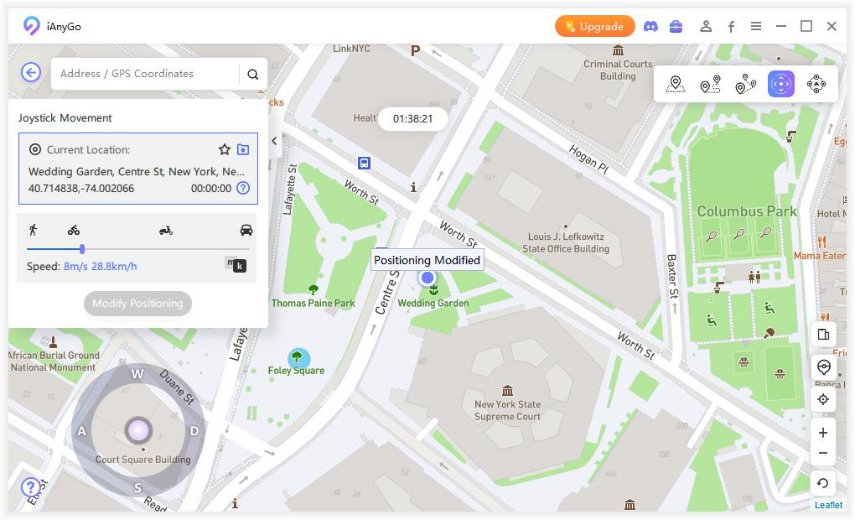
Launch the program and connect your device to the computer. Choose the "Joystick Movement" mode (the 4th one) on the home screen. After that, you can find the joystick in the lower-left corner of the screen.
Step 2 Set The Movement Speed
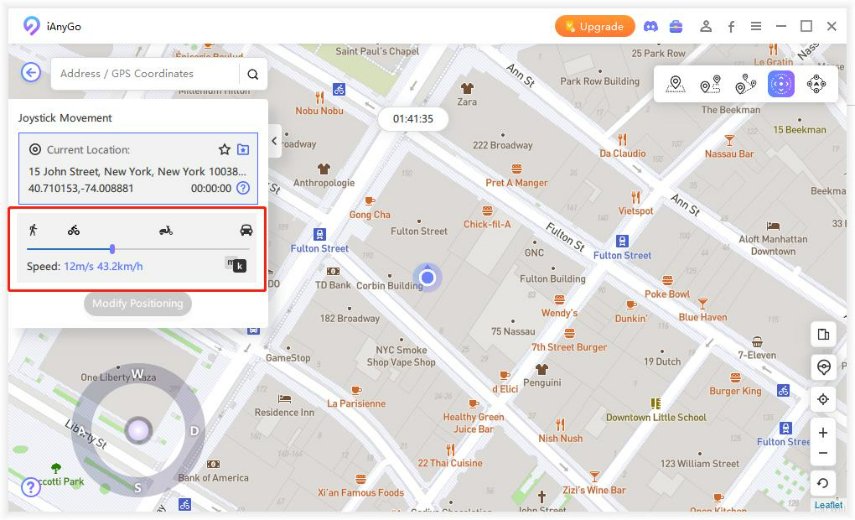
Drag the slider to set the speed you would like to move. You can choose walking, cycling, or driving speed. Its fastest speed can reach 72 kilometers per hour.
Step 3 Use Joystick to Start An Automatic Movement
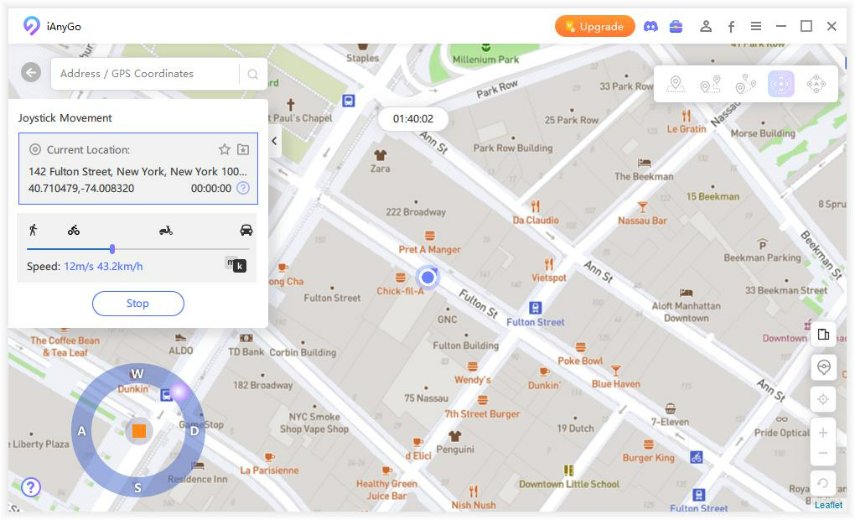
Drag the middle button to the circle and release it, then the GPS will start to move automatically at the set speed. You can tweak the direction freely in 360 degrees during the movement. (Note: the mouse pointer should also be placed in the circle when you drag the middle button.)
Manual GPS movement: You can also change the direction by using the Left and Right arrow keys on the keyboard during the movement.
Tips
Tip 1. You can scroll the mouse to zoom in on the map. This allows a better view of the GPS movement.
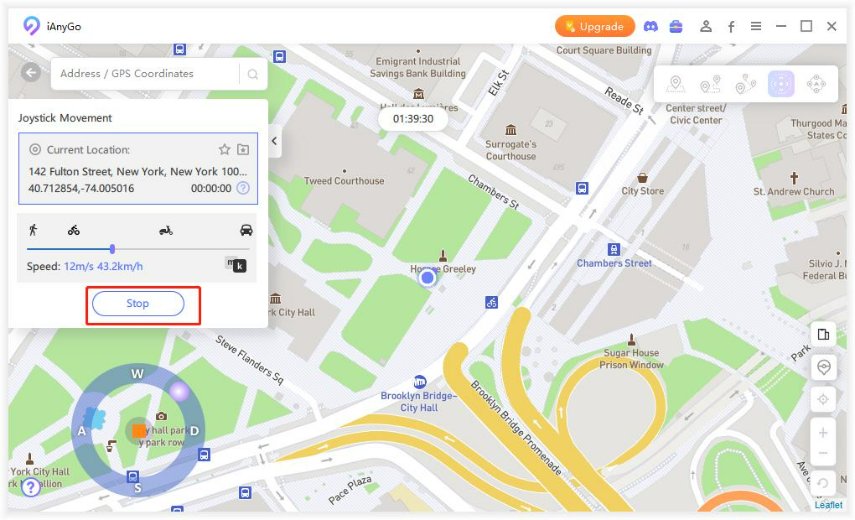
Tip 2. The movement can be stopped or paused whenever you want. Stop it by tapping the middle button. Otherwise, check the top left corner of the screen and press the “Stop” button. After that, the button will be grayed out.
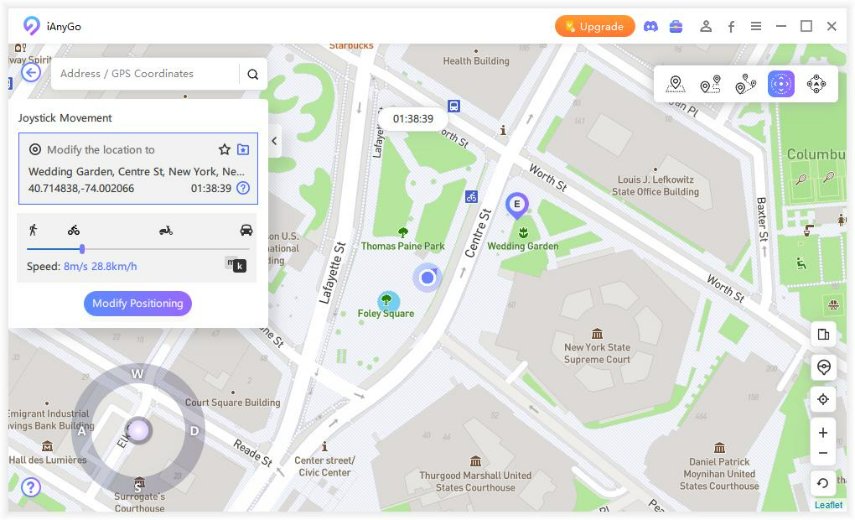
Tip 3. You can change the position by using the joystick movement. Select your preferred location or input its address into the search box and tap “Modify Positioning”.
This will change the GPS location instantly.
Part 5. How to Jump Teleport Phone’s GPS Location to Any Custom Coordinate
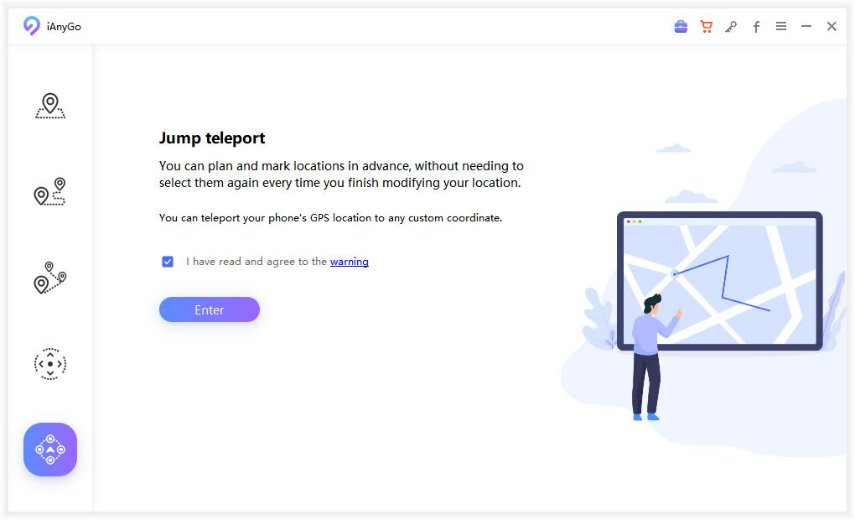
Good News! Tenorshare iAnyGo has integrated new feature, Jump teleport, helping you teleport your phone's GPS location to any custom coordinate. If you are a pokemon player, you can mark multiple pokestops or rare Pokémon coordinates and jump straight up.
Video
Step 1 Choose the “Jump teleport” Mode
Launch the program and connect your device to the computer. Choose the "Jump teleport" mode (the 5th one) on the home screen. Click “Enter” to start your jump experience.
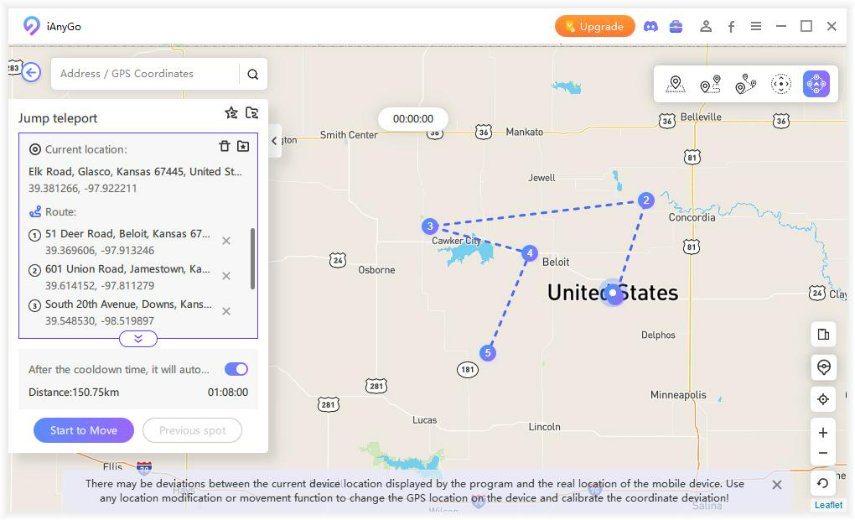
Step 2 Select Destinations or Route Nodes
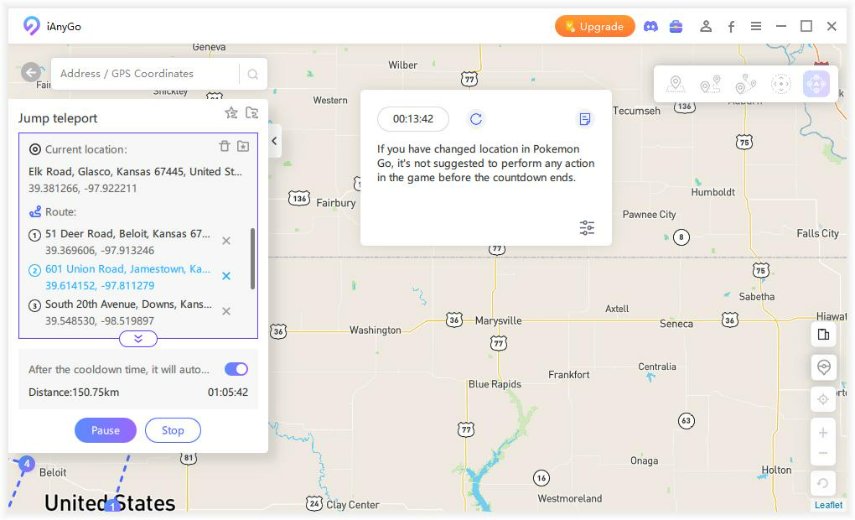
Please select your destinations or route nodes on the map. Click “Start to Move” to jump between different spots.
Tips
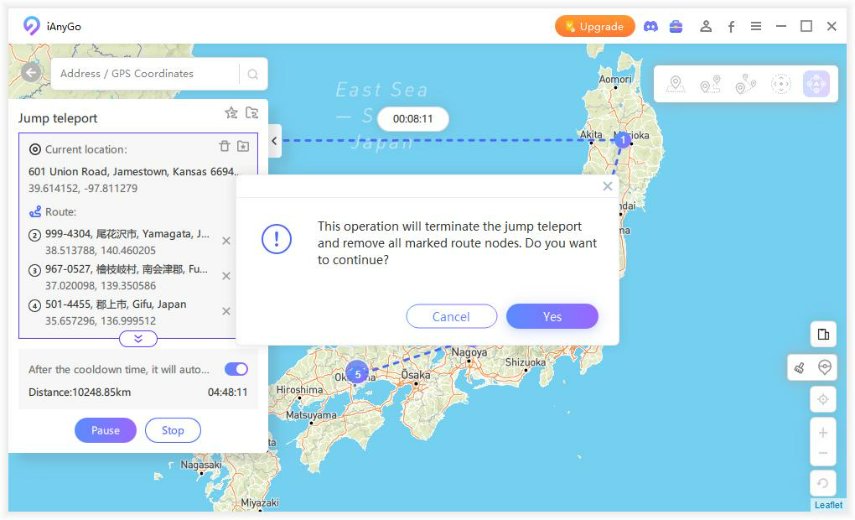
Tip 1. You can stop jumping at any time by clicking "Pause" or "Stop".
Tip 2. If you have changed location in Pokemon Go, it’s not suggested to perform any action in the game before the countdown ends.
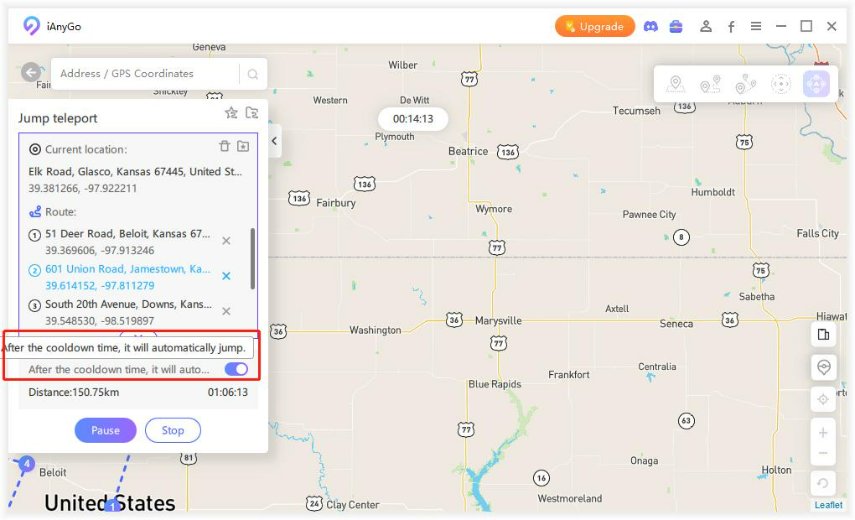
Tip 3. If you want to automatically jump after the cooldown time, you can open the switch.
Part 6. How to Get Pokestop by Scanning Pokestop & Gym
Video
Step 1 Scan Pokestop & Gym
Click on the second icon in the lower left corner to scan Pokestop & Gym nearby. Then tap “Start to Move” after selecting your route. iAnyGo will automatically scan for Pokestop & Gym near the selected location.
Step 2 Select a New Route Node
If there is no game landmarks found near the current marked location, there will be a reminder. You should select a new endpoint or route node.
Step 3 Wipe out Marked Location
Tap on “Clear” icon to wipe out all marked locations. Now you can mark and find new game landmarks again.
WiFi Connection/Driver Issues
1. I've linked several devices and now wish to remove one. How can I go about it?
If the connection is through Wi-Fi, switch the device or computer to a different network or disable Wi-Fi. As long as they're not on the same Wi-Fi network, iAnyGo won't detect the device.
For connections via a USB cable, just unplug the data cable.
2. What to do if the Wi-Fi connection keeps failing?
- Switch the network on the computer, trying wireless network if it's broadband network.
Be sure to disable the previous network card:
Win 10: Control Panel >> Network and Internet >> Network Connections >> right click to "Disabled" the previous network card.
Win 11: Control Panel >> Network and Internet >> Advanced Network Settings >> Disabled the Local Network.
Note: Wi-Fi connection is supported for iOS 18 devices.
3. What to do if the Driver installation keeps failing?
- Update to the latest Windows version.
Delete and reinstall the old driver.
Windows >> Device Manager >> View >> Show hidden devices >> Network adapters >> Tenorshare tsncmdevice >> right click to "Uninstall".
4. How to reset the location or maintain the fake location in iAnyGo when disconnected?
When you close the iAnyGo application on your computer, your fake location will be retained. If you want to restore your device to the real location, you need to restart your device.
Game Mode + Bluetooth Device Connection Tutorial
Video
1. Select Game Mode
From the Windows User' main interface, select the Game Mode option to spoof your location in the original game APP now.
2. Bluetooth Connection Tutorial
Step 1 After entering the Game Mode, select the device (PC or phone) to connect automatically.
- For iOS 18 or lower, go to the Bluetooth settings page and click to connect.
- For iOS 18 and above, swipe down from the control center Bluetooth menu and click to connect.
- If the connection fails, turn off and then turn on Bluetooth again, and click to reconnect.
Step 2 Once successfully on the map page, turn off Location Services, Cellular Network, and Wi-Fi, wait 10 seconds, and then turn them back on.
Step 3 When re-entering game mode for virtual location, manually correct any location deviation.
Step 4 If the above steps fail, try restarting the device and reconnecting.
Was this page Helpful ?
Still Need Help?
Just contact our support team and we will reply to you within 24 hours on business days.
Contact Support