How to Boot Windows 10 from USB Drive – 2025 Guide
Like it or not, optical disks have past their prime time. It’s been replaced by the faster and higher capacity USB flash drives. More and more PCs are abandoning the optical drive in favor for USB ports. So when the time comes to boot from Windows 10 installer, you need to have a bootable USB handy.
But how do you get a bootable Windows 10 USB drive? And how do you set your Windows 10 PC to boot from the USB?
Part 1: Creating Bootable Windows 10 USB Drive
Even though Microsoft does sell bootable Windows 10 USB drives, you can create your own. You’ll need a USB flash drive of at least 4GB, the minimum 6GB to 12GB of free space on your hard drive, and an Internet connection.
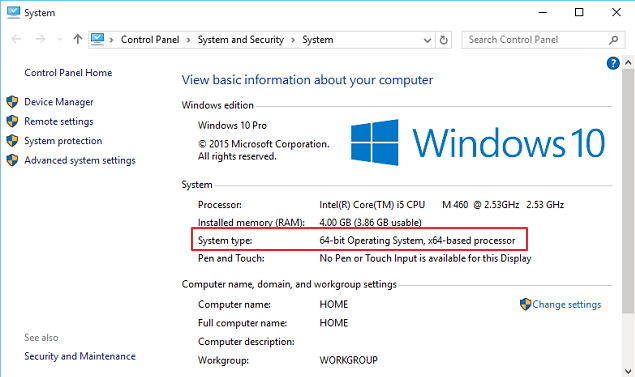
First, check what type of Windows do you need. Hold the Windows key on your computer and press the pause/break button. The information is available under “System type”. Then you can download the Media Creation Tool for the 32-bit copy or 64-bit copy of Windows.

Then launch the tool, and you’ll see the option to upgrade or create installation media. Choose the second one and hit next.

Follow the steps and choose the options that fit you best. Please note that the N variants of installer don’t come with Windows Media Player. Don’t forget to select USB as the media type.
- After checking the available space, the tool will continue by downloading Windows 10 installer. The process could take a while depending on the speed of your internet connection.
- And when the download finished, the tool will automatically create a bootable drive using the USB that you choose.
- Please note that it will erase everything on the drive, so be sure to save the important files before starting the process.
- The process is simple as everything is done automatically by the tool. Another option is to create the bootable drive manually using the command prompt. But why use the more complicated way if you have the easier way? So we’re not going to discuss the command prompt path.
Part 2: Booting Windows 10 from the USB Drive
Most computers are set to boot from the primary hard drive by default. But you could change this configuration from the BIOS. You can access BIOS when you start or restart your computer.
Because there are virtually too many different startup setups, you should consult your documentation. But in general, you should restart your computer and press one of the Function Keys to enter the BIOS. Then you navigate the BIOS menu using the arrows and enter keys.
After confirming the changes, your computer would restart once more, and it will boot from the USB. Make sure that you’ve already inserted the bootable USB that you created above before the restart.

Since the USB is already configured with Windows 10, the booting process will use it. All that you need to do is to follow the onscreen process.
The Booting Specialist
To help you make the whole booting process easier, you could use some help from an app called Windows Boot Genius. This is the ultimate Windows boot doctor that can help you easily create a bootable Windows 10 USB drive and fix a variety of Windows 10 booting issues including computer crashes, blue screen, random restarts, can't boot, and other Windows' booting problems.

Speak Your Mind
Leave a Comment
Create your review for Tenorshare articles

