How to Convert HEIC Photos? Look at These 6 Ways
“I just noticed that one of the new features of iOS 11 is the new image format .heic (instead of .jpg). When the files upload to Dropbox, they stay in .heic. I'm trying to convert HEIC to JPG. I can't find any software that can do this. Anyone knows of a trick to fix it? Thanks!”
HEIC is a new photo format used by default in iPhone 7 or later models in iOS 11. The new format allows you to keep a photo at half file size without any loss of quality, which can greatly save your iPhone storage. Since HEIC is newly adopted, the incompatibility is inevitable. You may need a more common format, like JPG. Here are 6 easy ways to change HEIC to JPG on iPhone.
- Method 1. Set Default Format from HEIC to JPG
- Method 2. Automatically Change HEIC to JPG in iOS 11
- Method 3. One-click to Transfer HEIC to JPG with No Definition Loss
- Method 4. Convert HEIC to JPG by Emailing
- Method 5. Transfer HEIC to JPG through OneDrive on Windows
- Method 6. Transform HEIC to JPG on Dropbox
Method 1. Set Default Format from HEIC to JPG
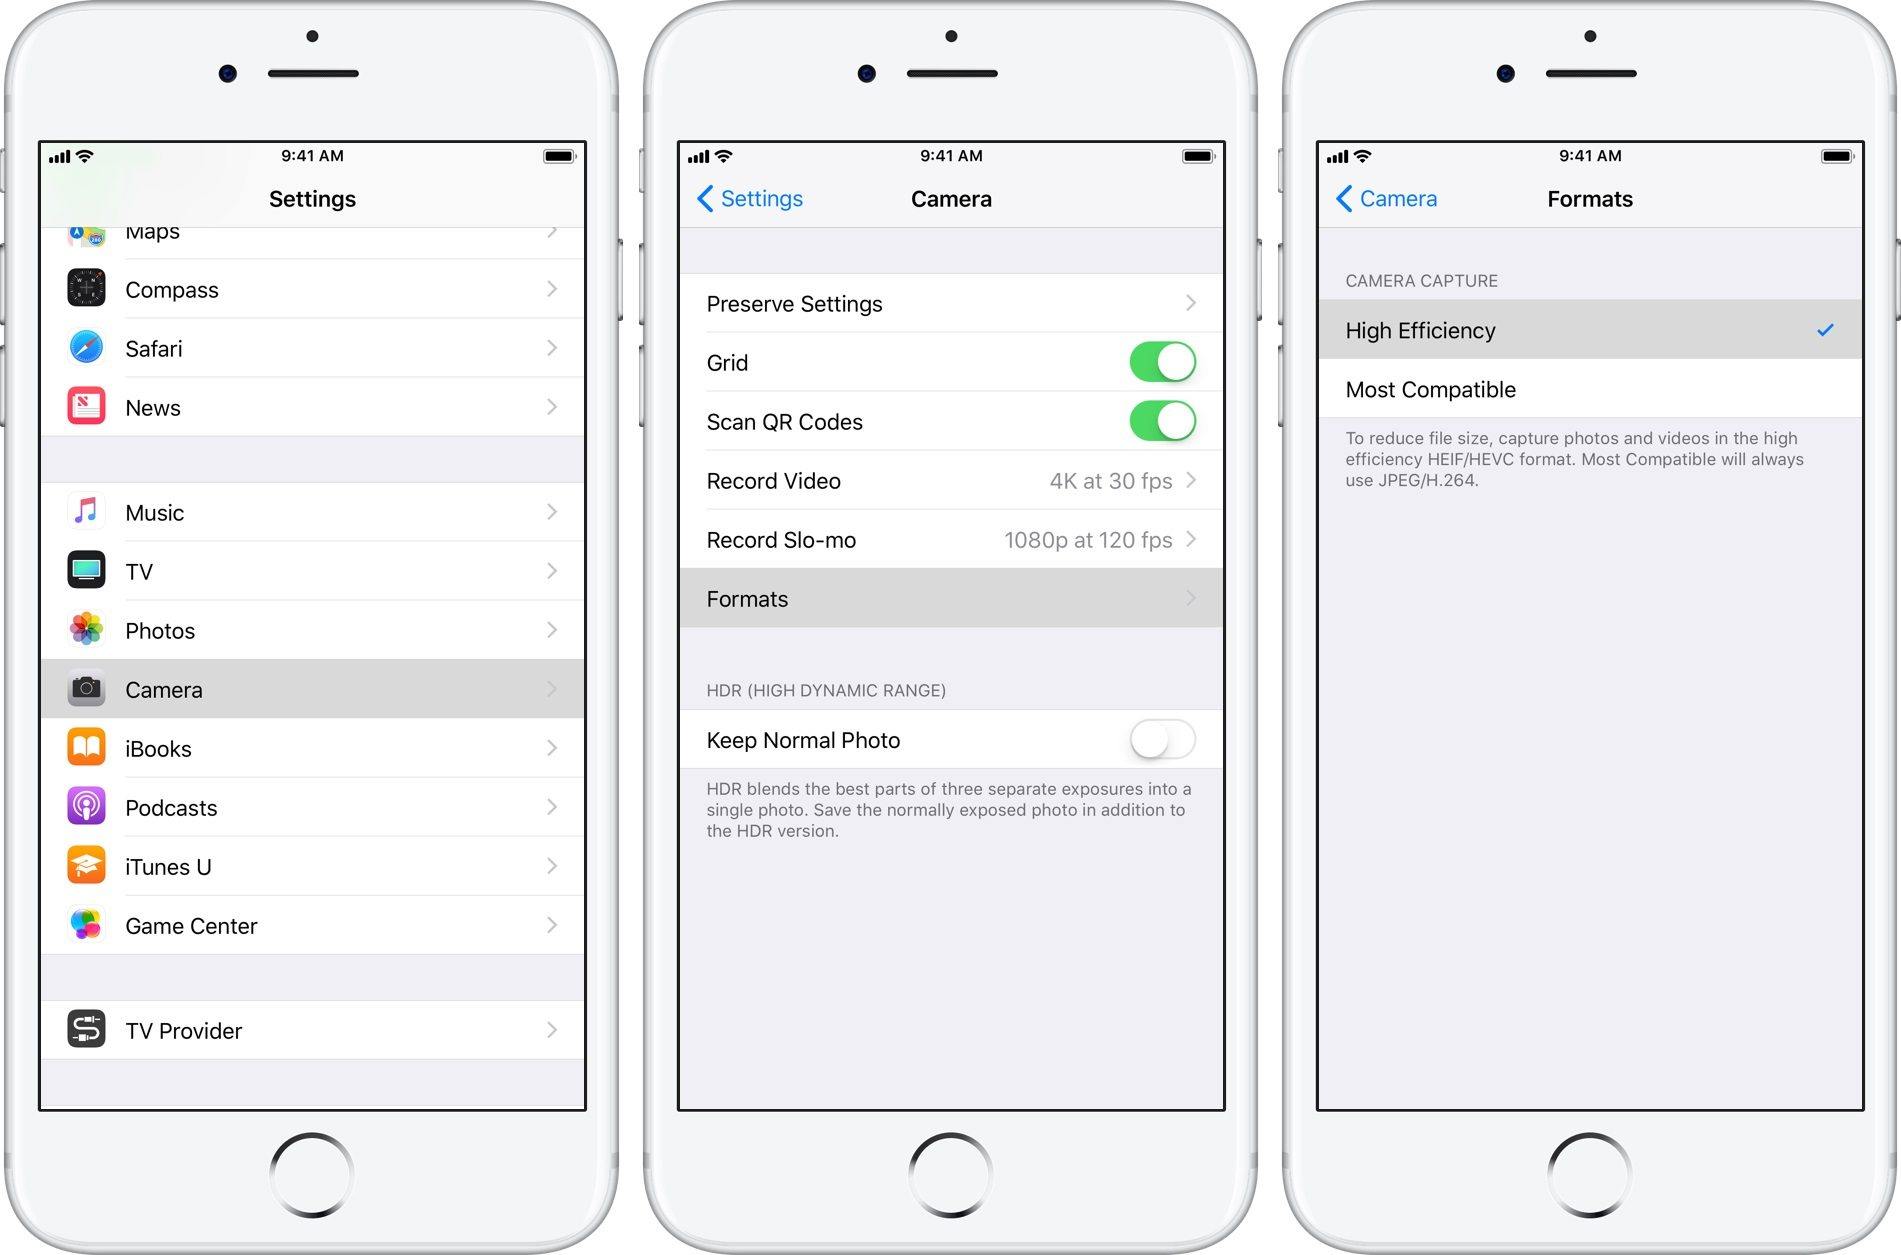
If you don’t want to use HEIC any more, you can just disable this new feature on iPhone. Go Settings>Camera>Formats>switch off High Efficiency under CAMERA CAPTURE. After that, your default photo format will change to the most compatible format, JPEG.
Method 2. Automatically Change HEIC to JPG in iOS 11
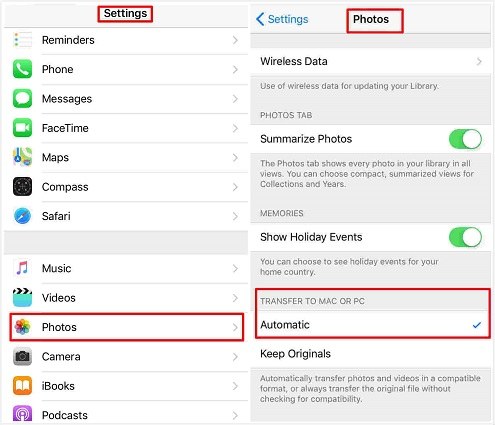
This method is very helpful when you need to transfer photos from iPhone/iPad to PC/Mac. It will convert HEIC to JPG automatically during transferring. Go Settings > Photos > select Automatic under TRANSFER TO MAC OR PC.
Method 3. One-click to Transfer HEIC to JPG with No Definition Loss
If you want to transfer photos from iPhone to PC/Mac and change HEIC to JPG without losing definition, an iOS file transfer tool, Tenorshare iCareFone, can greatly save your time and effort. It allows you to preview HEIC photos, which cannot be read in Windows explorer. It will convert HEIC photos to JPG files during exporting. Moreover, it can manage various iOS files one by one or in bundle, such as Apps, Contacts, Photos, and Videos etc.


Step 1. Download and install Tenorshare iCareFone, connect your iPhone/iPad to PC/Mac. Run Tenorshare iCareFone.
Step 2. Click “File Manager”>select “Photos”>choose the target photo album. All the photos will be displayed.
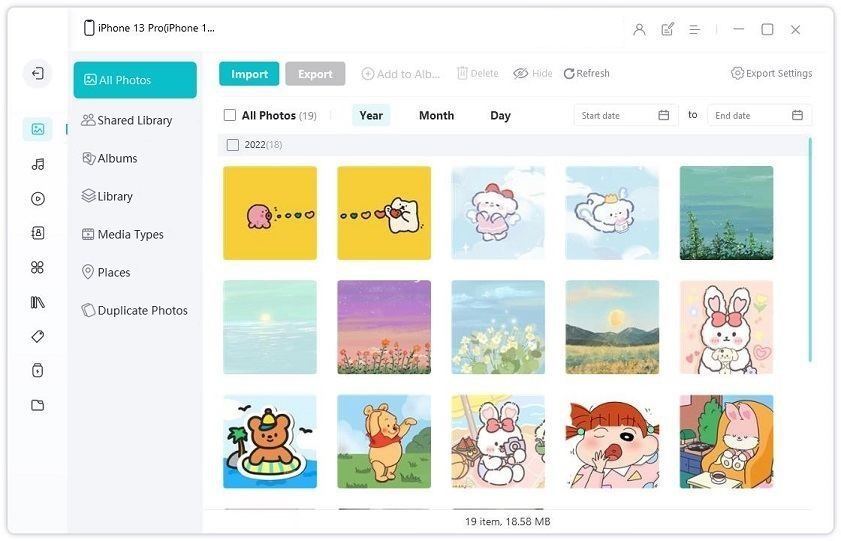
Step 3. Select the HEIC photos you want to move from iPhone/iPad to PC/Mac. Click “Export”.
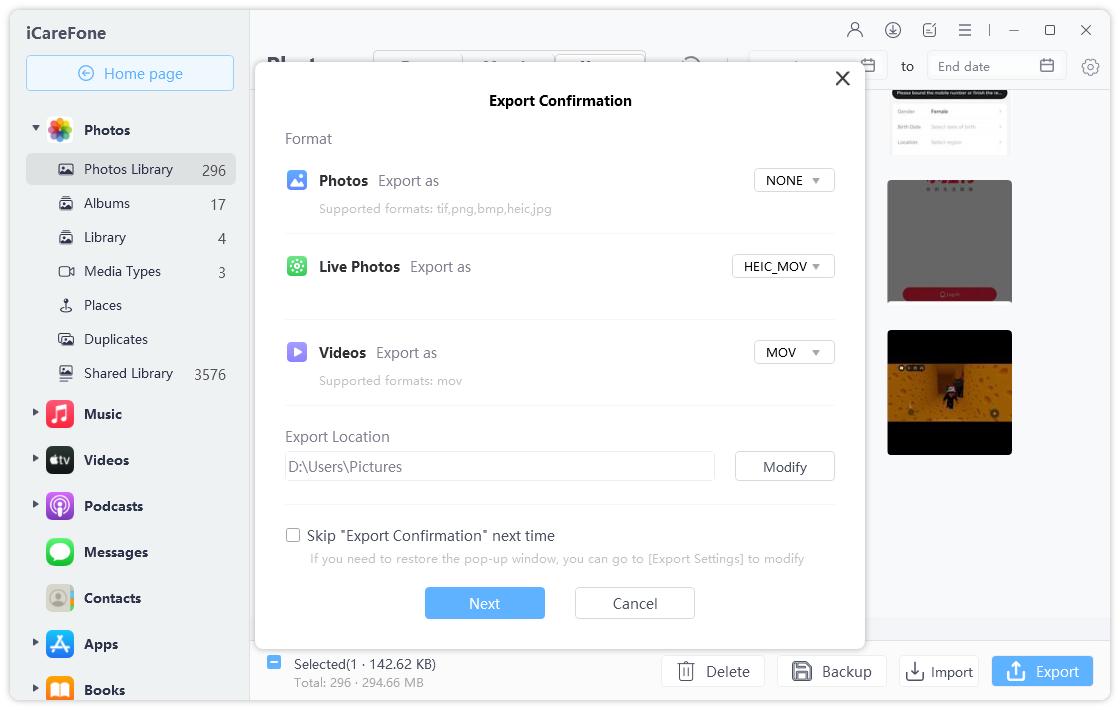
All your HEIC images will be converted to JPG on PC/Mac after exporting. In addition, Tenorshare iCareFone can also support to transfer photos from PC/Mac to iPhone.
Method 4. Convert HEIC to JPG by Emailing
You can also change HEIC photos to JPG by emailing yourself. Just sent them as an attachment. It will automatically convert to JPG. However, emailing will undoubtedly compress your photos and there is limitation to the file size.
Method 5. Transfer HEIC to JPG through OneDrive on Windows
The latest OneDrive can automatically convert HEIC to JPG on Windows 10 before uploading to the cloud. Users can view HEIC photos on Windows 10, OneDrive mobile app and OneDrive website.
Go to Settings > Advanced and turn on the Upload Most Compatible feature on OneDrive.
Your HEIC photos will be converted to JPG without using any HEIC to JPG converter.
Method 6. Transform HEIC to JPG on Dropbox
The latest Dropbox enables user to upload HEIC image and save as JPG file. Your HEIC photos will be changed to JPG automatically during uploading.
Step 1: Open the Dropbox app.
Step 2: Tap the gear icon on the upper right corner and choose Camera Uploads.
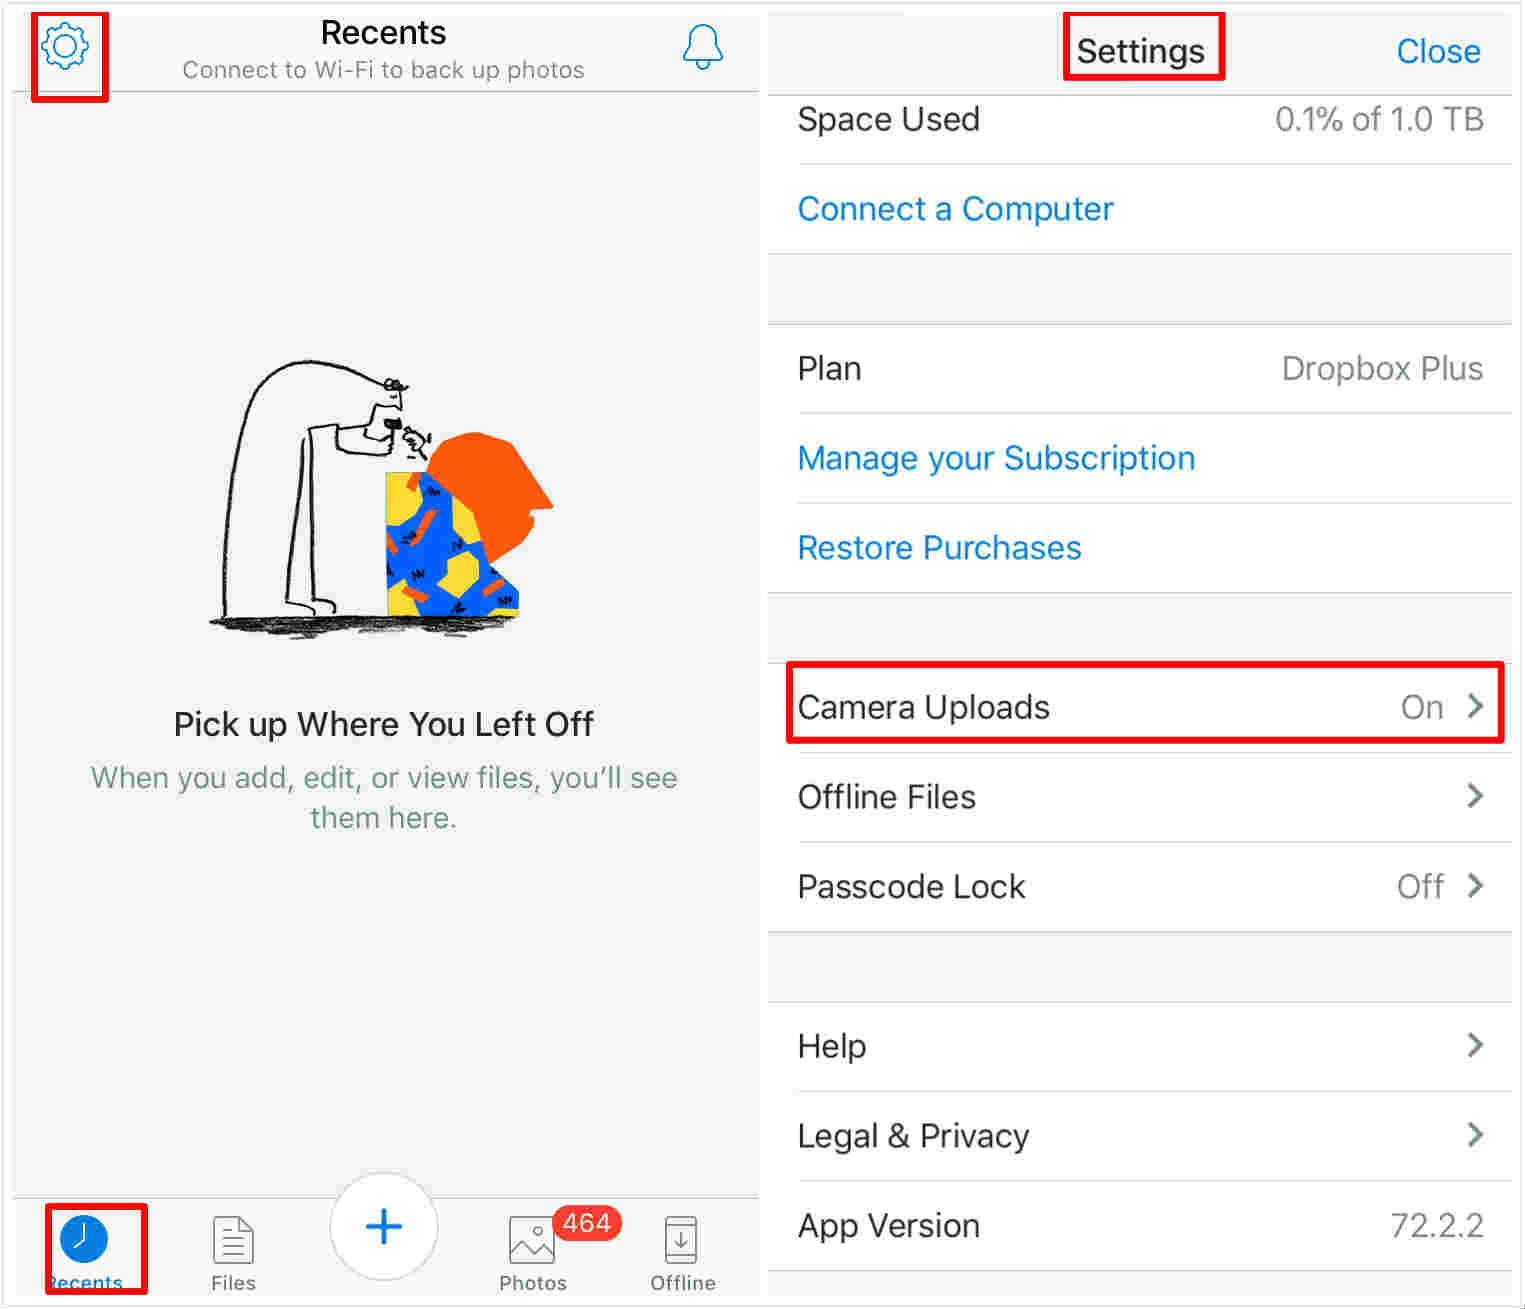
Step 3: Choose Save HEIC Photos as and choose JPG as upload format.
Bottom Line
That’s all for how to transfer HEIC to JPG. If you want to transfer existing HEIC photos to JPG files without losing quality, Tenorshare iCareFone can be your best choice. If you have any other problems, please leave your comment.


Speak Your Mind
Leave a Comment
Create your review for Tenorshare articles

Tenorshare iCareFone
Best Free iPhone Transfer & iOS Backup Tool
Easily, without iTunes


