How to Jailbreak My iOS Device on Windows
Before you bypass the iCloud activation lock, you need to jailbreak the iOS device. Because there is no jailbreak tool for Windows system, you can follow this tutorial to create a jailbreak environment on a Windows computer and then jailbreak your iOS device.

If you have a Mac (for macOS 10.13-10.15), it's suggested that jailbreaking your iOS device would be a better choice.
A Video Tutorial: How to Jailbreak on Windows
What Should You Prepare Before Jailbreaking?
Here is a need-to-do list before you jailbreak the iOS device on Windows.
- Make sure your computer runs Windows 7 or later, 32 or 64 bit.
- Get a USB flash drive with more than 2 GB capacity.
- Download checkn1x-1.0.6-amd64.iso.
- Download rufus-3.1.1.exe.
Step-by-Step Guide on How to Jailbreak on Windows
Step 1. Burn the checkn1x ISO file to the USB flash drive
- Insert the USB flash drive into your computer.
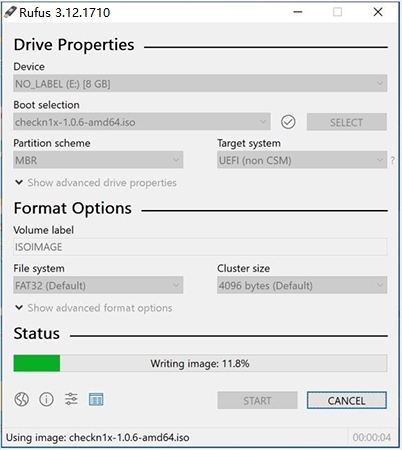
- After downloading the file Rufus, click Rufus to open the application.
Click the “SELECT” button to find the downloaded checkn1x ISO file. Leave the other options as defaults, and then click “START”.

Then a warning message pops up saying the data on your USB flash drive will be formatted(If necessary, please back up your USB flash drive). Then select the "Write in DD Image Mode" option, and then click OK.

It takes 2 or 3 minutes to burn checkn1x ISO file to USB flash drive.
When the burning process is completed, click the "CLOSE" button.


When the checkN1x ISO file is burned, please unplug and reinsert the USB flash driver into your computer in case the system doesn’t recognize it.
Step 2. Start to Jailbreak with checkN1x
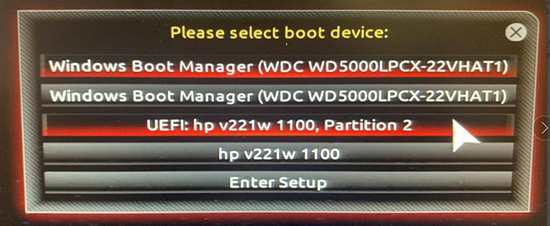
- Restart your computer. When the computer is powered on and loaded in the meanwhile, press F12 (Boot Menu).
In the startup window, select the USB flash drive that just burned the checkn1x ISO file.
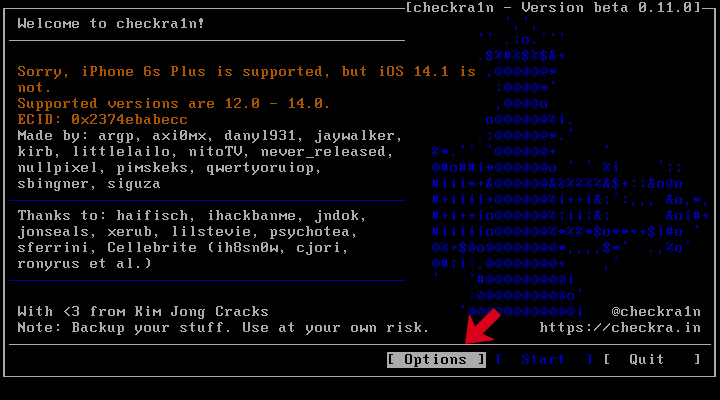
After you've launched the Checkra1n, connect your iOS device to the computer. Then select the Options from the keyboard arrow key and press Enter to set the jailbreak tool.
From the Settings screen, select Allow Untested iOS/iPadOS/tvOS versions option from the keyboard arrow key, and press Enter to select it.
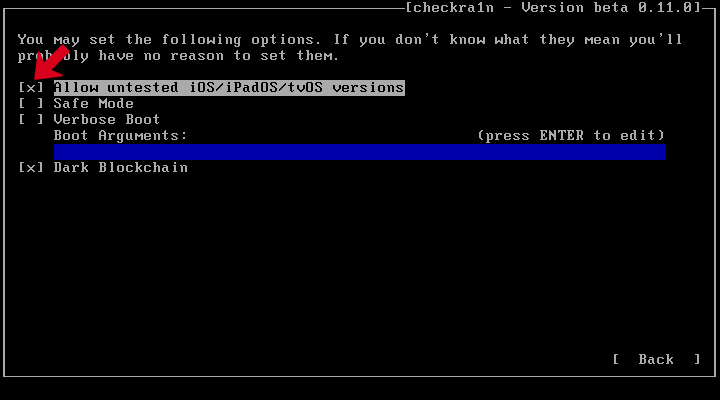
After selecting "Skip A11 BPR check", press Enter to select.

Then choose the Back button and press Enter to back to the main interface.

After you hit the Start button, press Enter to jailbreak your iOS device.
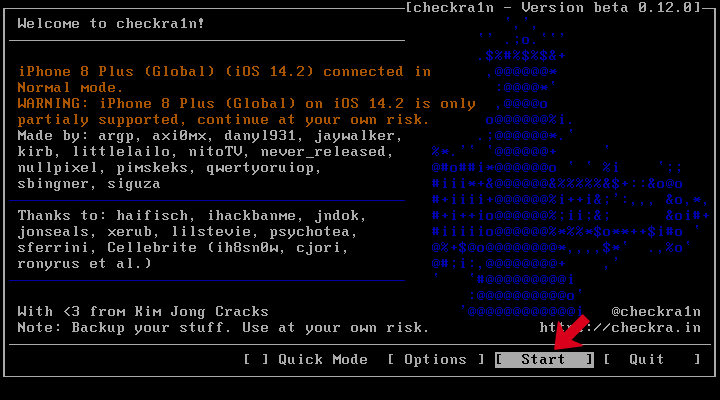
After the checkn1x tool is initiated, connect your iOS device to the computer, and you will see a connected reminder in the program. The select the Start option from arrow keys the on your keyboard and press the enter key.

To jailbreak your iOS device, CheckN1x requires your device be in DFU mode. Select "Next" and the program will direct you to DFU mode.

Check the "Next" option and Checkn1x will automatically put your iOS device into recovery mode first.

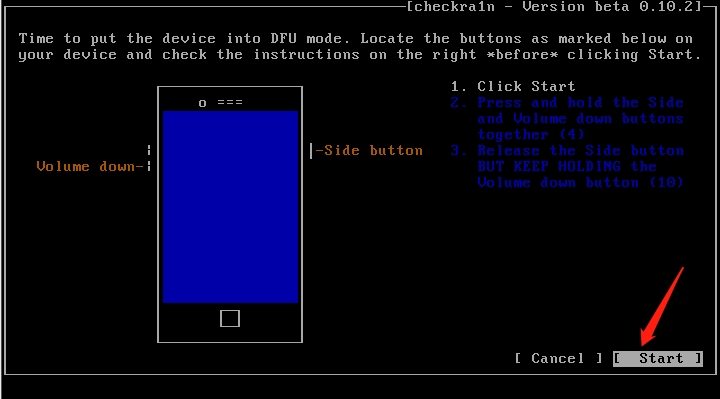
Select the "Start" option, and then follow the instructions on Checkn1x to put your iOS device into DFU mode.
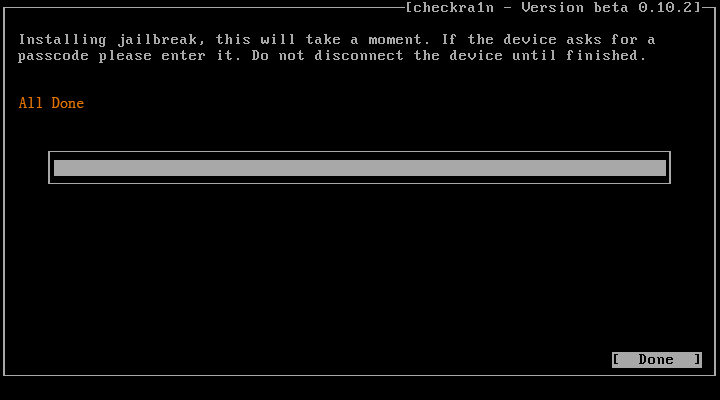
After your device enters DFU mode successfully, Checkn1x will automatically jailbreak your device. When the jailbreaking process is completed, select "Done" and unplug the USB flash drive.
For most branded computers, the shortcut key to "Boot Menu" is F12. If F12 is invalid, refer to the following "Boot Menu" shortcuts
If your computer is unable to enter the "Boot Menu", try entering the COMPUTER BIOS/UEFI and modify the system Boot entry Settings to enter the Linux CheckRA1n environment. For detailed guide, please check the following:
BIOS/UEFI Settings: How to Boot Your Computer from USB/CD/DVD
How to Set Boot Computer from USB/CD/DVD


If you have an iPhone 8/8 Plus/ X with iOS 14 system, you need to tick "Skip A11 BPR check" option .
You could not jailbreak an iPhone 8/8 Plus/ X running iOS 14(with lock screen passcode). If with lock screen passcode, please have a deep flash of the firmware firstly, and try to jailbreak again.


Tip 1: If the jailbreaking process gets stuck:
- Change a different USB flash drive and try to jailbreak again.
- Restart your iOS device and computer and try to jailbreak again.
Tip 2: If jailbreak failed:
Re-plug your device into the USB port on the back of your computer host and try again.
Tip 3: Notes for iPhone 8/8 Plus/ X devices with iOS 14 system:
For Phone 8/8 Plus/ X with iOS 14 system before jailbreaking, they should be in inactive and without any lock screen passcode.
Remove iCoud Activation Lock On iOS Device
After your device is jailbroken successfully, restart the computer, and your computer will automatically enter the Windows operating system. Please use Tenorshare 4MeKey to remove the activation lock of the iOS device. Here comes the Tenorshare 4MeKey Remove iCloud Activation Lock Tutorial.


