How to Fix Windows System Resources at 100% When Nothing is Running
You are looking at your screen, confused. The computer is unresponsive and frozen, the fans are blaring at the top speed trying to cool down the CPU temperature, and everything becomes unusable. The problem is, you can't see any running application on the screen.
What happens? And what can you do to fix the problem?
Part 1: Why Windows System Resources at 100% When Nothing is Running?
If you've ever watched one of those hackers movies, you will likely to see someone with thick eyeglasses typing something in front of the black computer screen filled with white text scrolling up. Those who have been around long enough in the computing world will know that is more or less what using computer looked like before Apple introduces Graphical User Interface to the personal computer.
GUI takes the personal computer to the masses. What was once a scary and mysterious machine with complicated codes and programming languages to learn, now is a friendly box with an easy point and click operations that even an elementary school kid could use.
But while GUI indeed makes using the computer so much easier, it has at least one drawback compared to the ugly text-only interface. With GUI, you only see what you need to see, and you don't know what's running in the background.
What does the history of GUI have anything to do with our topic? To put it simply, if you see nothing running on the screen doesn't mean that nothing is running. There are tons of processes happen in the background. It's just that the pretty GUI doesn't show you that.
So, the first thing that you need to do when your computer resources at 100% even when nothing is running is to check these background processes.
Part 2: How to Check Background Processes on Your PC?
To peek behind the screen, you need the help of some tools.
Task Manager
The first tool that you should try is Task Manager.
The easiest way to open the tool is to press Ctrl + Alt + Del to bring out Windows Security screen. From there you will have to option to open Task Manager by clicking Start Task Manager.
You could also right-click the taskbar and choose Start Task Manager from the pop-up menu. Or another popular way for older Windows is to press Windows + R to open the Run dialog and type taskmgr and hit OK.

After opening the task manager, go to the Processes tab, sort the table, and find out your culprit.
Resource and Performance Monitor
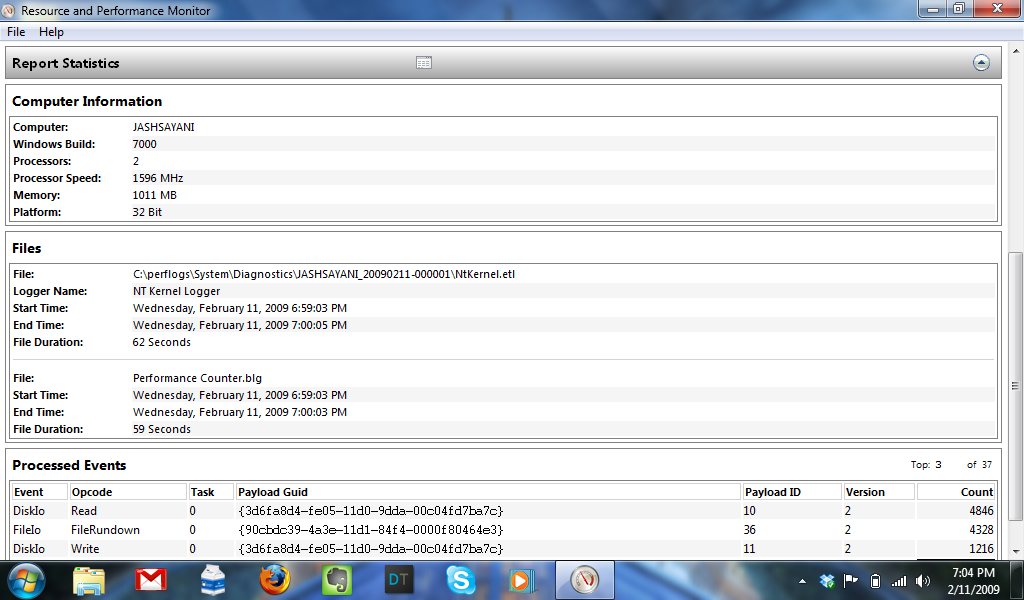
If you tried Task Manager and still can't find what causes your system to max out, you need a more comprehensive tool. Here's where Resource and Performance Monitor comes in. This tool will show you more details on what processes are running in the background, even things that are not shown by Task Manager.

To open the tool, type perfmon.exe in the search box and hit enter.
Part 3: How to Fix High CPU/RAM/Memory Usage Issues on Windows 10/8/7?
There are several possible scenarios on what's eating out your system resources. To find out which ones, try disabling some of these services and check back with either Task Manager or Resource and Performance Monitor to know whether the solution helps.
Disabling Possible Culprits Using Command Prompt
Some of these solutions require you to run the command prompt as an administrator. So before you do anything else, type cmd.exe in the search box. From the list of choice, right click Command Prompt and choose Run as administrator, then choose Yes for confirmation.
And here are the processes that you could try to disable from the Command Prompt to cool down your system resources to the normal level. Type them down, press enter, and observe whether it helps.
These two features are known to be resource hogging. So it's a good idea to start with them.
- disabling Windows Search - type net.exe stop “Windows searchâ€
- disabling Superfetch Service - type net.exe stop superfetch

Reset Virtual Memory
Some computer comes with less memory needed to complete a process. To make up for limited memory of a computer, Windows makes use of the available space left on the hard drive as virtual memory when needed. The concept is good but things can get out of hand in practice, and the virtual memory clogs up the storage and eats up the system resources.
To reset virtual memory, follow the steps:
- Go to Start > File Explorer. Right click This PC and choose Properties.
- Click Advanced System Settings on the left panel.
- Click the Settings button under the Advanced tab.
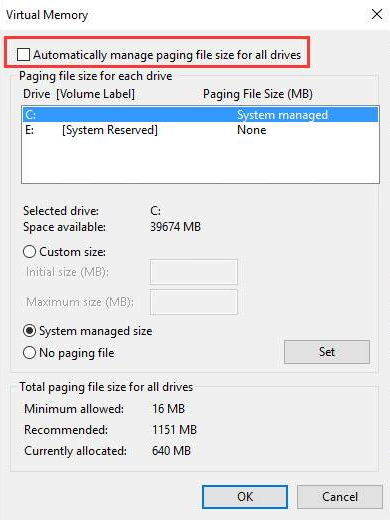
- Go to Advanced tab, and choose Change in Virtual memory category.
- Make sure the box before Automatically manage paging file size for all drives is off.
- Select your windows drive, that is where you store your Windows operating system(usually partition C), set the number accordingly. Then press Set and then OK to continue.
Please note that to avoid the virtual memory to become too bloated, you should set virtual memory to the recommended size of 1.5x the amount of installed RAM.

Disable Anti-Virus Software
Another known hogger is Anti-Virus software. Notice the plural form because there are usually more than one installed on every Windows computer. Even though those apps suppose to protect users from malicious attacks, constant full system scanning will eat out your system resources in no time.
Try to temporary disable them to see whether it helps to bring back your system to normal. If it does, consult the manufacturer for a solution or try to find another anti-virus that is more friendly to your system.
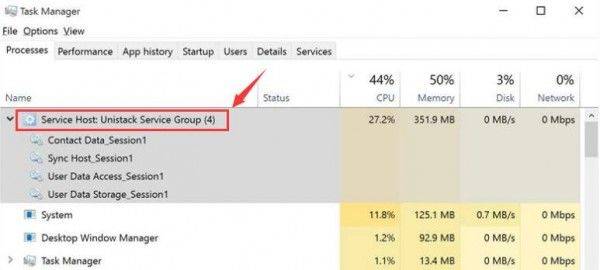
Since virus and malware attacks are part of Windows users daily life, Microsoft released its default anti-malware called Windows Defender which automatically enabled and occupy a majority of bandwidth usage and I/O as shown in this image.

To disable Windows Defender, click Start > Settings. In the search box, type defender and choose Windows Defender settings. Turn off the Real-time protection and Cloud-based Protection.
Virus, Trojan, Malware, and Such
But you also need to consider is that your computer has been infected with a malicious entity such as virus, trojan, malware, or something of that nature. They are notorious for being running in the background and silently modifying your system.
So your fixing attempt should be firing up your antivirus and hunting those nasty infections and kill them.
Preventing the Problem in Advance
There's an old saying: "an ounce of prevention is better than a pound of cure". It means that before your system become problematic, it's better to prevent the problem in the first place. To help you do that, you need the help from Windows Care Genius. This system care tool offers 22 powerful features to clean up junk files, speed up your PC performance, optimize Windows system and secure your privacy.
Speak Your Mind
Leave a Comment
Create your review for Tenorshare articles


