How to Upload Photos from iPhoto to Facebook
by Jenefey Aaron Updated on 2019-07-25 / Update for OS X
Social media has turned us from a very private being where everything inside the closed door will be kept inside, to the total opposite where people share everything to everybody from where they go for the holiday to what they have for breakfast. The new routines for eating out is hands off the meal before taking the food pictures and share them with the world.
One can argue that Facebook is the most popular social media today. Thus it's the ultimate destination for all the photos that we want to share. The SOP for sharing photos to Facebook is open the application - whether the web-based, desktop, or mobile - then locate and upload your photos from the interface. You could also take the photos using the Facebook app.
But what if you want to organize and edit your photos before sharing them? You will need several steps and use several different apps. Is it possible to cut the middlemen and upload photos directly from your photo organizing and editing app?
If you are using iPhoto on Mac, there's a quicker way to share photos straight from the app.
Steps to Export Photos from iPhoto to Facebook
Before being replaced by Photos in 2015, iPhoto is the default built-in photo manager in Mac. Even after officially retired from its duty, there are still tons of Mac users who use iPhoto to organize their photos by time, place and event description.
Note: If you have iPhoto 11 or newer, you can connect it with Facebook easily. Otherwise, you'll need Facebook Exporter for iPhoto to help you send the pictures from your iPhoto to Facebook.
To directly upload photos to Facebook from iPhoto 11 or newer, first, you need to select the photos that you want to publish.
Then go to Share menu and choose Facebook from the pop-up menu.

After that, you need to log in to your Facebook account and select the album that you want to add your photos to. However, if you only want to post single photos to your wall, click Wall.

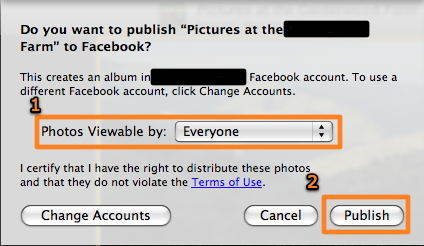
On the next window, choose an option from the "Photos Viewable by" pop-up menu. Please note that this option isn't available if you're publishing to your Facebook Wall. If you do that, you can add a caption for the set of photos instead.

The last step is to hit the Publish button and let iPhoto does its job. You can view your published album by clicking on your Facebook account in the Source list, or use the album in site same way you use any other Facebook album when you are on Facebook.
Protect and Recover Your Mac Data
The usual problem with keeping your photos on your computer's hard drive is that the data is prone to loss risk. Because as time has proven over and over again if something can go wrong, it will. Computer users around the world have experienced once too many times of losing their precious data.
Fortunately for Mac users, there's Data Recovery for Mac. This app is a complete Mac data recovery solutions to recover all types of files from Mac's hard drive and other portable devices like USB flash drive, external hard drive, SD card, iPhone, etc. on OS X 10.10 Yosemite, 10.9 Mavericks, and lower.
