How Do I Downgrade Back to Mojave after Update to macOS Catalina
by Jenefey Aaron Updated on 2021-06-04 / Update for Mac OS
“Recently I upgraded to macOS Catalina but I was disappointed. The new OS is equipped with several advancements and it is attractive as well. But the performance of the OS is not good and it is full of bugs. How do I downgrade?”
There are a lot of dedicated Mac users trying to downgrade back to Mojave. Apple pretty much messed up with the new upgrade and users are very disappointed. So, if you are among them and wish to go back to macOS Mojave, then read the article below.
- Part 1. Why You Want to Downgrade Mac OS Catalina to Mojave
- Part 2. What Should You Do Before Downgrading Back to Mojave
- Part 3. Common Ways to Downgrade to Mojave from Catalina
- Bonus Tip: How to Restore Data after Downgrading Back to Mojave without Backup
Part 1. Why You Want to Downgrade Mac OS Catalina to Mojave
The users are mostly trying to downgrade macOS 10.15 to an earlier version because they are very disappointed. There are a few advanced features with macOS Catalina but there are too many issues with the said OS. Here’s a look at the macOS Catalina issues;
- Catalina does not support 32-bit apps
- Mac stops booting after installing Catalina.
- Catalina's update gets stuck.
- Sidecar errors.
- Native instrument products are not compatible with Catalina.
- Keeps asking for Apple ID.
- Missing icons in Finder.
- I can’t connect to Wi-Fi or Bluetooth.
- iCloud gets lost.
- External drives, mouse, USB, keyboards not working.
Part 2. What Should You Do Before Downgrading Back to Mojave
These days, manufacturers recommend users to make a backup of their hard drives on a daily basis. It is for the protection of their files. Backing up is especially important if you are trying to downgrade macOS without losing data.
But the truth to be told, we will run out of reasons pretty quickly if we start talking about the importance of backups. So, just keep in mind that the most important reason is the protection of your precious data.
- The Mac could get damaged.
- The hard drive could fail.
- File recovery from an SSD will be very challenging.
- It is possible that you will lose the Mac.
- It could get stolen.
- Malware infection.
So, these are the possible accidents could happen to your Mac. And in the process, you will lose all your files. So, it is better to keep a backup file ready.
So, on your Mac, it is very easy for you to create a backup of your hard drive using the built-in Time Machine app. This is a great app; works perfectly. Here’s how to back up your Mac, before you downgrade macOS Catalina to Mojave;
Step 1: Connect your External drive to the Mac.
Step 2: An alert will appear on the screen, asking if you want to use this drive with Time Machine. Select ‘Use as Backup Disk’.
Step 3: If the said alert does not appear on the screen, then you need to format the external drive.
Step 4: After the connection is established, choose the ‘Storage Device’ and click ‘Use Disk’.
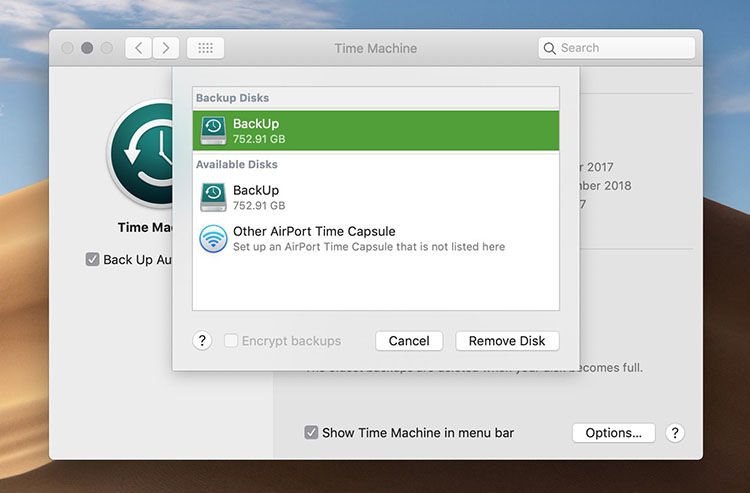
Now, you just have to wait as Time Machine creates and stores the backup files on the external drive.
Part 3. Common Ways to Downgrade to Mojave from Catalina
There are actually 2 official ways to downgrade macOS X. The procedures are pretty simple, designed conveniently for the users. Let’s have a look;
Way 1. Downgrade Mac OS Catalina to Mojave with Time Machine
The very first method to downgrade Mac we are about to discuss involves the use of Time Machine backup.
Time Machine is a built-in backup system, present on every Mac device. So, if you had created a backup file with Time Machine, then you will have no trouble at all to downgrade to Mojave from Catalina.
Step 1:Connect the Mac to the internet and click on the ‘Apple’ icon.
Step 2:Select ‘Restart’ from the drop menu.
Step 3:As the Mac restarts, hold ‘Command and R’ keys together. The ‘OS X Utilities Selector’ will open.
Step 4:Select ‘Restore from Time Machine’ backup. Click ‘Continue’ to proceed.
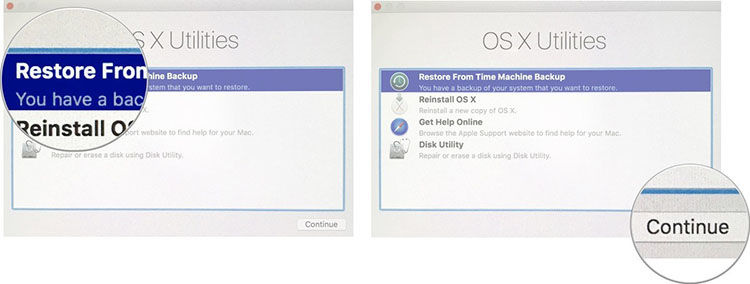
Step 5:Click ‘Continue’ again and choose the ‘Backup Source’ of your Time Machine backup.
Step 6: Click ‘continue’ to proceed. Now, just select the most recent ‘macOS Mojave backup’ and click ‘Continue’.
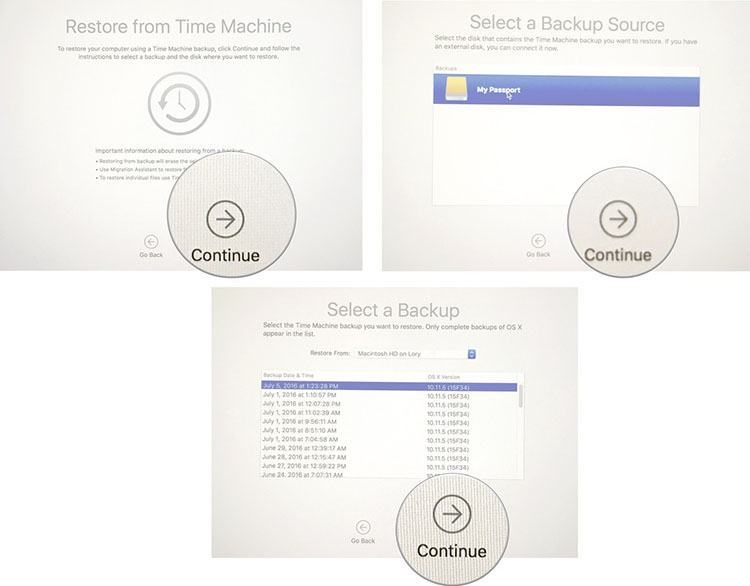
Immediately Mac will start restoring from that Time Machine backup. After the restore is completed, Mac will reboot.
Way 2. Using USB Driver to Create a Bootable macOS Mojave Installer
This is the conventional way to downgrade macOS. You have to simply erase the installed macOS 10.15 Catalina from your Mac and then install the Mojave version.
Here’s how to downgrade macOS Catalina;
Step 1:So, connect the Mac to the internet and click on the ‘Apple’ icon.
Step 2:Choose ‘Restart’ from the drop menu.
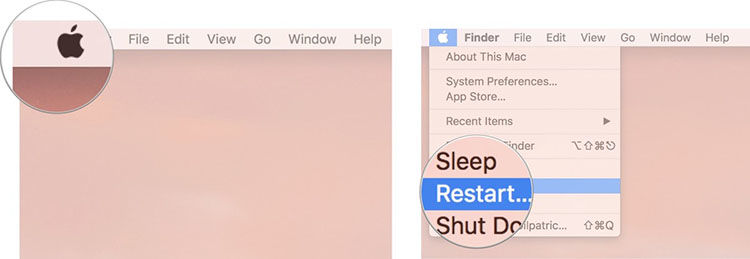
Step 3:While the Mac restarting, press and hold ‘Command and R’ keys together. The Mac will enter ‘Recovery Mode’.
Step 4:Then, click on the ‘Disk Utility’ under ‘OS X Utilities Selector’. Click ‘Continue’ to proceed.

Step 5:Choose the ‘Startup Disk’ and then click on the ‘Erase’ tab at the top.

Step 6:You have to enter the name for the file that is about to get destroyed, type macOS Catalina.
Step 7:Click ‘Erase’ again, to erase the OS from the Mac completely.

Now, you have successfully erased macOS Catalina from your Mac. It is time to install macOS Mojave. You have to download a copy of the macOS Mojave on your Mac from the App Store. Make a copy of that file and create a bootable drive with it.
Step 1: As usual, connect the Mac to the internet and connect the bootable drive.
Step 2:Click on the ‘Apple’ icon and choose ‘Restart’ from the drop menu.
Step 3:Hold down the ‘Option’ key while the Mac restarts and you will have the option to select the Startup Disk.
Step 4:From there, choose the connected bootable disk and macOS Mojave will start installing on your Mac.
Step 5: Lastly, click ‘Continue’ on the installation panel, in order to complete the installation.
This a very simple procedure, but as long as macOS is getting installed you must not disconnect the Mac from the internet.
Bonus Tip: How to Restore Data after Downgrading Back to Mojave without Backup
As we have discussed in the article, the common ways to downgrade your Mac from Catalina to Mojave includes the use of Time Machine backups and using a USB drive to make a bootable version of macOS Mojave.
Unfortunately, during such procedures, all the files from the device get erased completely. This is the reason, users are recommended to make a backup of their hard drive even before moving on to the downgrading. But mistakes can be made easily.
So, downgrade macOS from 10.15 to an older version and if you have lost some of your important files along the way, then immediately recover them using Tenorshare 4DDiG for Mac Data Recovery.
UltData is a professional data recovery program for Mac. The program has an excellent data recovery rate with the simplest recovery procedure;
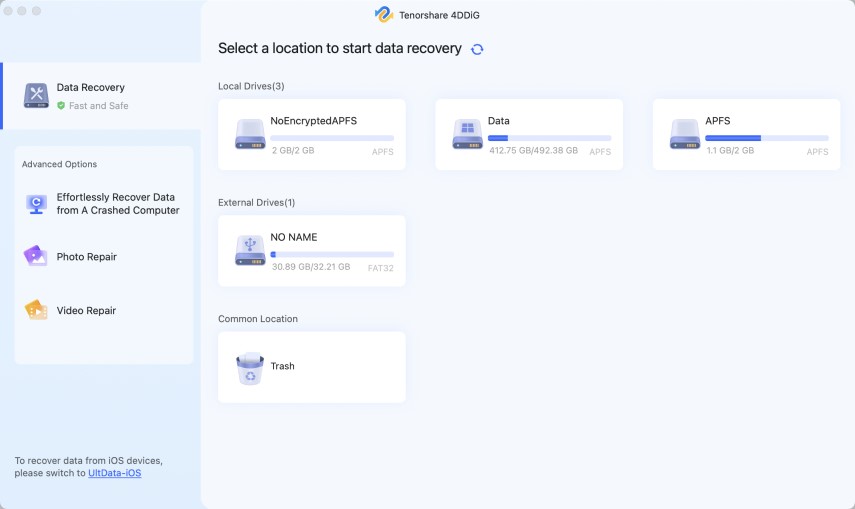
Step 1Download and install UltData on Mac and then launch it. Choose the location of the deleted files on your hard drive and click ‘Scan’.
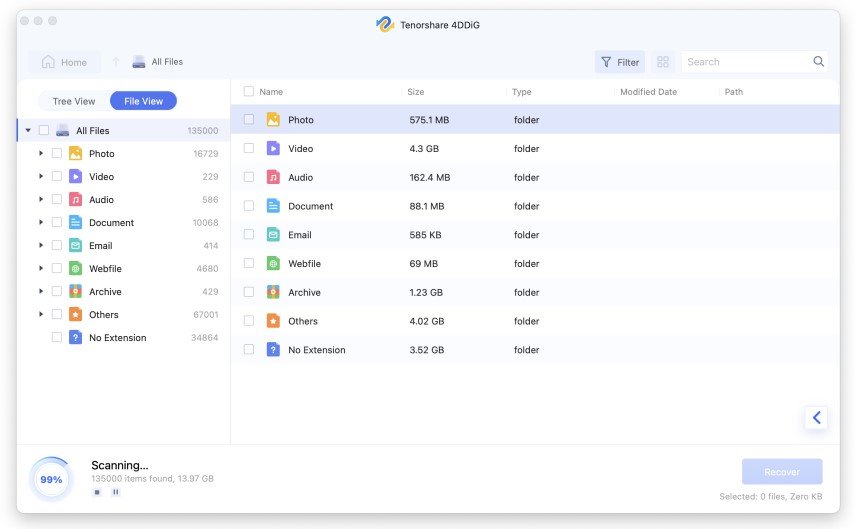
Step 2UltData will start scanning the hard drive for the deleted files. After a while, the scanned results will be generated and displayed on the screen.
Step 3There will be numerous files listed in the results. Select the files you need and click ‘Recover’ to recover them, immediately.
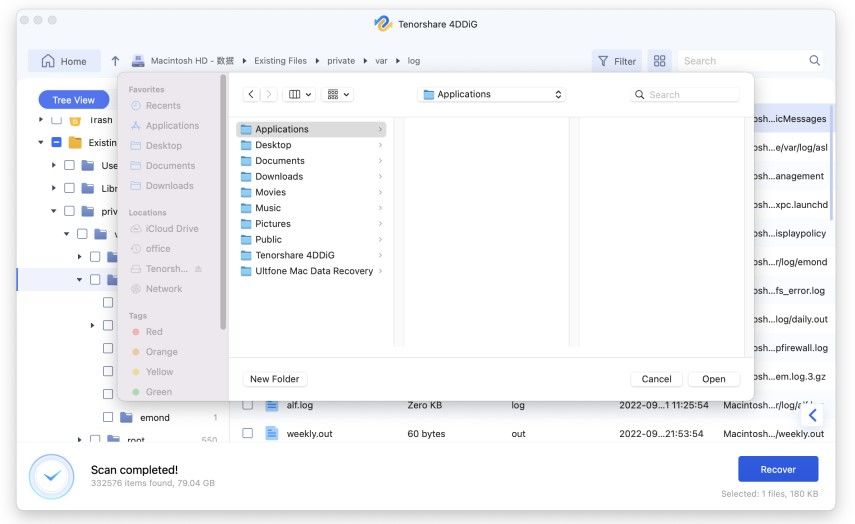
Be sure to restore the files on a different partition. If you restore them on the same partition, then the files will get overwritten and will be lost permanently.
Conclusion
Therefore, the user may want to downgrade macOS from 10.15 to an older version but Apple has made the procedures pretty simple for the convenience of the users. These methods are easily accessible and can be executed very easily, as you can see in the article. But making a backup of the files is necessary, as during the downgrade all the files will get erased. If you still forgot to do it, then not to worry, you can use Tenorshare 4DDiG for Mac Data Recovery to recover those lost files back immediately.

