Full Guides on How to Clear Cache on Mac
by Anna Sherry Updated on 2021-06-04 / Update for Mac OS
A cache is what we call the technical data created and gets stored whenever an app or a browser or even system executes a task. The thing is that the cache files are also very vital and impact the performance of devices. So, if your device contains too much cache files, it will slow down. So, you need to clean those files frequently. Now, the question is; how to clear cache on Mac? You will find the answer to that question in the article below;
- Part 1: What is Cache files on Mac?
- Part 2: What is Browser Cache and How to Clear Cache on Mac Chrome/Safari/Firefox?
- Part 3: What is System Cache and How to Clear System Cache on Mac?
- Part 4: What is User Cache and How to Clear User Cache on Mac?
- Extra Tip: Recover Mac Data using a 3rd Party Data Recovery Software
Part 1: What is Cache files on Mac?
So, you got the idea that cache files get created whenever an app or the browser or even the system executes a task. And this process is continuous, if you don’t clear them, they will take huge space on the device.
The older cache files just stay inside the system, they have no function. They just pile-up, clogging the system folders. Basically, this irrelevant files will slow down the Mac and later it gets worse, as there are some undetected cache files that are known to interfere with the system.
But before we get into, how to clear cache on Macbook Pro? You need to know the classification of Cache files. There are 3 types;
- Browser Cache
- System Cache
- User Cache
Part 2: What is Browser Cache and How to Clear Cache on Mac Chrome/Safari/Firefox?
The browser Cache is the cache files created by the tasks executed by the browsers. If you clear them, you will get two advantages; it will clear-up space and Mac performance will be faster.
Unfortunately, there are too many different browsers available and each of them deals with their respective cache files differently. So, we will only provide solutions for 3 major browsers; Chrome, Firefox, and Safari.
Empty Cache on Safari
Safari is the dedicated browser designed by Apple for Mac. Clearing Safari cache probably the easiest one on this list. The manual method to clear the Safari cache will be a bit longer. So, here’s how to clear cache on Macbook Pro Safari;
Step 1: On your Mac, run Safari and go to “Preferences”.
Step 2: Click on the “Advanced” tab and then, enable “Show Develop Menu”.
Step 3: Now, navigate to the “Develop” portion of the menu and click on “Empty Cache” option.
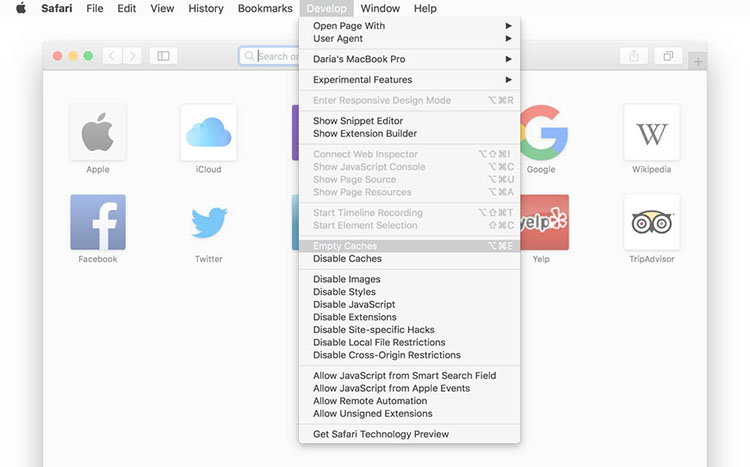
So, if you were asking; how to clear cache on mac Safari? This is the way to do it, manually.
Empty Cache on Chrome
Another popular web browser is Google Chrome. This browser may not be designed specifically for Apple devices but the browser runs on them and has a quite a popularity even among the Mac users. It is very easy to clear cache chrome Mac.
So, here’s how to clear cache on Mac chrome;
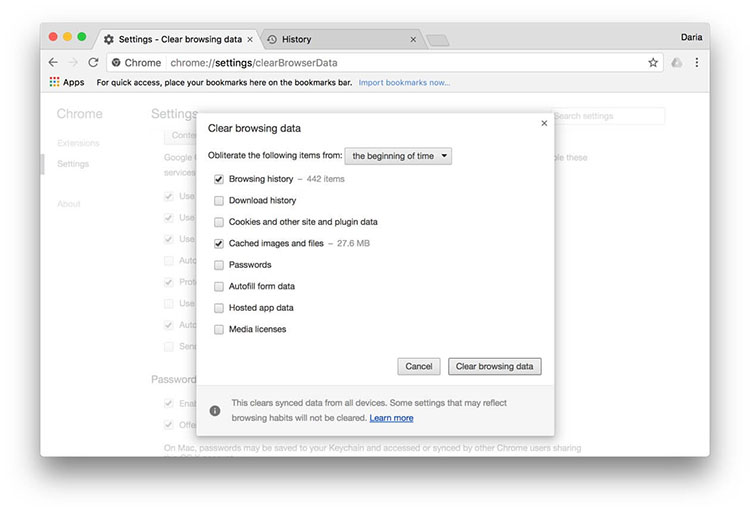
Step 1: Go to Google Chrome’s Settings.
Step 2: Navigate to “History” and click on “Clear Browsing Data”.
Step 3: You also need to make sure that all the images and files are also selected.
Step 4: After that, click on “Beginning of Time” option and then click on the “Clear Browsing Data” to initiate the procedure.
Empty Cache on Firefox
The last browser on our list is Firefox, developed by Mozilla. Compared to other browsers on this list, clearing the cache for Firefox is much easier. Let’s have a look;
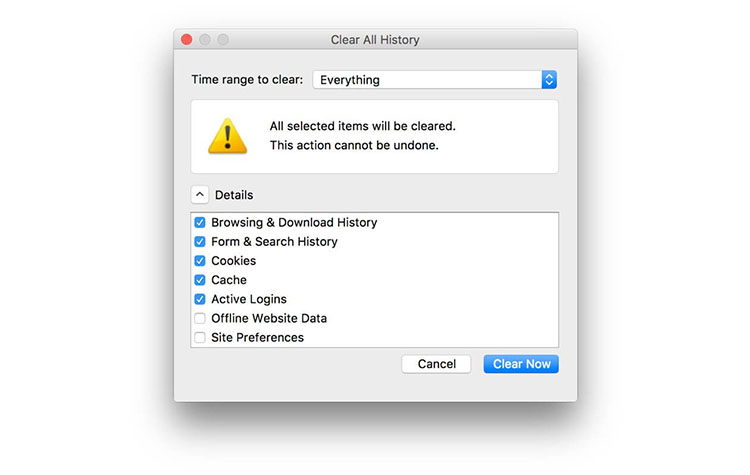
Step 1: Run the browser and go to “History”.
Step 2: Click on “Clear Recent History”.
Step 3: After that, you need to choose every option from the time range menu.
Step 4: Now, you need to click on the “Arrow” sign just beside “Details”, in order to check the Cache files.
Step 5: Lastly, click “Clear Now”.
Part 3: What is System Cache and How to Clear System Cache on Mac?
You probably have no idea, how much space can be cleared just by clearing System Cache files. You can assume, it can be at least a few GBs. But you need to be very careful while clearing those files, if you accidentally delete wrong files, the system could get damaged.
So, just be safe, read the steps detailed below, very carefully. Here’s how to clear cache on a Mac;
Step 1: Simply, open your Mac and run “Finder”.
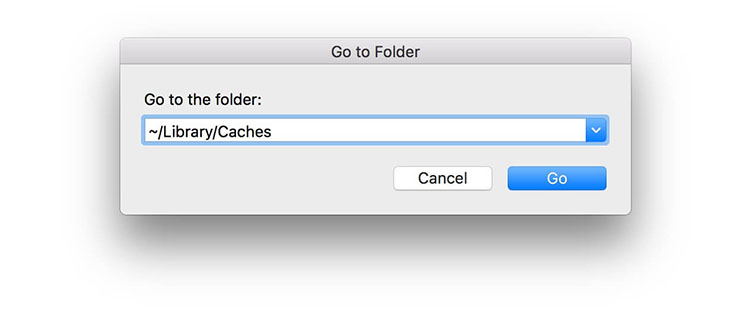
Step 2: Click on “Go” and then navigate to “Go To Folder”.
Step 3: Now, type the following;
~/Library/Caches
After typing that, hit “Enter” on keyboard.
Step 4: Backup the folders if you think something could go wrong. Otherwise, keep the folders but you have to manually visit each of the folders and erase the files inside.
Unfortunately, the procedure is not still finished yet. You just have to follow the similar steps mentioned above but instead of the previous command, you need to type the following;
/Library/Caches
After clearing this folder you are finished, just empty the “Trash” afterwards.
Part 4: What is User Cache and How to Clear User Cache on Mac?
"How to clear DNS cache on Mac?"
The User Cache or also known as the App Cache falls under System Caches. So if you have deleted the System Caches using the previously discussed manual method, then all the User or App and DNS Caches have all been deleted.
So, if you want to delete User Cache, follow the procedure, mentioned in the “Part 3” of this article.
Extra Tip: Recover Mac Data using a 3rd Party Data Recovery Software
As mentioned earlier, it can be difficult to delete System Cache files manually without the required technical knowledge.
Even though we are careful, a few specific files could get erased accidentally. Resulting a lagging and much slower performing Mac with numerous error messages appearing, now and then.
Needless to say, it will be very difficult for the users to work with the said Mac. So, an immediate recovery of those particular files is required and there is no better way than using a professional data recovery software designed for Mac. 4DDiG for Mac Data Recovery by Tenorshare is a similar product, performance is much better than all the other similar products on the market.
So, let’s make the data recovery using 4DDiG for Mac Data Recovery. The steps are detailed below;
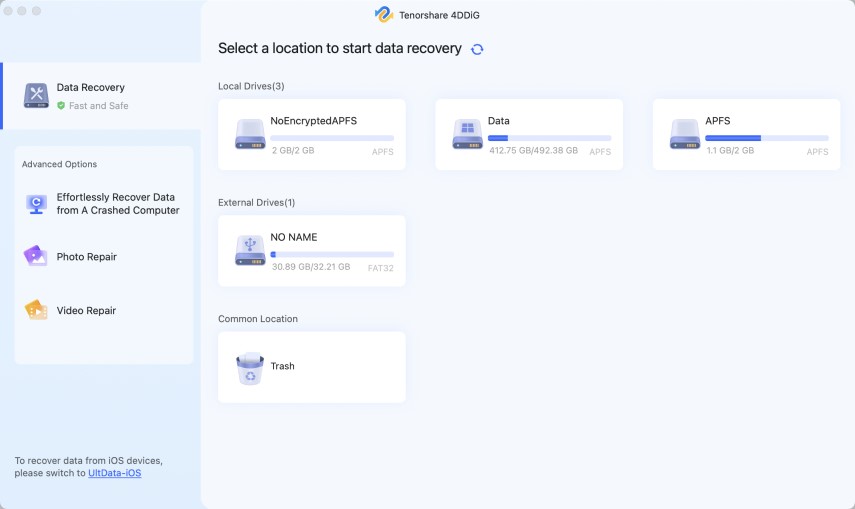
Step 1So, download and install 4DDiG for Mac Data Recovery on your Mac and launch it. Then, choose a location on the Mac and click “Scan”.
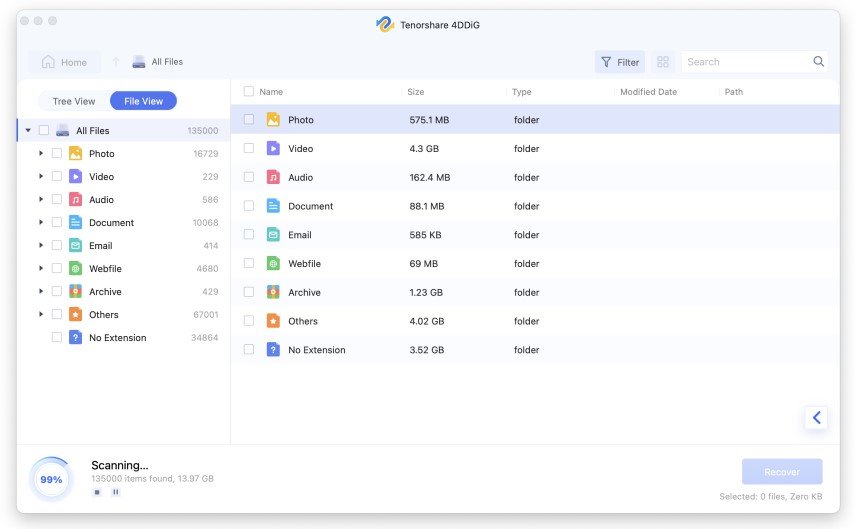
Step 2The complete scan of that partition will take a few minutes. After completing the scan, the results will be generated for preview. If you click on the previewed files individually, you will get additional details.
Step 3Now, select files from that list and click “Recover” for the recovery of those selected files.
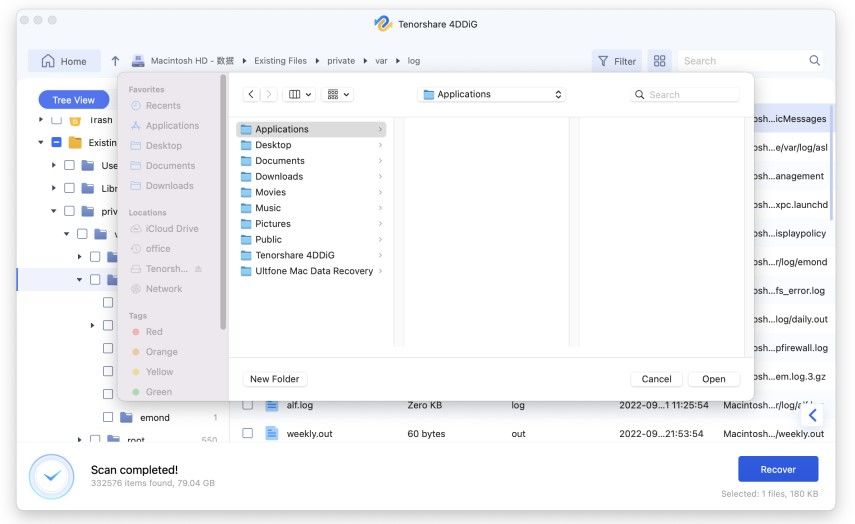
Step 4You must not make the recovery on the same partition where you lost them, doing that will cause data loss permanently.
Conclusion
Nonetheless, caches are important files. Related to the operation and the execution of several tasks. But if they are being stored for too long on your Mac; then they have outlived their relevance. You need to delete them immediately. Otherwise, they will just stay on your computer. Consuming gigabytes of space and tampering the performance of Mac. So, it is better that you remove these expired files using the detailed procedures mentioned on this article.

