How to Migrate OS to SSD/HDD and Manage Disk Partitions with 4DDiG Partition Manager
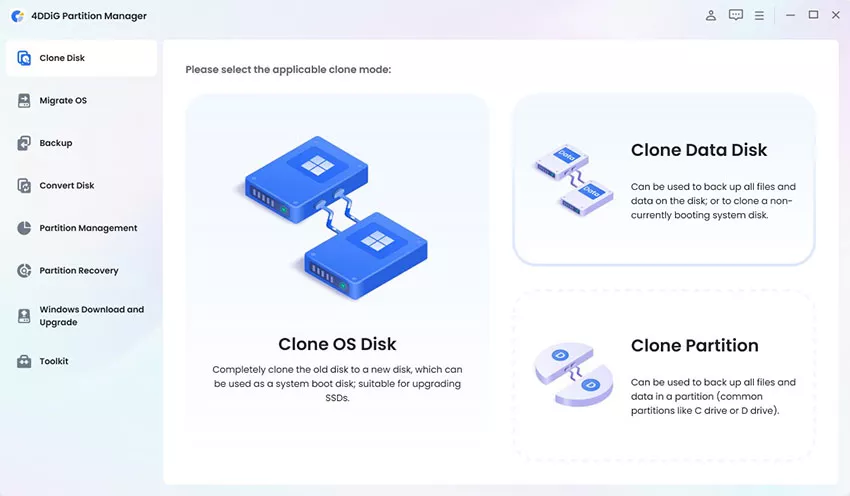
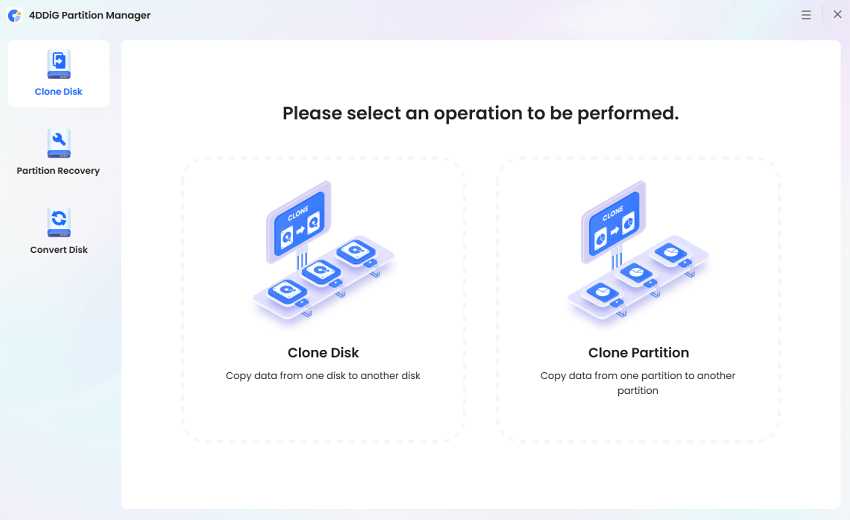
Disk/Partition Cloning
4DDiG Partition Manager is the ultimate disk cloning software that enables you to safely and quickly clone data from your source disk or partition to a new target disk or partition. This cloning feature makes it easy to upgrade, replace, or backup your hard disk. In the following sections, we'll demonstrate how to clone a disk and how to clone a partition.
![]() Secure Download
Secure Download
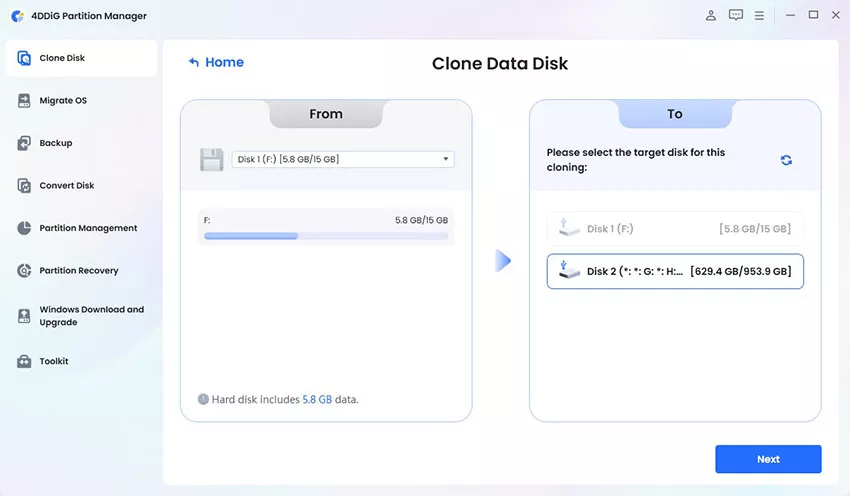
- Even if the target disk is smaller than the source disk, cloning is still possible as long as the target disk is equal to or larger than the used capacity.
- The data on the target disk will be cleared, so if you have important data on it, please make sure to make a backup first.
- The data on the source disk will be cloned to the target disk intact, and the data on the source disk will not be changed or lost during the cloning process.
Clone Hard Disk to SSD/HDD:
-
Step 1:Connect an external disk to your computer after downloading and installing 4DDiG Partition Manager on your computer. Then launch the application, select “Clone Disk”.
-
Step 2:Select a target disk to receive cloned data from the source disk and then click on the Continue button. (The target disk defaults to the disk you connect to the computer).
-
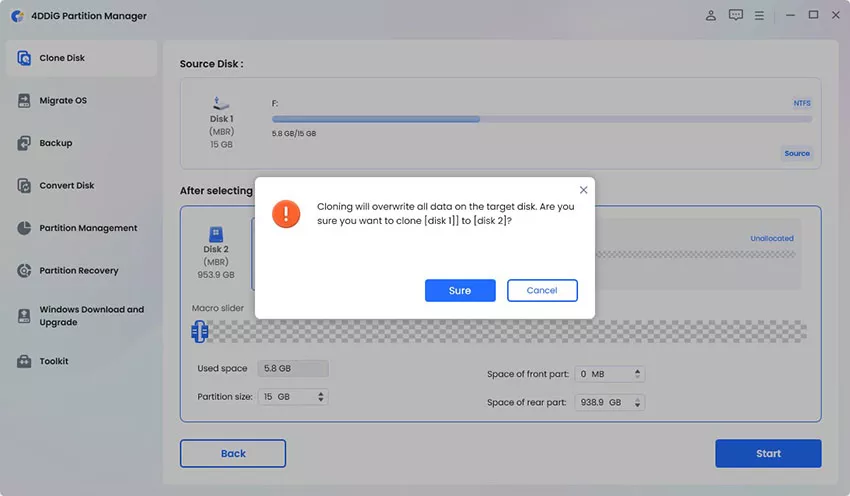
Step 3:Please note that cloning will overwrite all data on the target disk, so after you confirm that everything is correct, click on the Sure button.
-
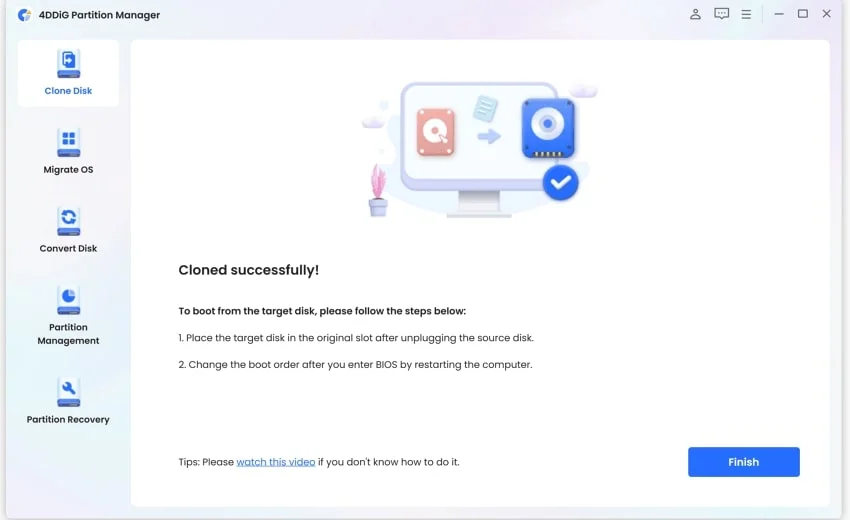
Step 4:Then, you will see a preview interface showing the effect of the cloned disk. After confirming that the preview is correct, click on the Start button to start the cloning operation.

-
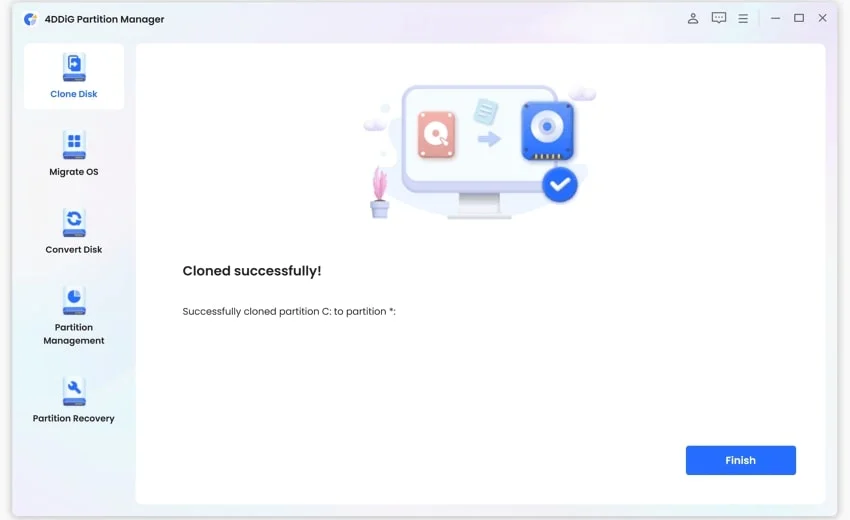
Step 5:Wait for the disk cloning to complete. The speed of cloning depends on the size of the source disk. Please wait patiently and do not perform other operations or interrupt the current operation.
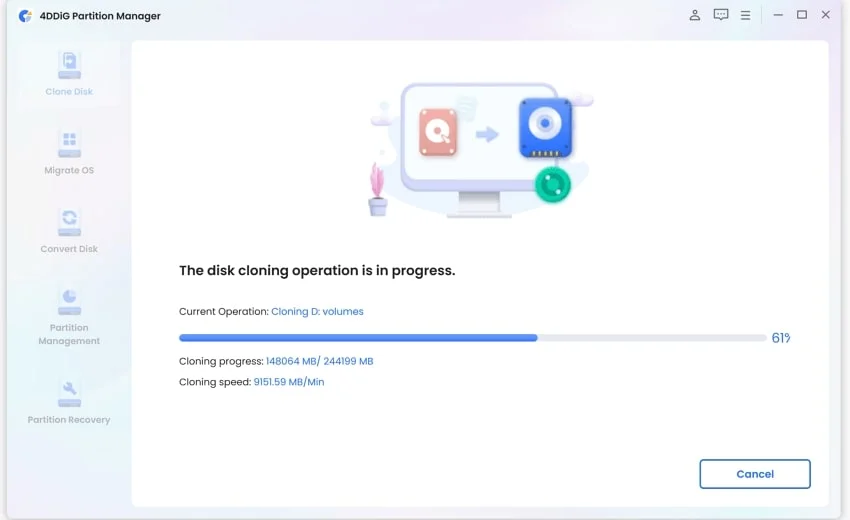
Now you have successfully cloned the data from the source disk to the target disk.
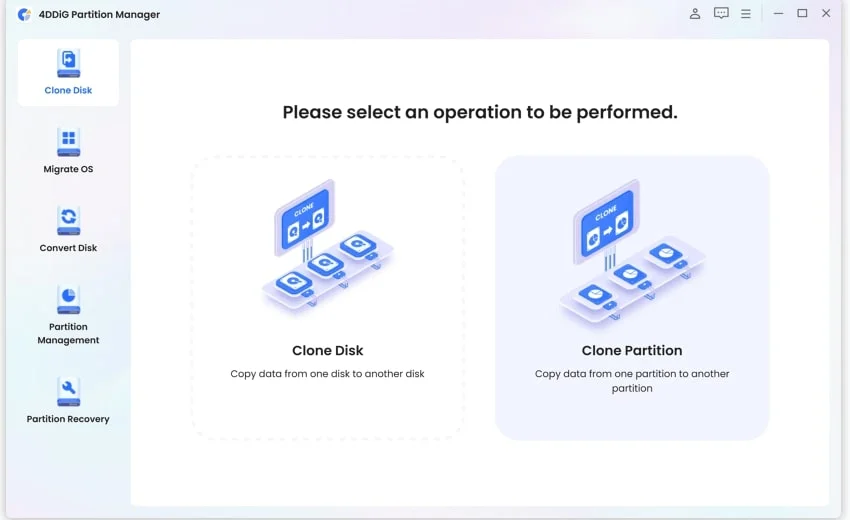
Clone Partition:
-
Step 1:Connect an external disk to your computer after downloading and installing 4DDiG Partition Manager on your computer. Then launch the application, select “Clone Disk” in the left navigation panel and then select “Clone Partition”.
-
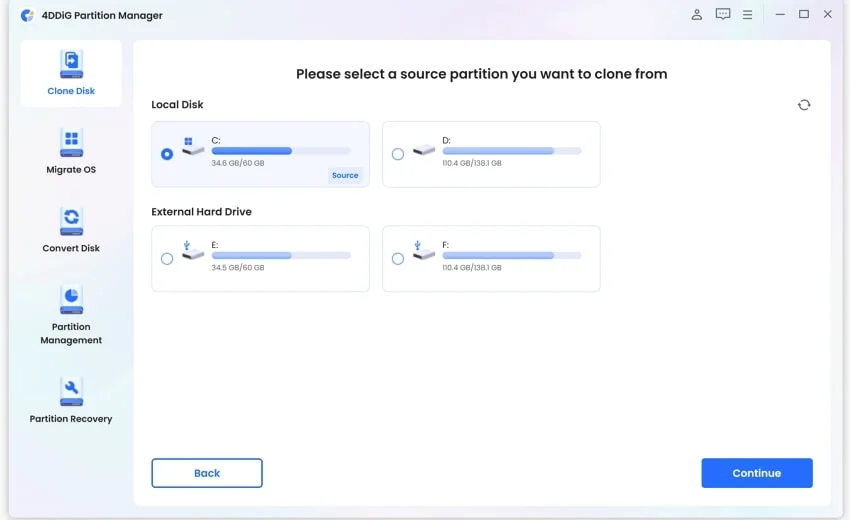
Step 2:Select a source partition you want to clone from. After you make sure that your selection is correct, click on the Continue button.
-
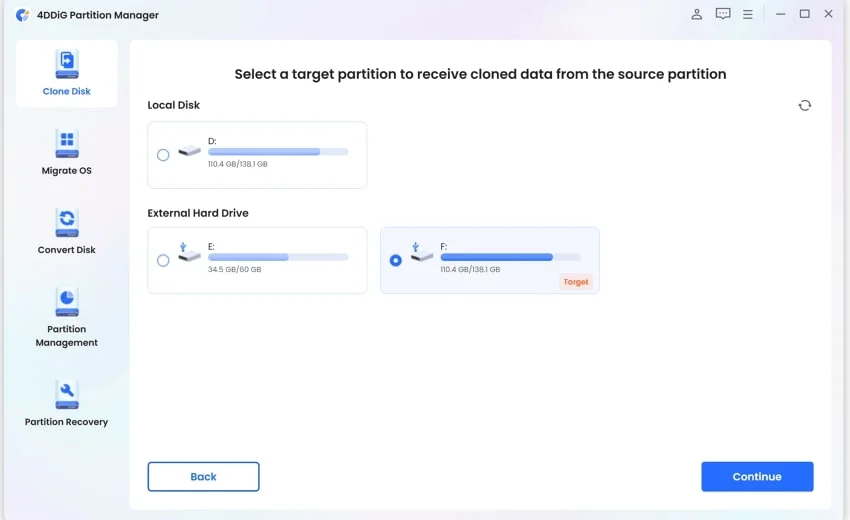
Step 3:Then, select a target partition to receive cloned data from the source partition. After you make sure that your selection is correct, click on the Continue button.
-
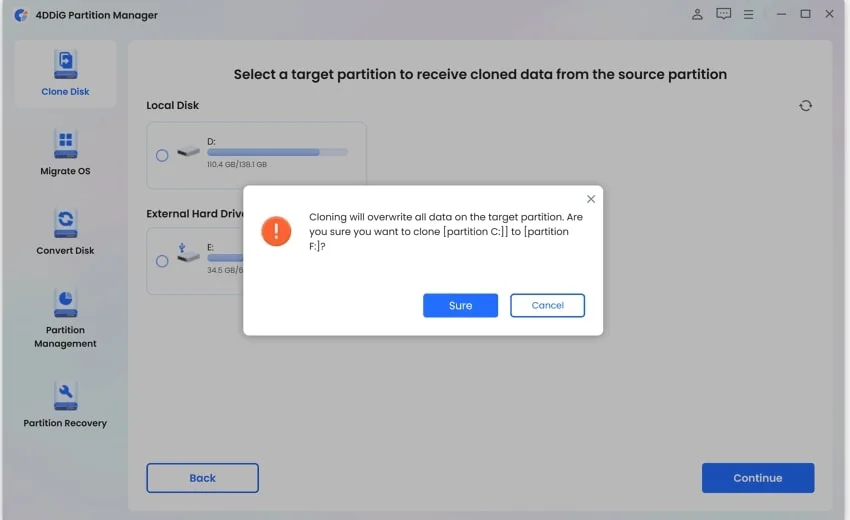
Step 4:Please note that cloning will overwrite all data on the target partition, so after you confirm that everything is correct, click on the Sure button.
-
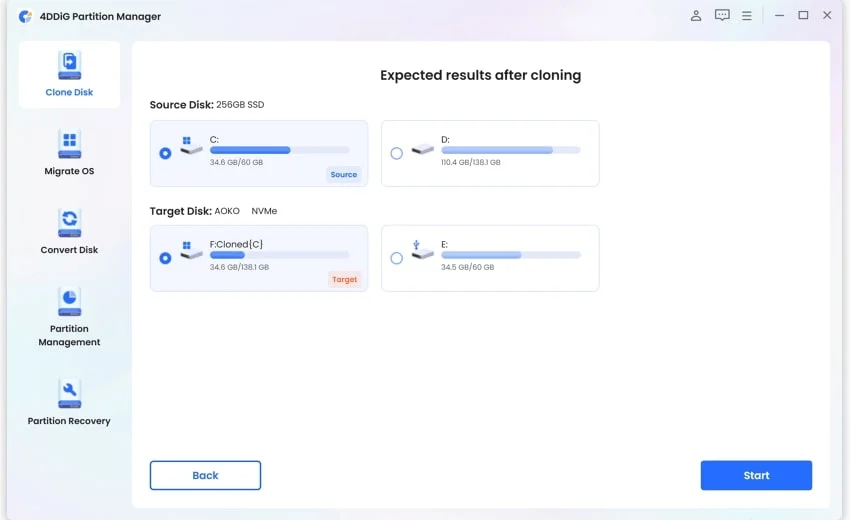
Step 5:Then, you will see a preview interface showing the effect of the cloned partition on the target disk. After confirming that the preview is correct, click on the Start button to start the cloning operation.
-
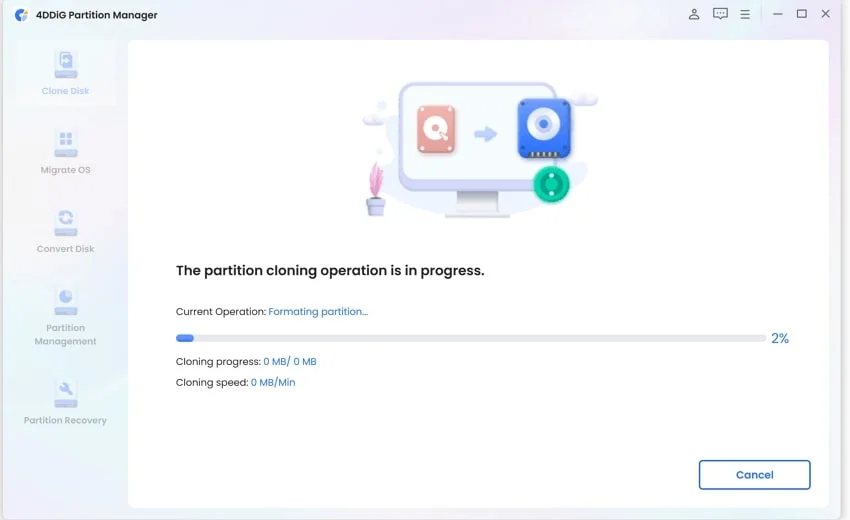
Step 6:Wait for the partition cloning to complete. The speed of cloning depends on the size of the source partition.
Now you have successfully cloned the data from the source partition to the target partition.
Migrate OS to SSD/HDD
4DDiG Partition Manager provides an easy and safe way to migrate your Windows operating system to a new SSD or HDD disk without reinstalling Windows. Aparting from the operating system, it can also transfer data, applications & programs, personal accounts and settings in a few clicks.
![]() Secure Download
Secure Download
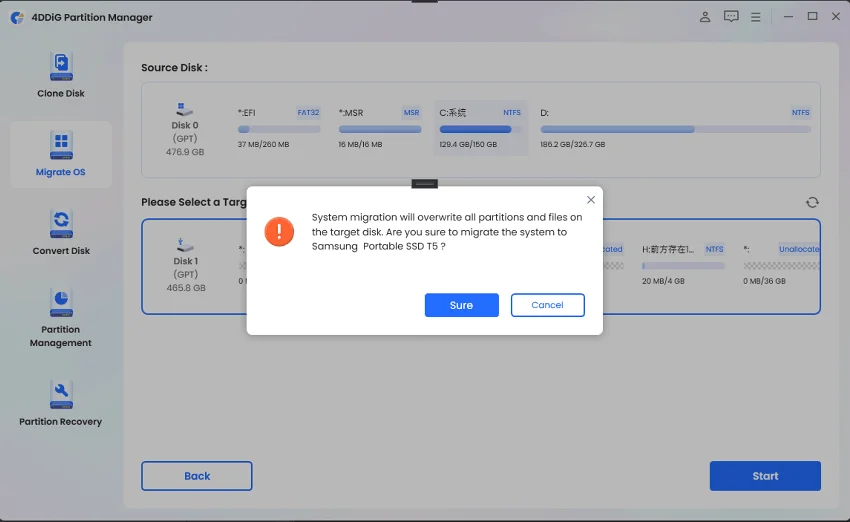
The OS migration process will delete all data and existing partitions on the target disk, so remember to back up your important data before you start the migration.
-
Step 1:Connect your new drive after downloading and installing 4DDiG Partition Manager on your computer. Then launch the application, select the new drive as the target disk and then tap on "Start" to continue. (The source disk is selected by default).
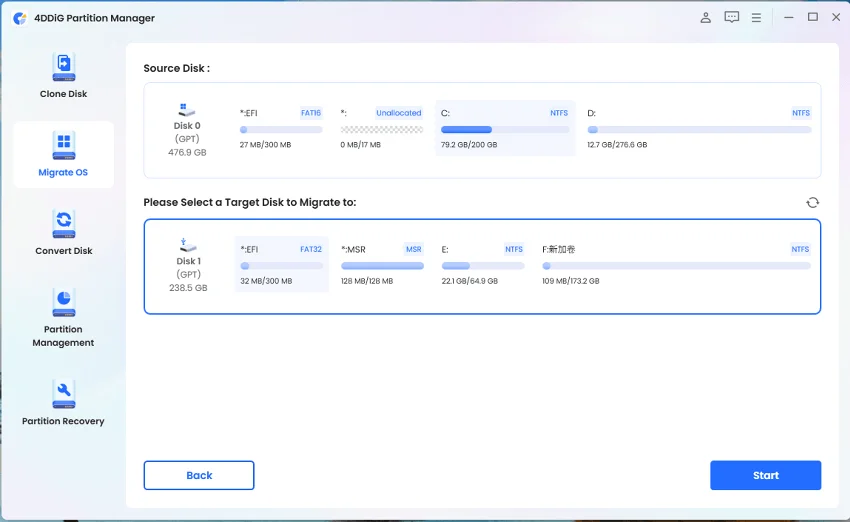
-
Step 2:A pop-up windows will appear informing you that during system migration, partitions and files on the target disk will be overwritten. To proceed to the next step, click "Sure" and then "Start" to start the system migration.
-
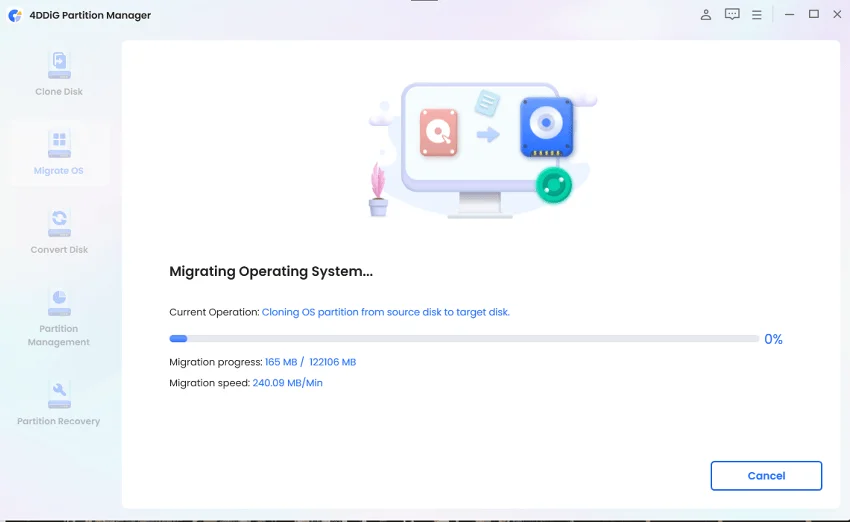
Step 3:System migration will now begin under 4DDiG Partition Manager and will take some time to complete depending on the size of the drives. You can view migration-related data such as migration speed, elapsed time, and so on.
Now you have successfully migrated your OS to the target drive.
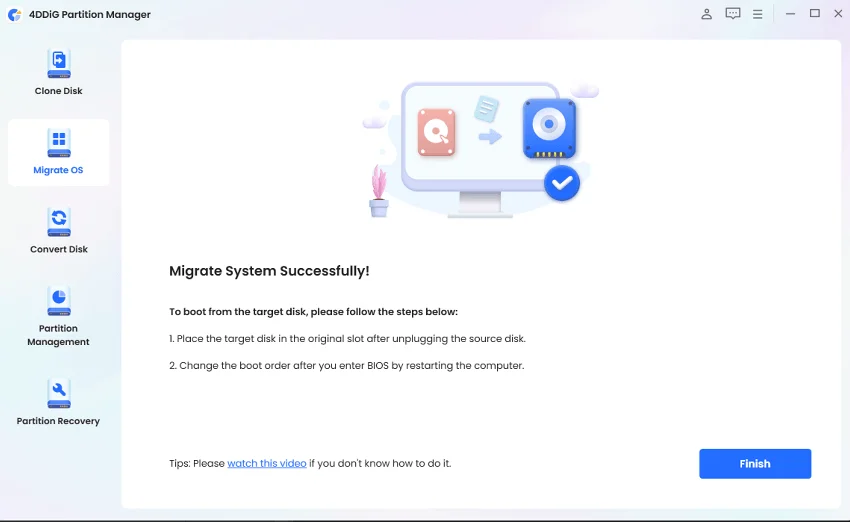
Boot PC from the New Drive
After successfully transfer OS to your target disk with 4DDiG Partition Manager, you're probably wondering how to boot your computer from the new drive after transferring your entire system to it. Here's how you can do:
-
Step 1:Remove the source disk and insert the target disk into the original slot. After entering BIOS, restart the computer to change the boot order. You can also watch the video below for more information on how to boot your computer.
Resize/Move Partition
Resizing a partition is the process of making a partition smaller to release some space/get some unallocated space. The unallocated space can be merged with its adjacent partition(s) or can be used to create one or more new partitions.
To resize and move a partition:
-
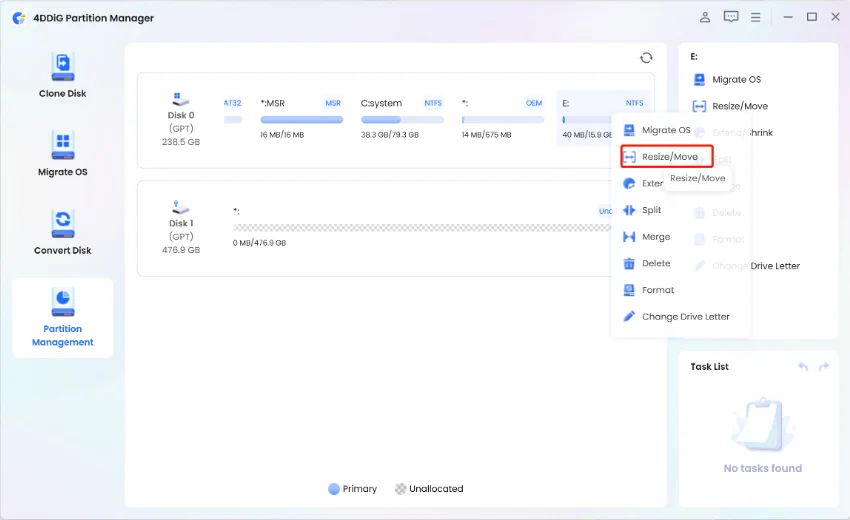
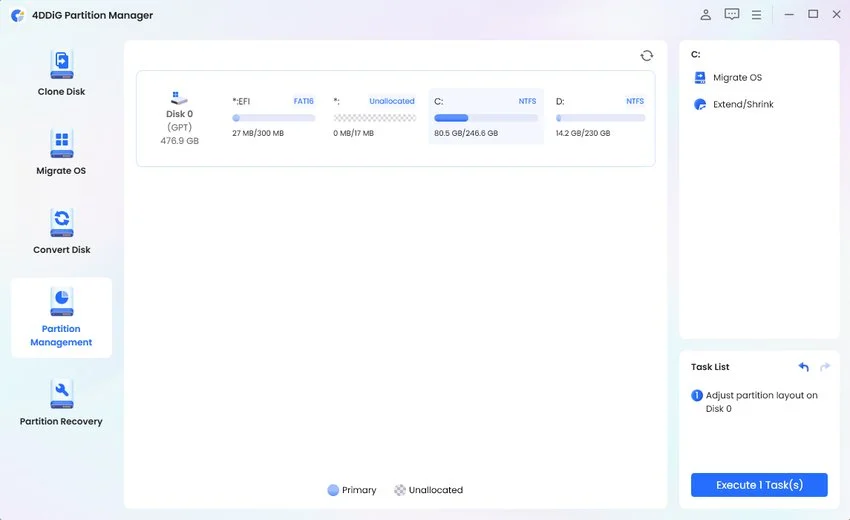
Step 1:Install and launch 4DDiG Partition Manager. Select "Partition Management" in the left navigation bar. Then right-click on the partition that you want to resize and select "Resize/Move" from the drop-down menu.
-
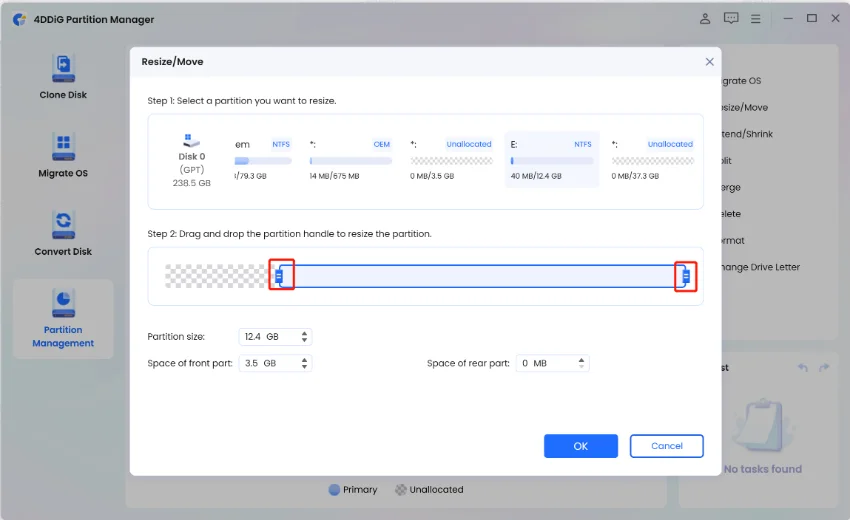
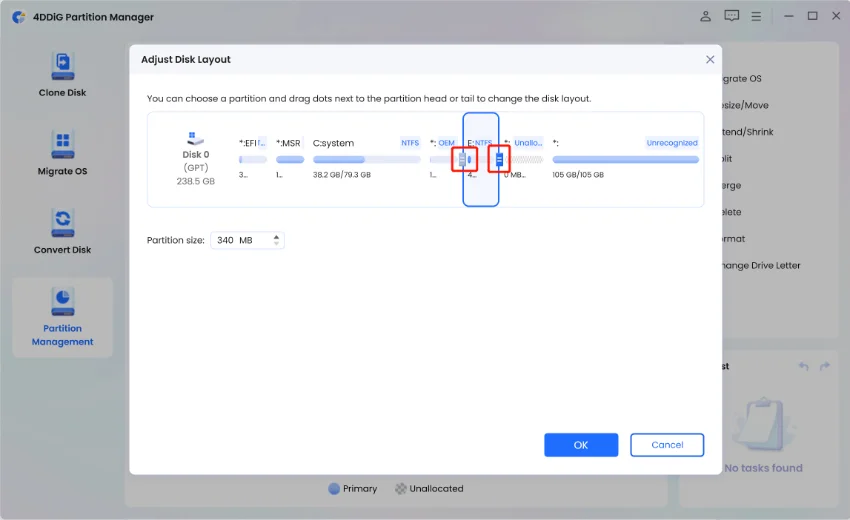
Step 2:In the pop-up window, drag and drop the borders of the selected partition to change its size. Alternatively, you can enter a specified partition size in GB. Once the partition size is set, you can preview the result of the changes you made. If you are satisfied with it, click OK to queue the operation.
 Note
Note
To move a partition, drag the whole partition handle towards unallocated space or manually define the amount of unallocated space in the front or rear part of the partition.
-
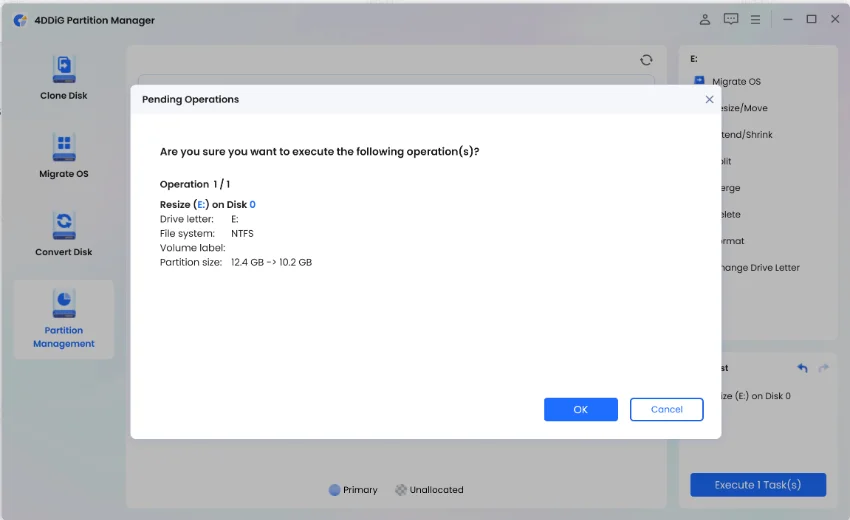
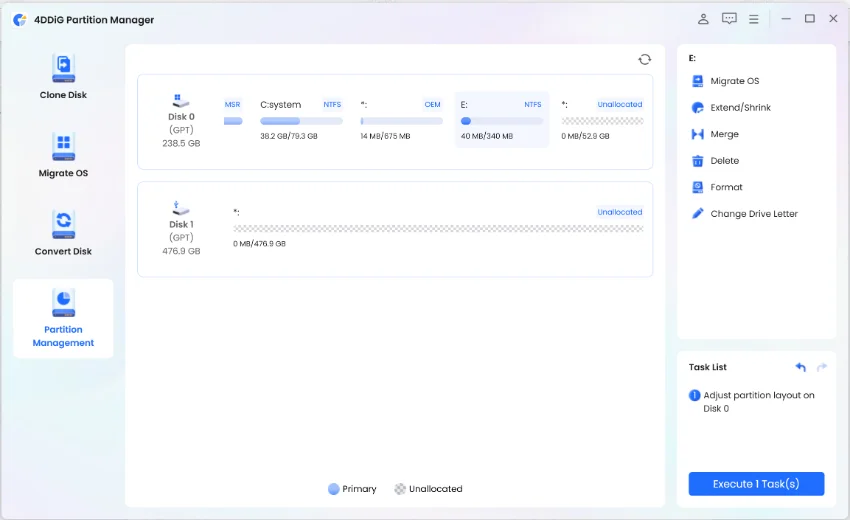
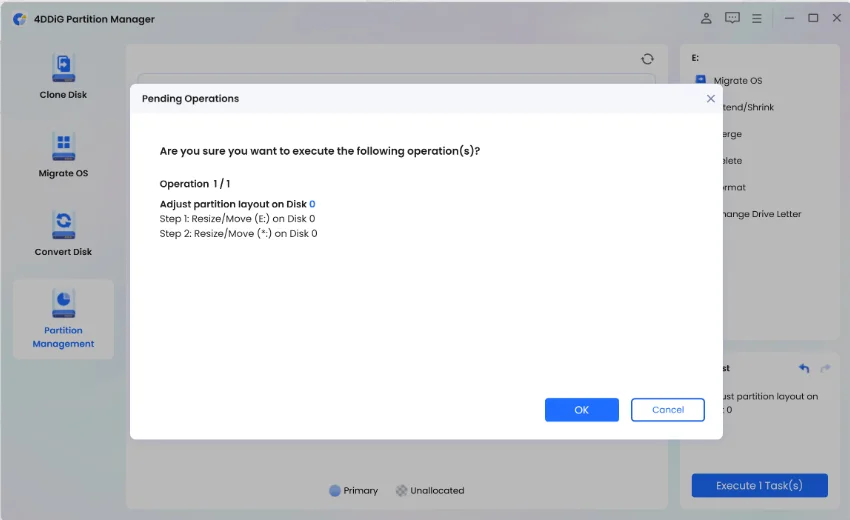
Step 3:The queued resizing operation is shown in the Task List. Click Execute 1 Task(s) and click OK to commit the operation.

-
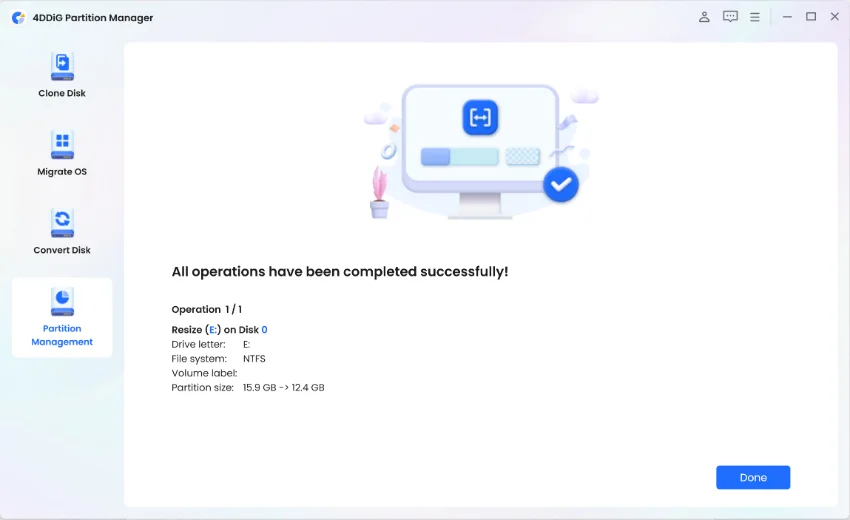
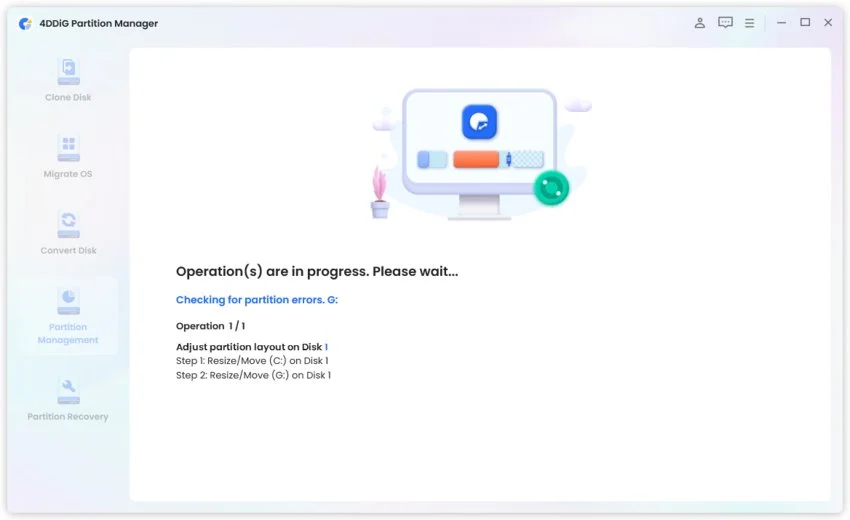
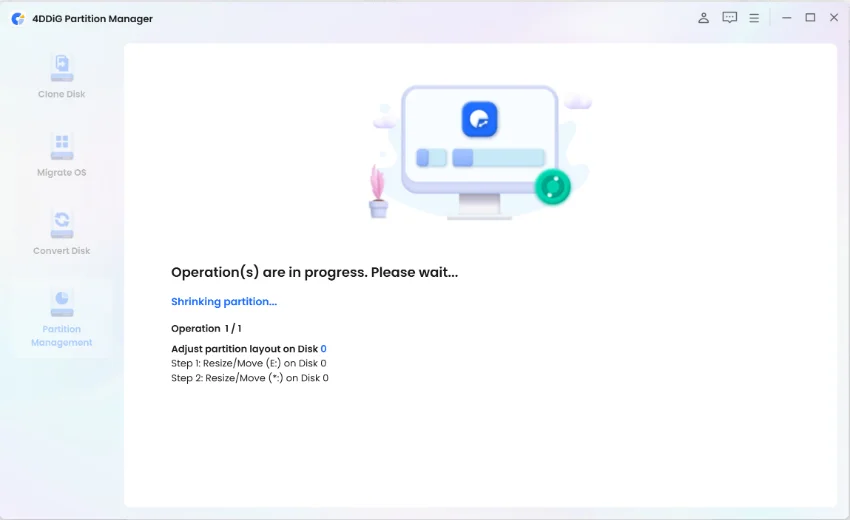
Step 4:The partition resizing process will start immediately and will take some time.
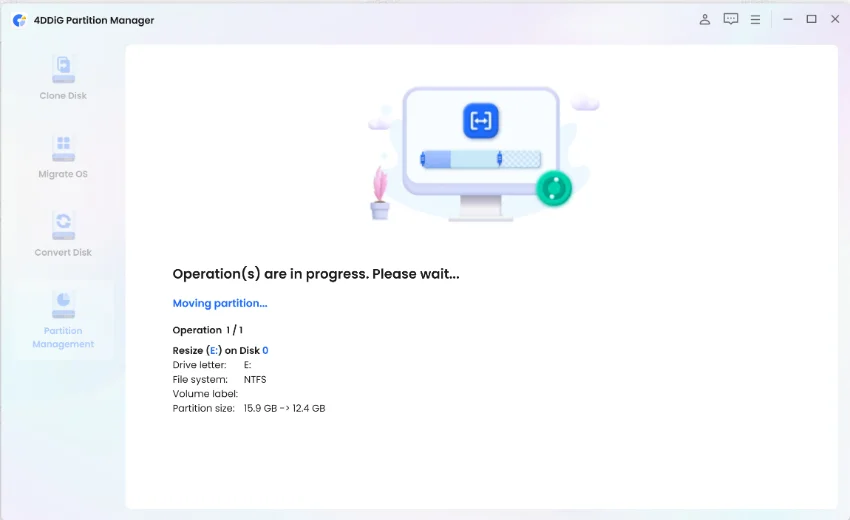
-
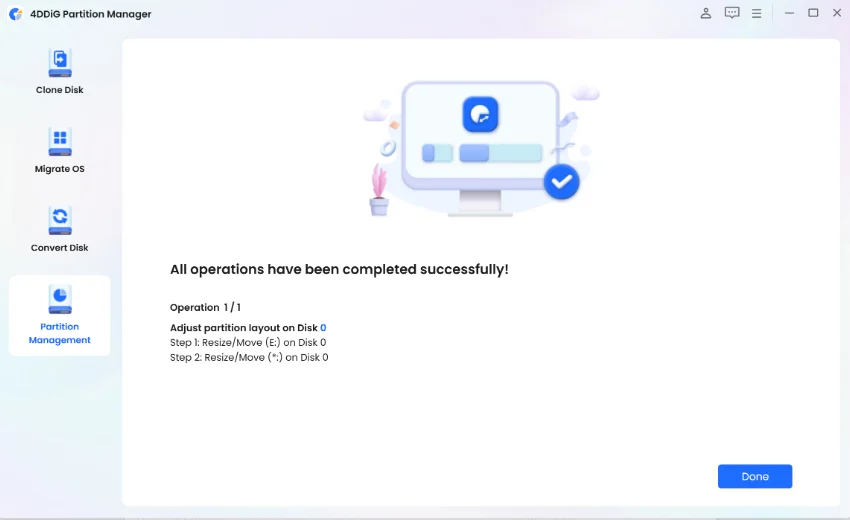
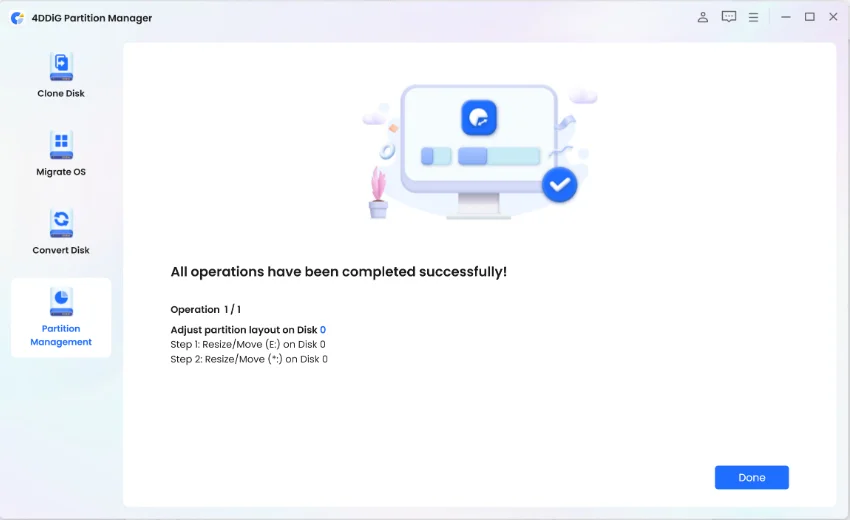
Step 5:Wait until the partition size is adjusted as expected and click Done.
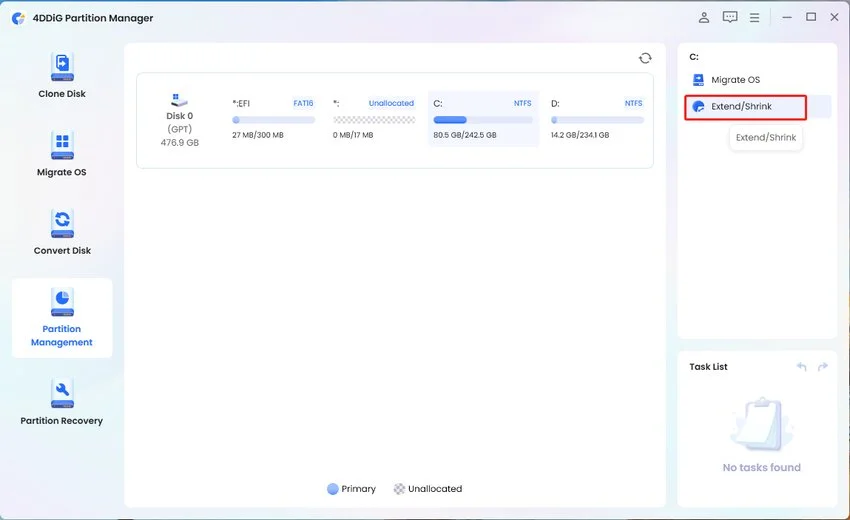
Extend/Shrink Partition
4DDiG Partition Manager allows you to extend a partition to make it bigger or shrink a partition to make it smaller in size. When your disk partition runs out of disk space, you can expand the storage of the partition by taking free space from unallocated space in the same disk or shrinking any other existing partitions.
The Extend/Shrink feature will be unavailable when there are more than 4 partitions on your disk. Besides, you cannot extend or shrink a partition with free or unallocated space in another separated hard disk.
To extend a partition:
-
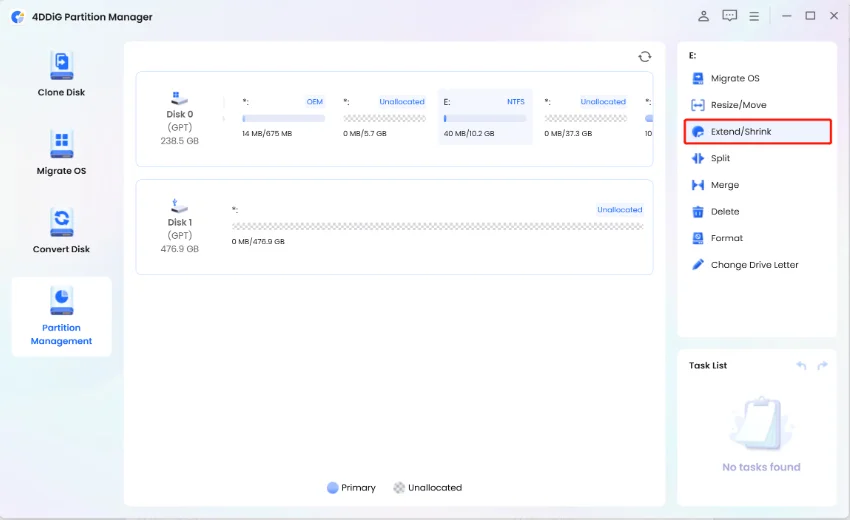
Step 1:Download and launch 4DDiG Partition Manager. Select "Partition Management" in the left navigation bar. Then right-click on the partition you want to extend and select "Extend/Shink" from the pop-up menu.
-
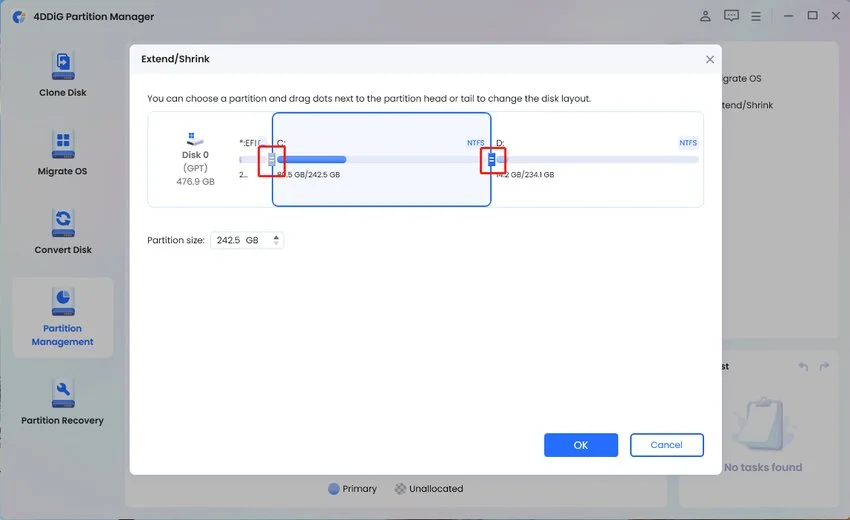
Step 2:Drag the right border of the selected partition rightwards or drag its left border leftwards to extend its size. Alternatively, you can choose an adjacent partition or unallocated space that you want to take free space from, and drag its border rightwards or leftwards to release free space for the target partition. When you finish the adjustment, click OK to proceed.
-
Step 3:A pending operation will be added to the Task List. Simply click "Execute 1 Task(s)" and select OK to commit the operation.

-
Step 4:It will take some time for the partition extending process to complete depending on the amount of space you want to add to it. To avoid data loss or corruption, please do not close the program until the process is complete.
-
Step 5:Click Done when the partition is successfully extended.
To shrink a partition:
-
Step 1:Right-click on the partition that you want to shrink and select "Extend/Shrink".
-
Step 2:Drag the right border of the selected partition leftwards or drag its left border rightwards to reduce its size and make room for its adjacent partition(s). Once done, click OK and get back to the main interface.
-
Step 3:Click the Execute 1 Task(s) button in the bottom right corner of the panel and select OK to commit the operation.
-
Step 4:The program then starts to shrink the selected partition based on your settings. Wait for the shrinking process to complete.
-
Step 5:Click the Done button when the partition is shrunk successfully. You will see the specified shrink volume has been added to its adjacent partition(s).
Split Partition
Splitting partition refers to dividing a large partition into two or more smaller ones. When you buy a new computer with only one partition, or there is a large partition on the hard drive, you may need to split the partition to create new partitions and store various data.
To split a partition:
-
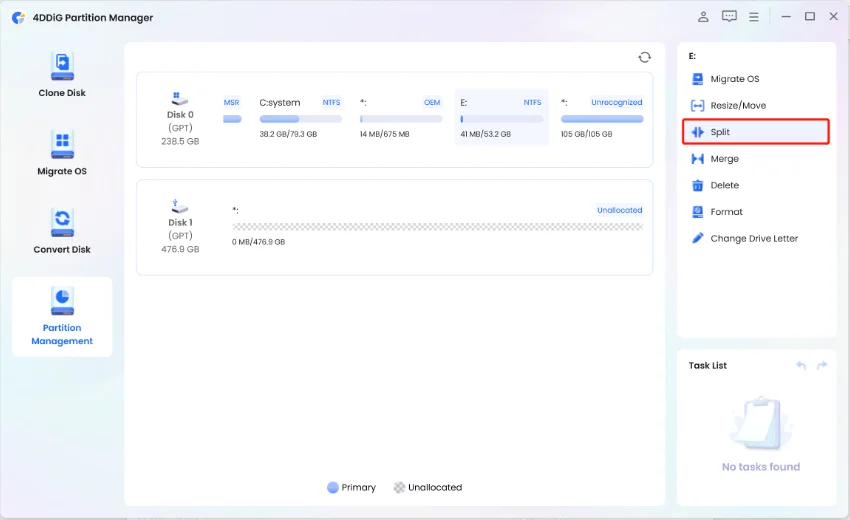
Step 1:Download and launch 4DDiG Partition Manager. Select "Partition Management" in the left navigation bar. Then right-click on the partition that you want to separate and select "Split".
-
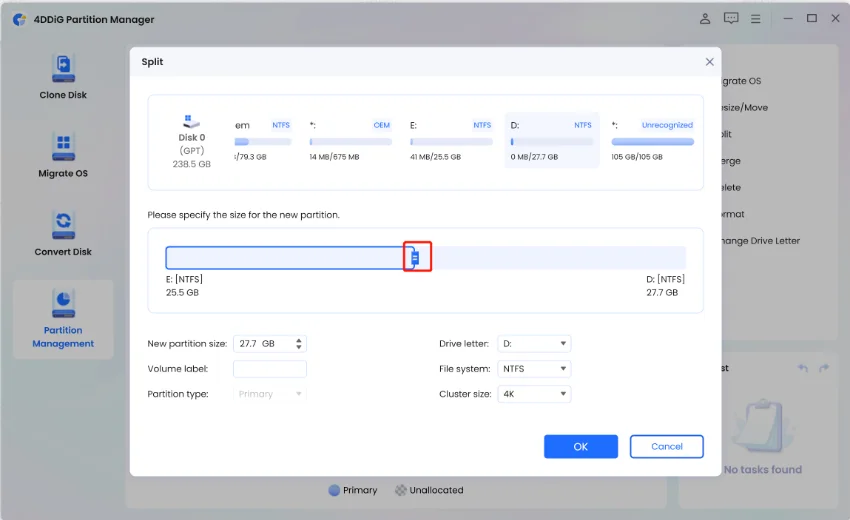
Step 2:Drag the partition handle leftwards or rightwards to specify the size for the new partition, or you can manually enter an exact value as the new partition size. Then specify other parameters for the new partition, including drive letter, files system (NTFS, exFAT, FAT16, or FAT32), and cluster size.
-
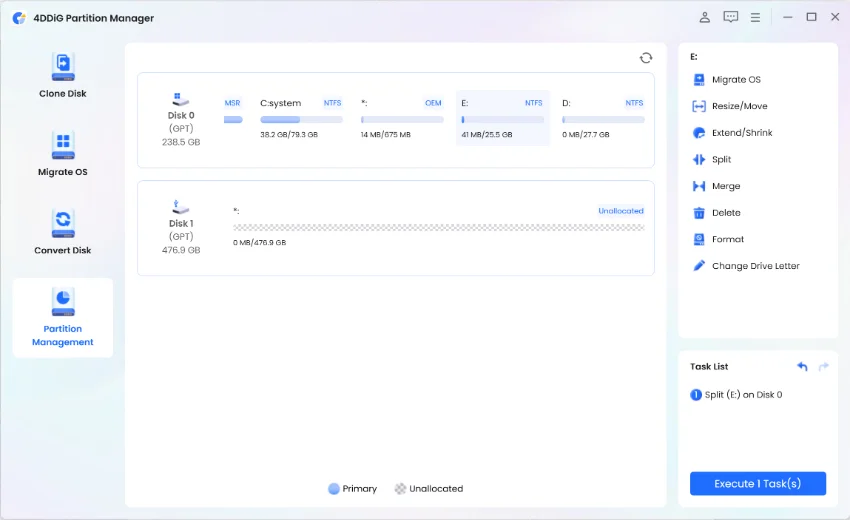
Step 3:You will see the splitting operation pending in the Task List. Click Execute 1 Task(s) and select OK when the program prompts operations to be done.
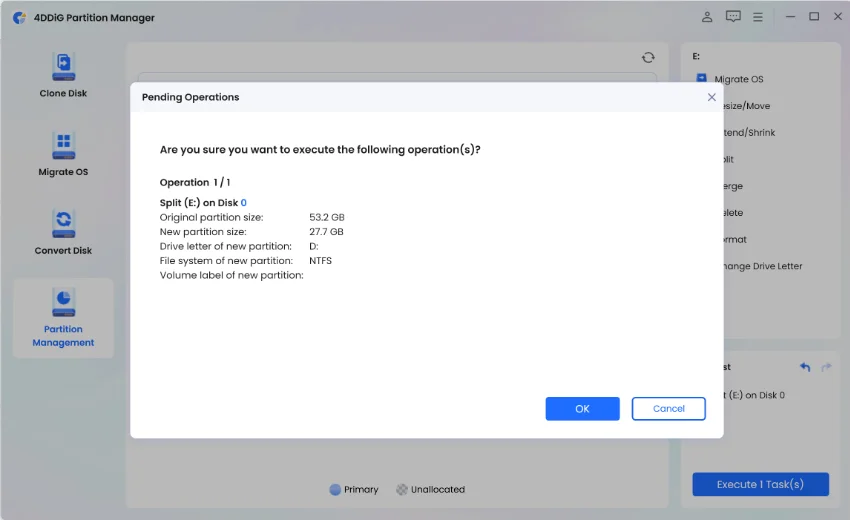
-
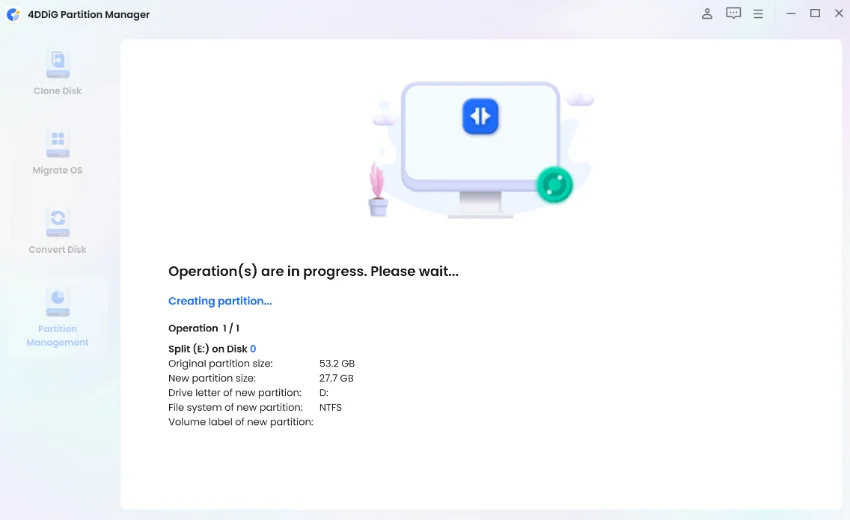
Step 4:The splitting process may take some time, so wait patiently and do not close the program until the process is finished.
-
Step 5:Click Done when the partition is successfully split into two small ones.
 Note
Note
The split partition feature is currently available for NTFS and FAT32 partitions. Besides, you can only split the unused space of a partition to create a new partition. A partition that is totally used up and an unallocated partition cannot be split.
Merge Partitions
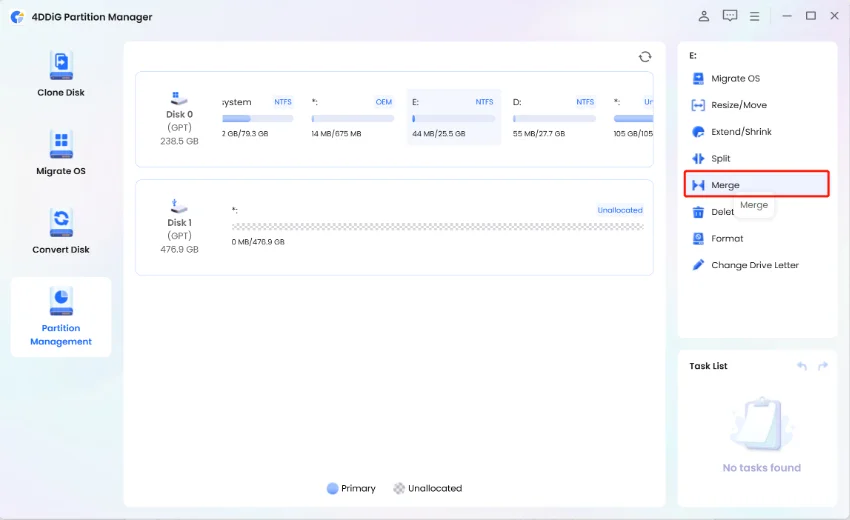
Merging partitions refers to combining two partitions of one hard drive into a single larger one or combining unallocated space with an existing partition to expand the available space on a partition. Partition merging is quite necessary when you have multiple partitions on your hard drive and you want to reduce the redundant ones for better management, or when one of your partitions is getting full but other partitions are nearly empty.
To merge two partitions or merge unallocated space into a partition without losing data:
-
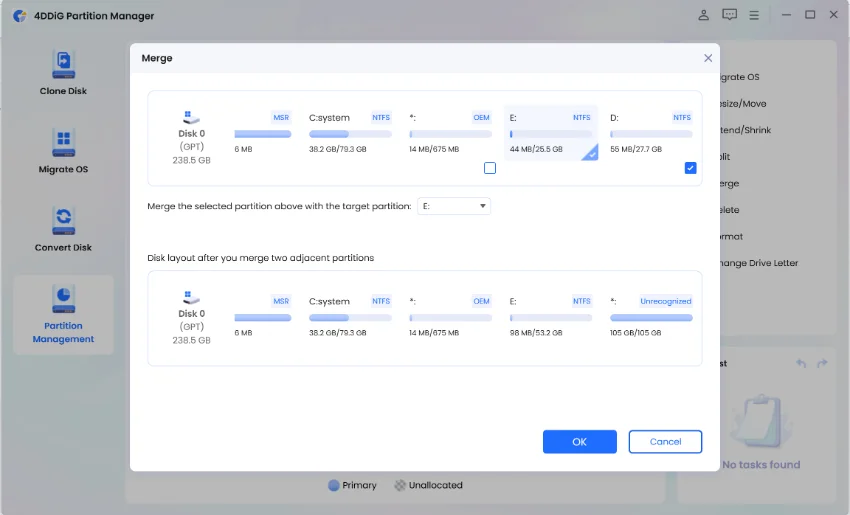
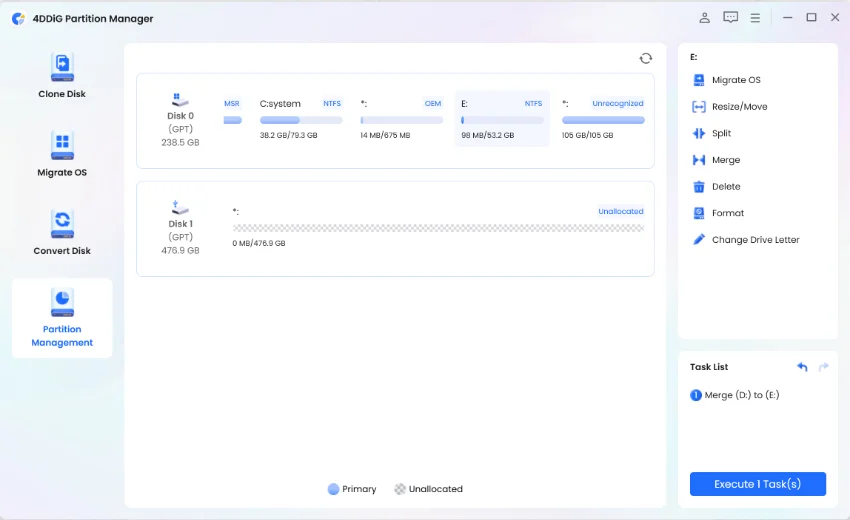
Step 1:Right click on the target partition that you want to increase its capacity and select "Merge".
-
Step 2:Select a partition or unallocate space adjacent to the target partition and preview the disk layout after partition merging. Then click OK to merge the selected partition or unallocate space with the target partition.
 Note
Note
Currently you can only merge two adjacent partitions. If a partition or unallocated space is not adjacent to the target partition, you cannot merge them.
-
Step 3:A pending operation will be added to the Task List. Simply click "Execute 1 Task(s)" and select OK to commit the operation.
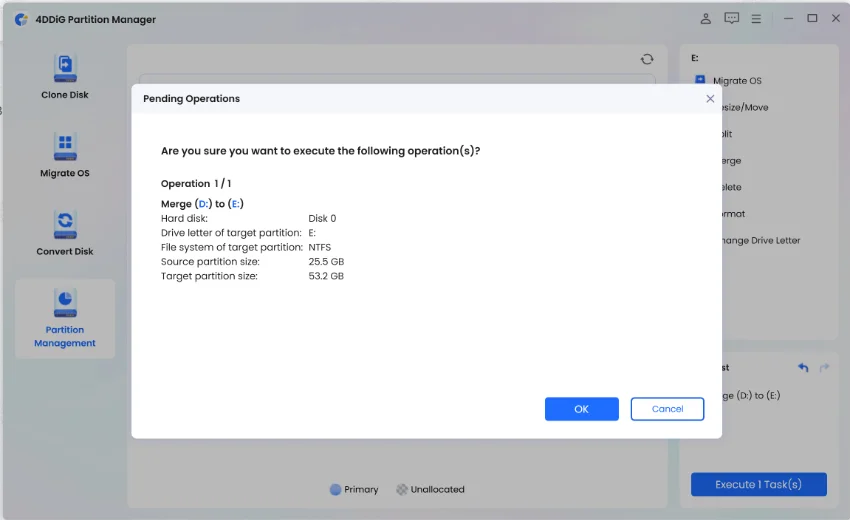
-
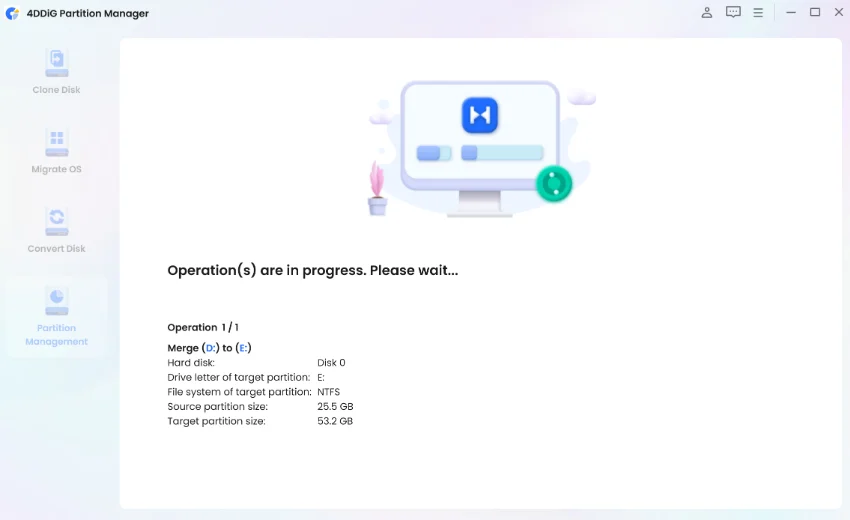
Step 4:The partition merging process can take some time to complete, depending on the size of the partition you want to merge. To avoid data loss or corruption, please do not close the program until the process is complete.
-
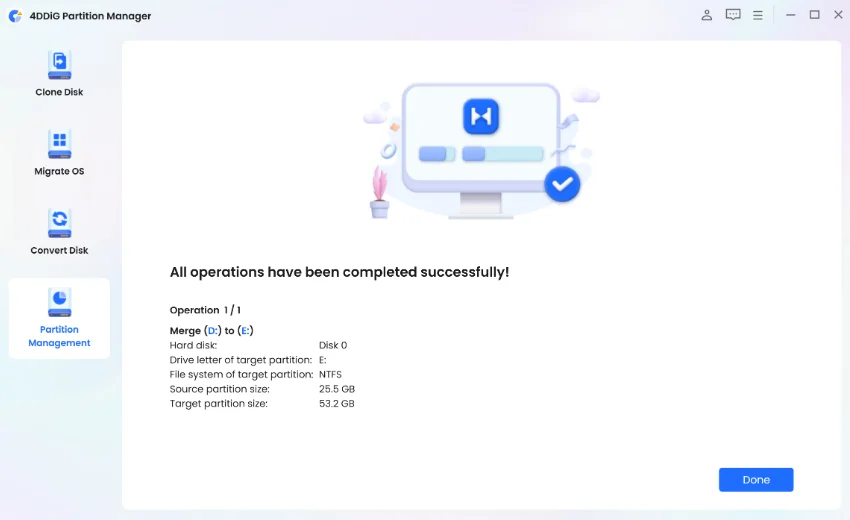
Step 5:Click Done after successfully merging the partitions.
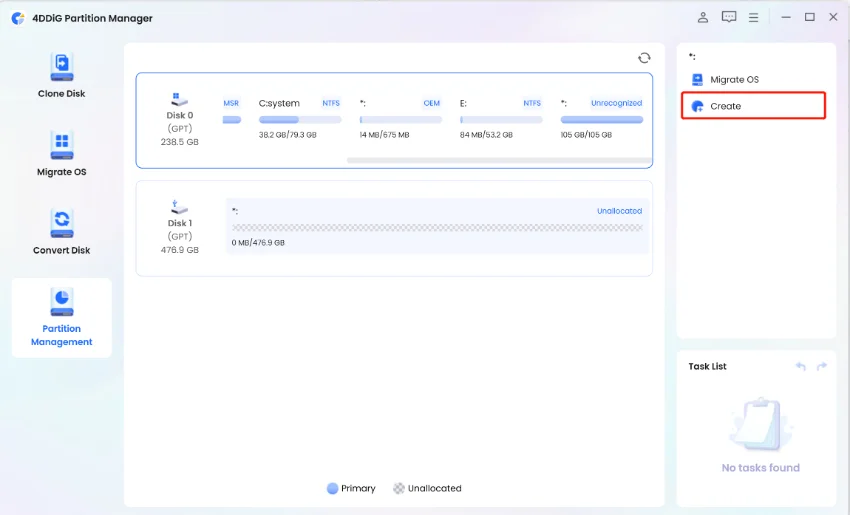
Create New Partition
If there is unallocated space on a hard disk, you can create a new partition from the unallocated space by adjusting its size, file system format, and drive letter. If there is no unallocated disk space, you can create some by shrinking an existing partition.
To create a partition from unallocated space:
-
Step 1:Download and launch 4DDiG Partition Manager. Select "Partition Management" in the left navigation bar. Then right-click the unallocated partition from which you want to create a new partition and select "Create". (This option is unavailable if there is no unallocated disk space.)
-
Step 2:In the popup window, set parameters for the new partition, including partition size, drive letter, volume label, and files system (NTFS, exFAT, FAT16, or FAT32), and then click OK.
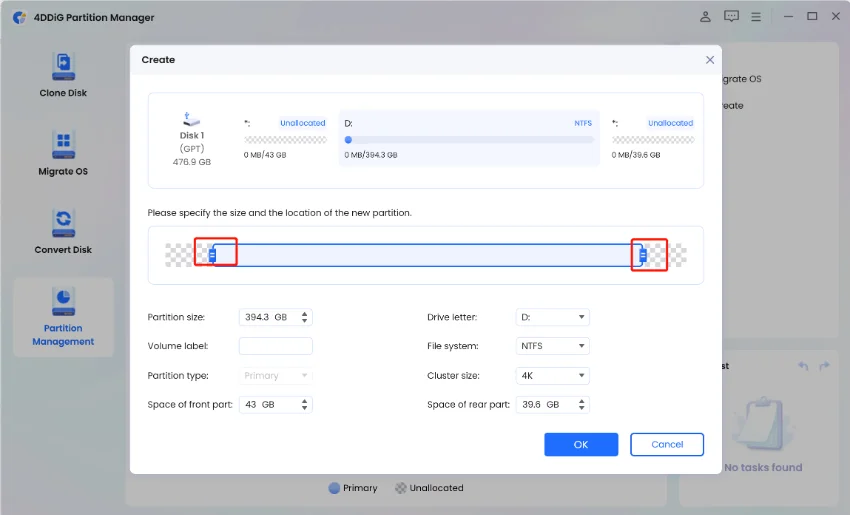 Note
Note
You can either drag the partition handle to specify the size of the new partition or manually enter the size of the volume you want to create in GB.
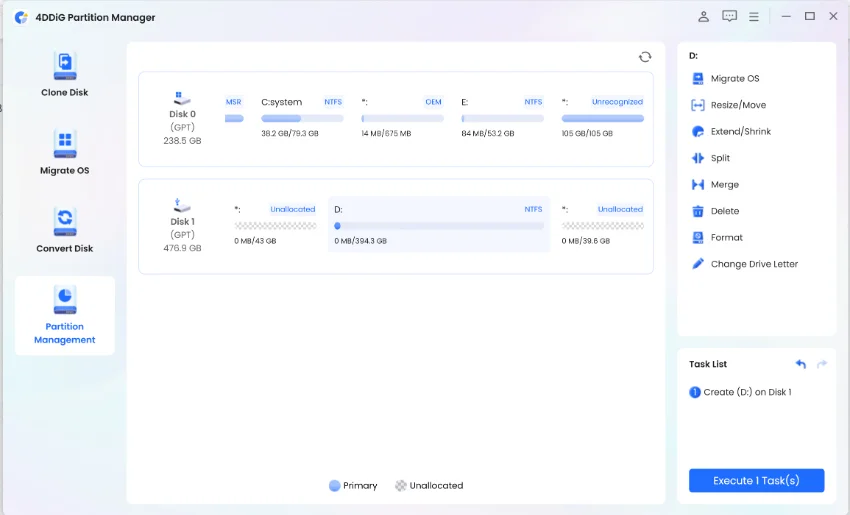
-
Step 3:From the main interface, you can preview the size and position of the newly created partition. Click "Execute 1 Task(s)" and click OK if confirmed.
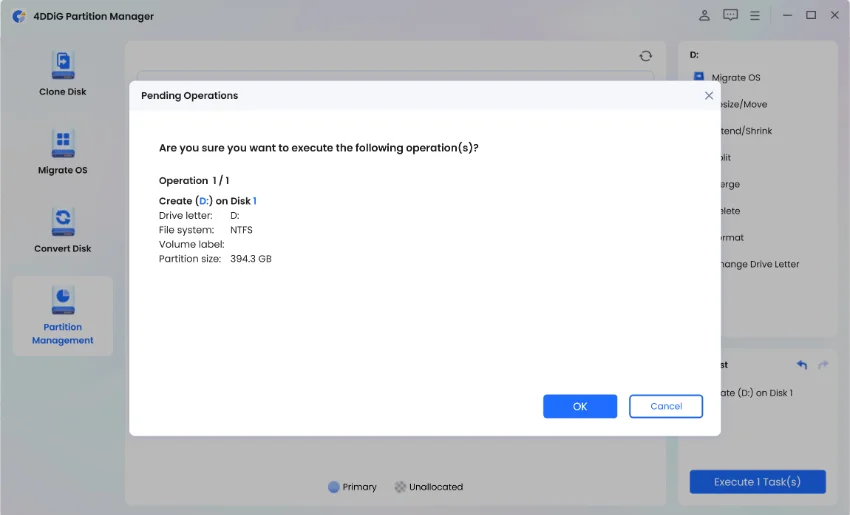
-
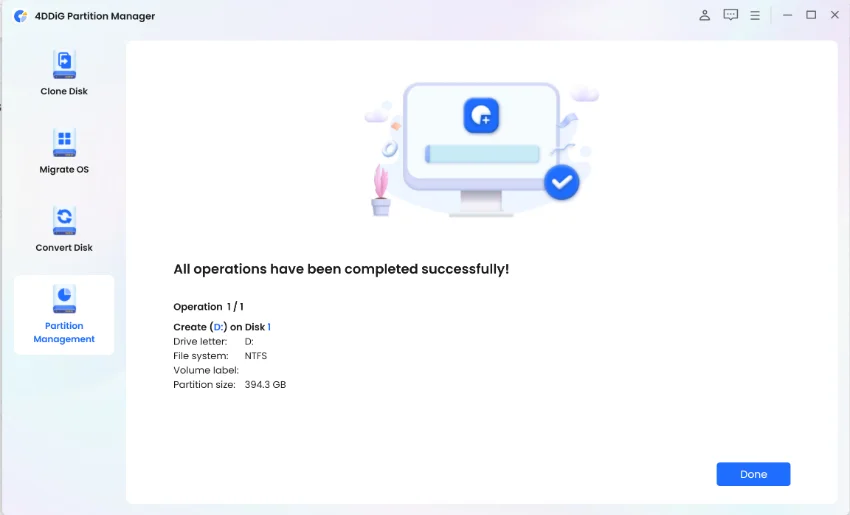
Step 4:Wait for the new partition to be created. During the partition creation process, the program will automatically format the partition so that it can be used to store data.
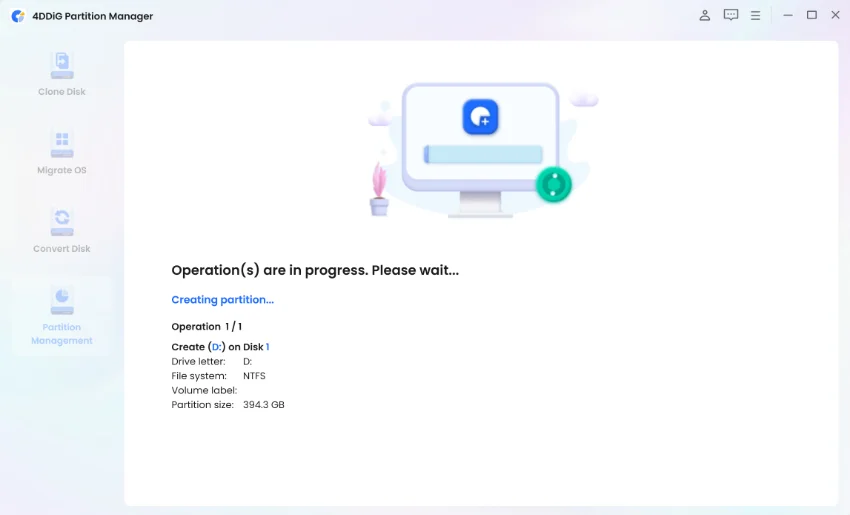
-
Step 5:Click Done when a new partition is created successfully.
Delete Partition
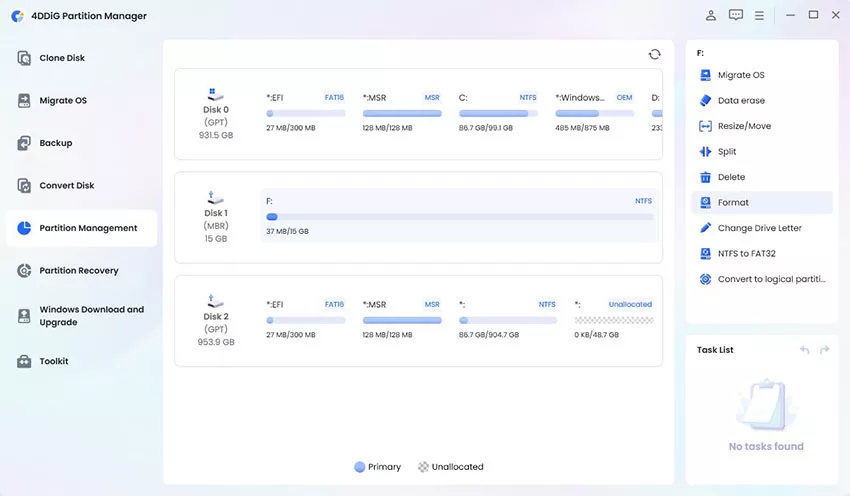
Deleting a partition on a hard disk can help free up disk space. If there is a partition you no longer need on your disk, you can use 4DDiG Partition Manager to delete it with ease, and turn it into unallocated space that is available for extending the size of another partition on the same disk.
To delete a partition:
-
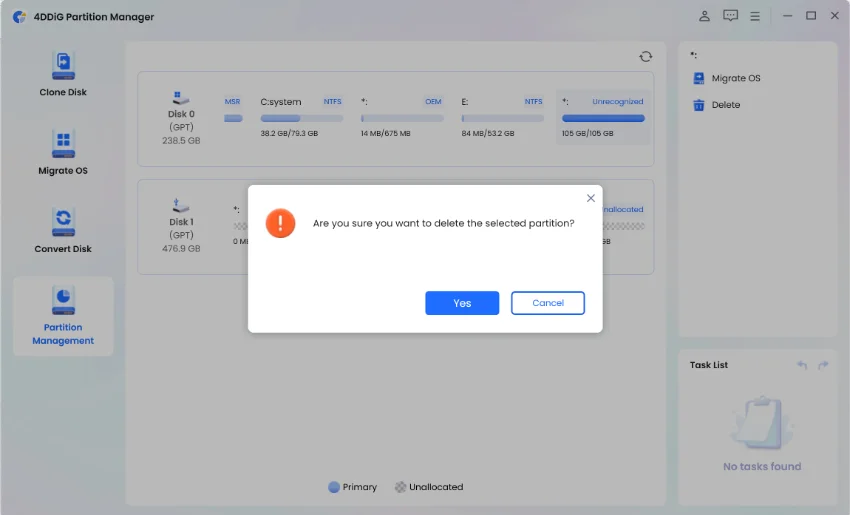
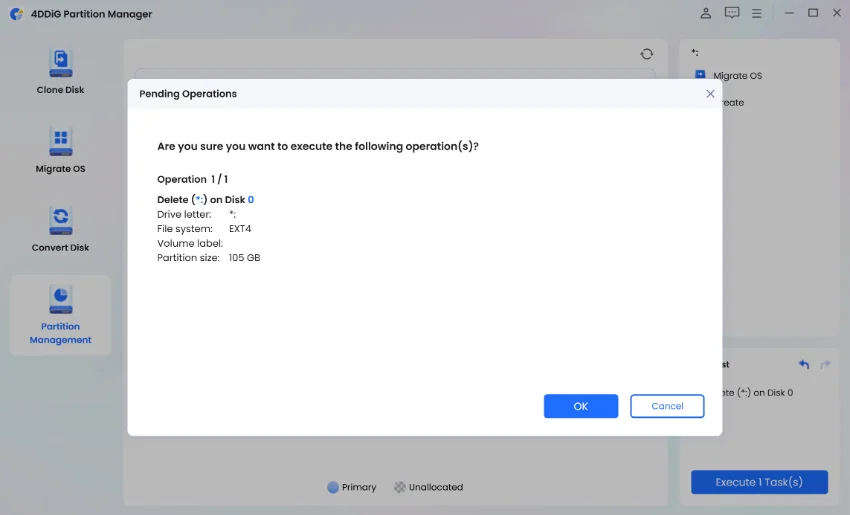
Step 1:Download and launch 4DDiG Partition Manager. Select "Partition Management" in the left navigation bar. Then right-click on the partition that you want to delete and select the Delete option from the drop-down list.

-
Step 2:Click Yes when a dialog that asks for confirmation appears.
-
Step 3:The program then adds the deletion task to the Task List. Click "Execute 1 Task(s)" in the bottom right corner and click OK to make the deletion take effect.
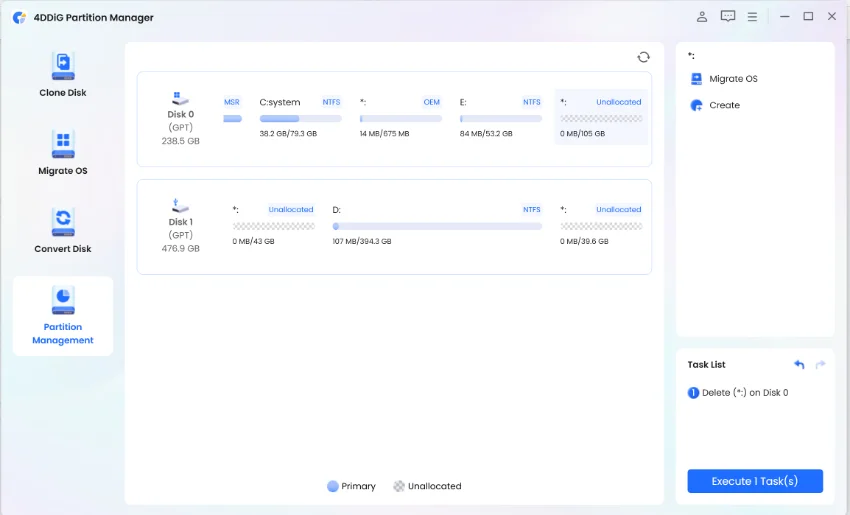
-
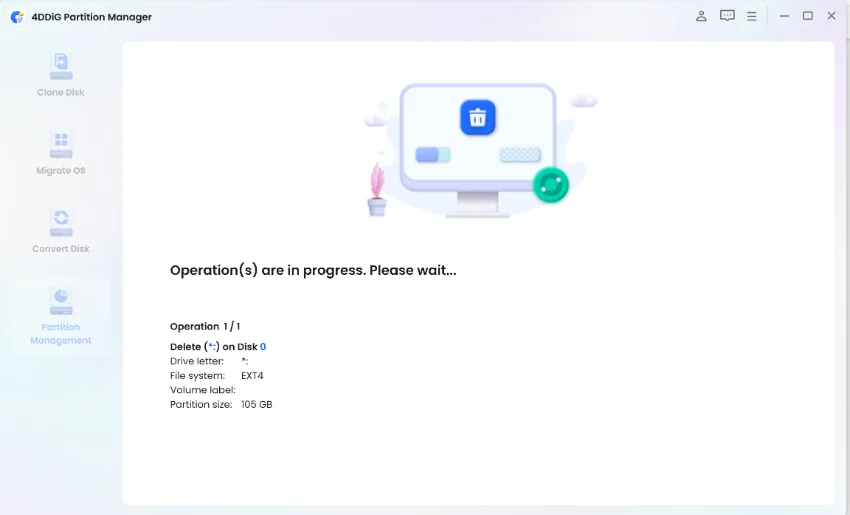
Step 4:Allow a few seconds for the program to finish the partition deletion.
-
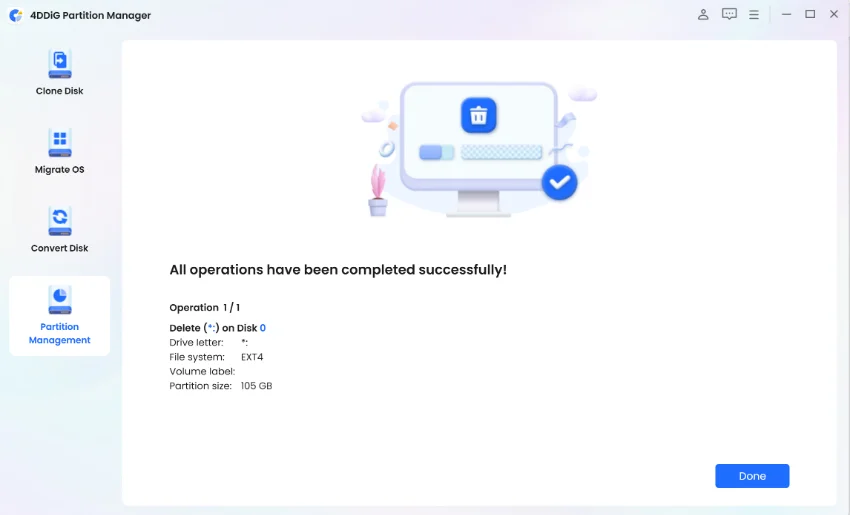
Step 5:Click Done when the selected partition is deleted successfully.
Format Partition
Formatting a partition is the process of deleting all data on a chosen partition and installing a file system to prepare available space for the operating system. There are many situations when you need to format a partition:
- When you want to delete all data on a partition without deleting the partition, you can format it for rearrangement.
- A partition that is newly created should be formatted before it can be used to store data.
- When the file system of a partition is not supported or gets damaged or corrupted, you can format the partition with a new file system like NTFS and exFAT.
To format a partition:
-
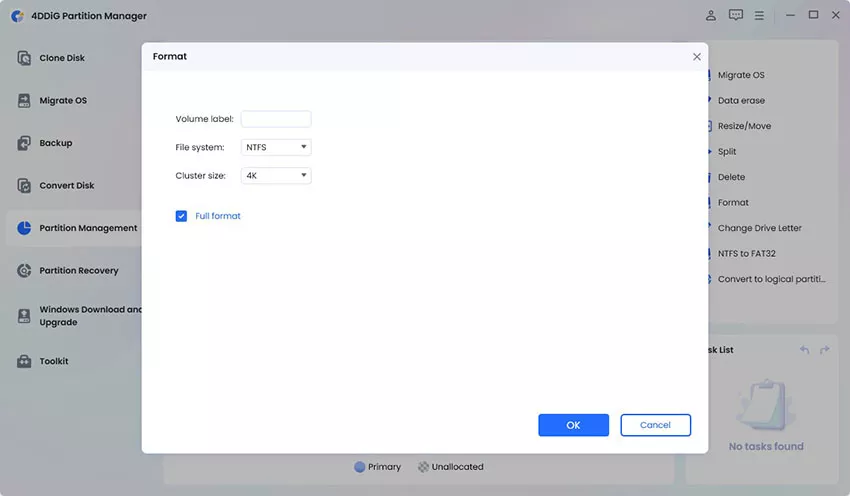
Step 1:Download and launch 4DDiG Partition Manager. Select "Partition Management" in the left navigation bar. Then right-click the partition that you want to format and select the Format option.
-
Step 2:Reset the volume label, file system, and cluster size for the partition. Once confirmed, click OK to continue.
 Note
Note
If you tick the Full format option, all the existing data on the partition will be fully overwritten and erased, and can't be recovered with the help of any data recovery software.
-
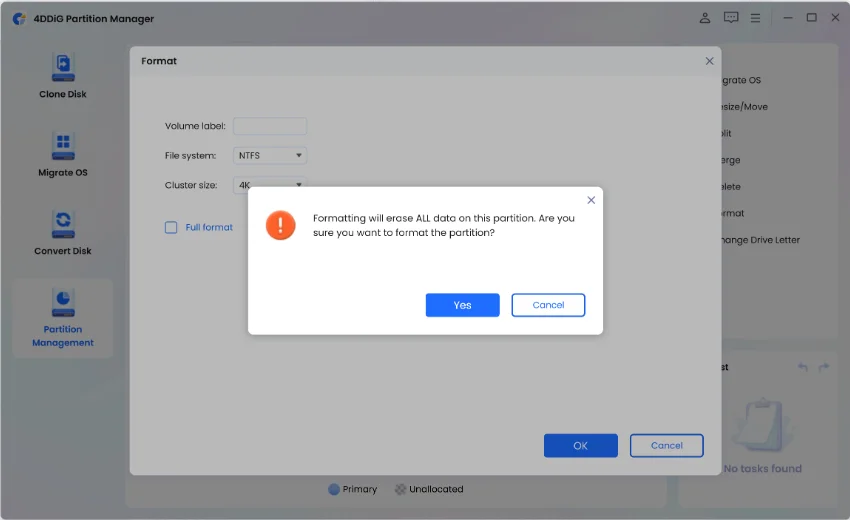
Step 3:Click Yes when you are ready to format the partition.
-
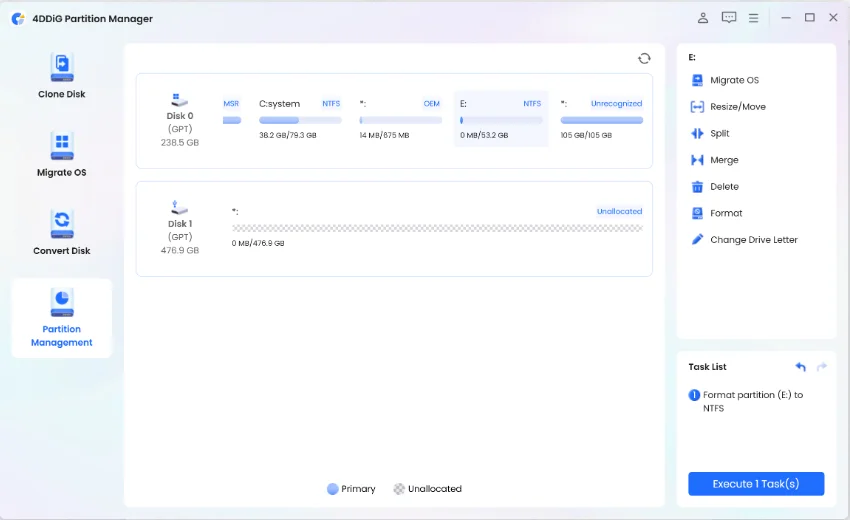
Step 4:You can preview the result after the partition is formatted. If it is satisfying, click "Execute 1 Task(s)" and then OK to start the partition formatting process.

-
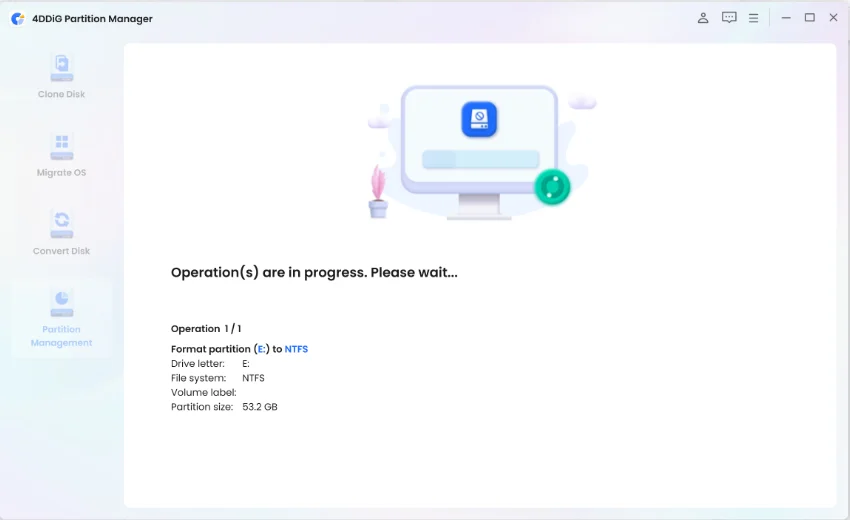
Step 5:Wait for the program to finish formatting the partition.
-
Step 6:Click Done when the partition is formatted successfully.

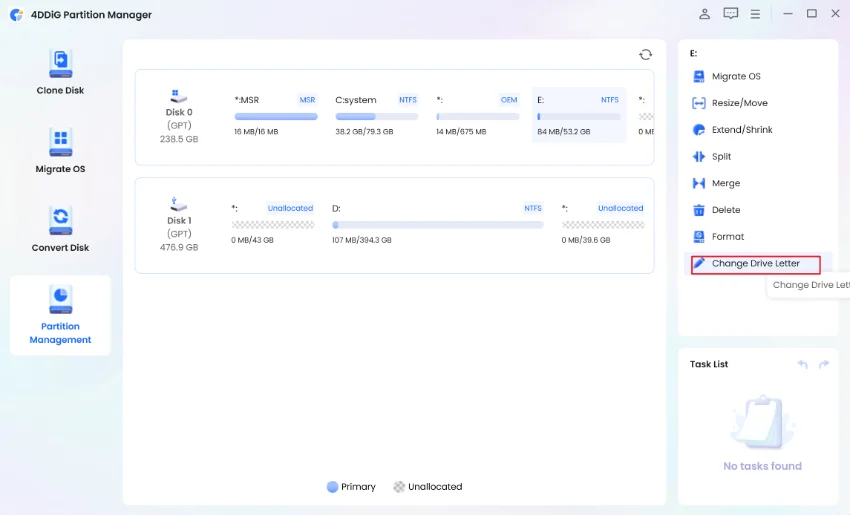
Change Drive Letter
Typically, Windows will assign a drive letter to any disk drive it detects automatically when the file system on its partition is recognized. However, you can change the drive letter of a partition according to your preference.
To change the drive letter of a partition:
-
Step 1:Right-click the partition whose drive letter you want to change and select "Change Drive Letter".
 Note
Note
You cannot change the drive letter of the drive that the Windows operating system is installed on, that is, your local C: drive letter, otherwise, it will result in Windows not booting, and apps won't run at all, etc.
-
Step 2:Select a new drive letter that hasn't been taken up by other partitions for the partition and click OK.
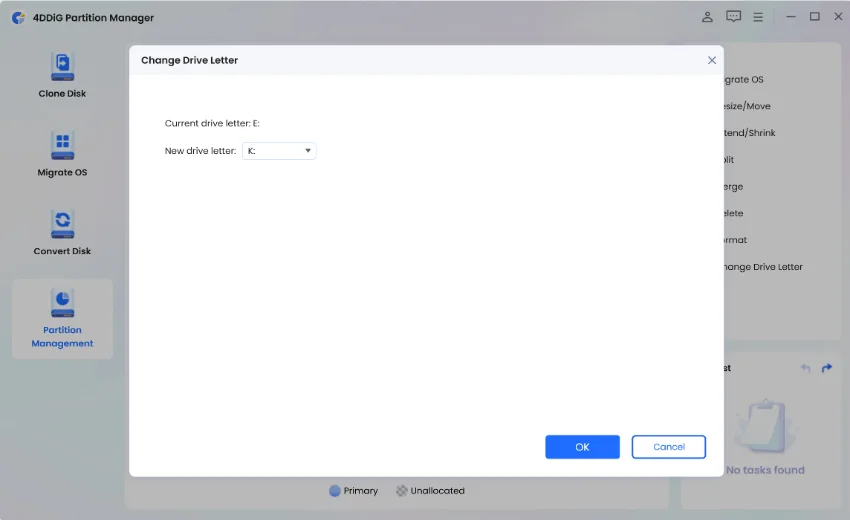 Note
Note
The drive letter of the selected partition will be removed if you choose None as the new drive letter.
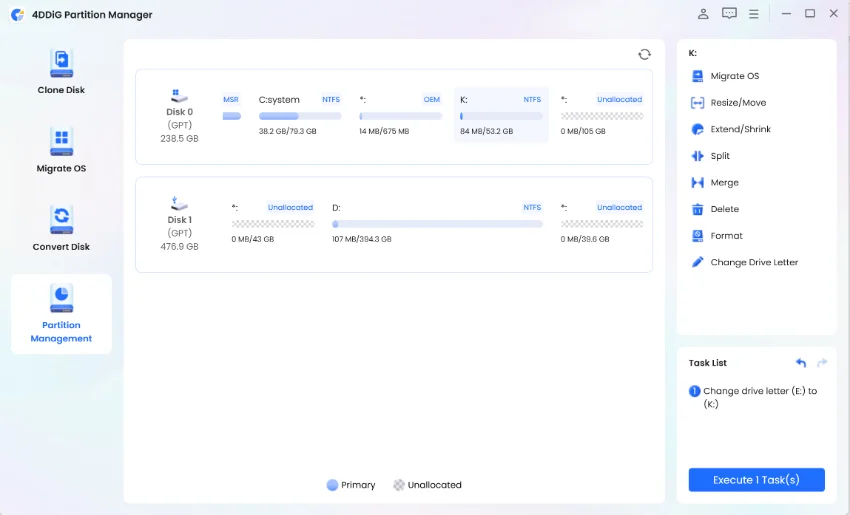
-
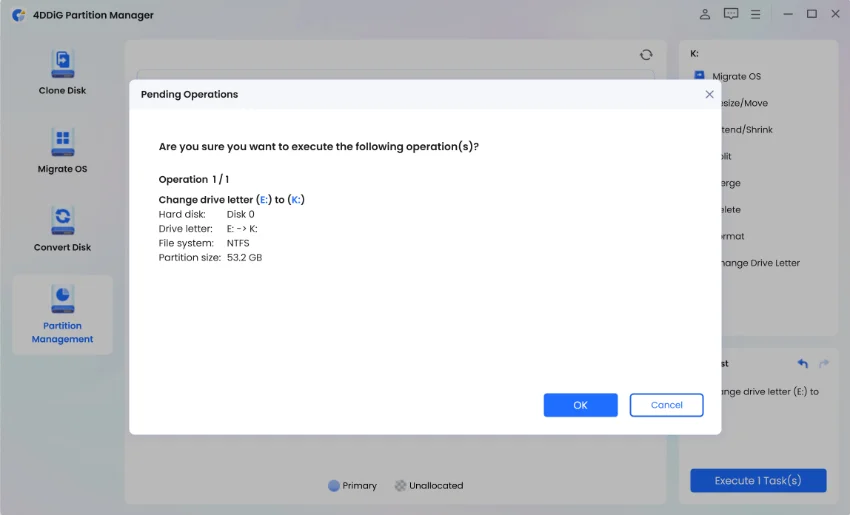
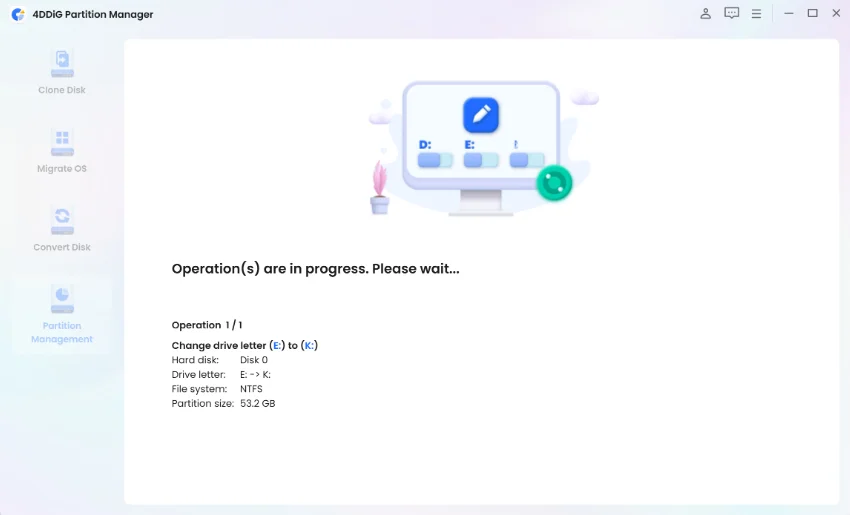
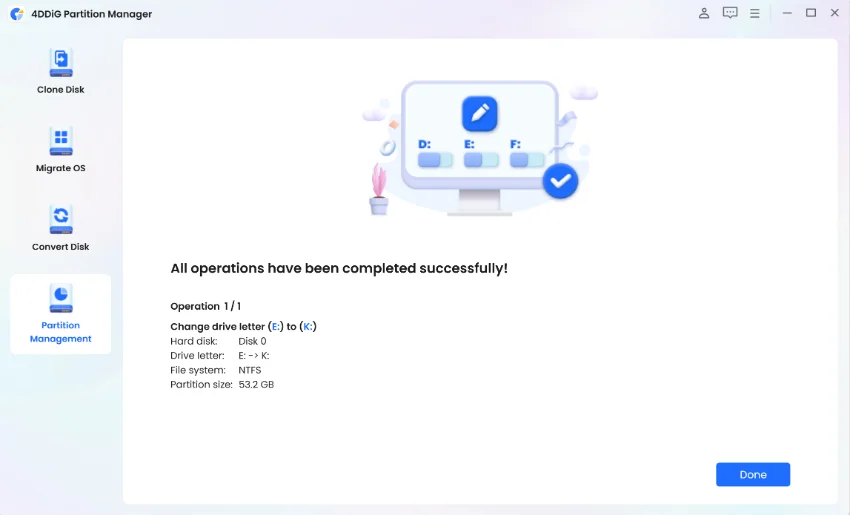
Step 3:The main interface displays a preview of the partition with the new drive letter. Click "Execute 1 Task(s)" and then select OK to commit the change.
-
Step 4:Wait patiently until the process is complete.
-
Step 5:Click Done when the drive letter of the partition is successfully changed to the one you specify.
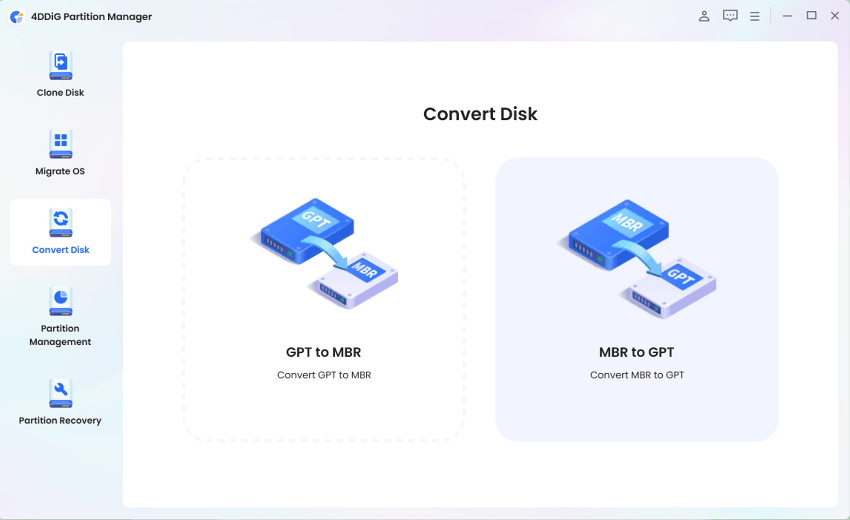
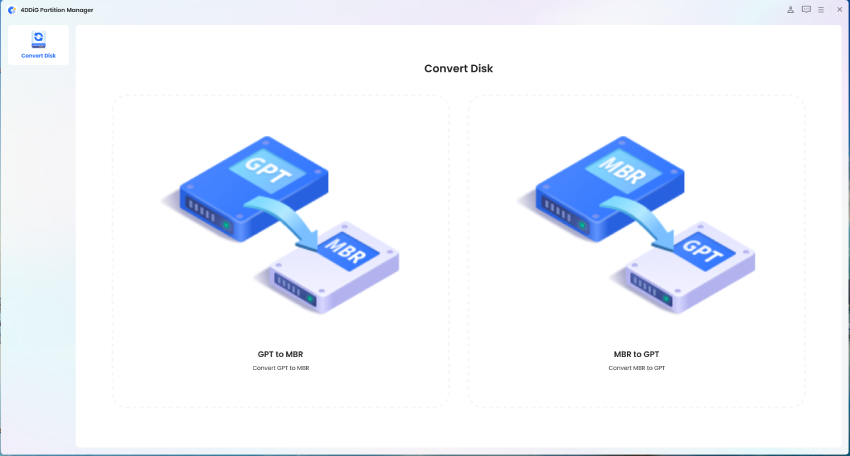
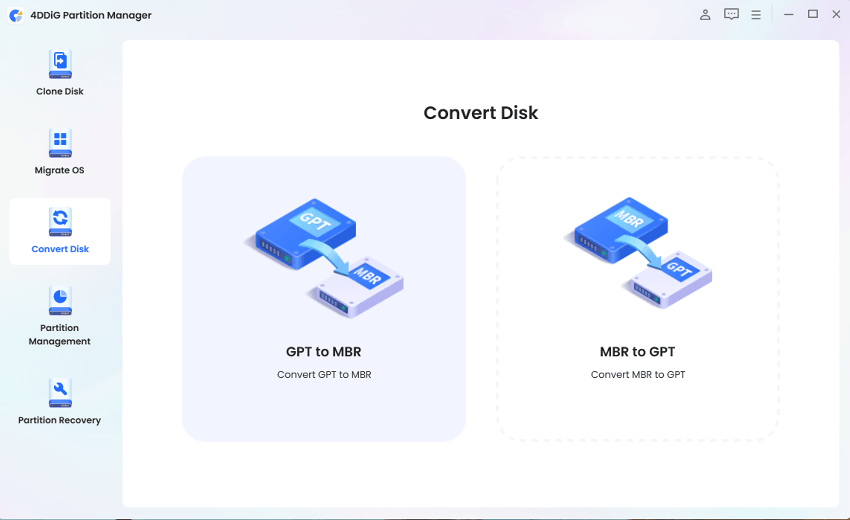
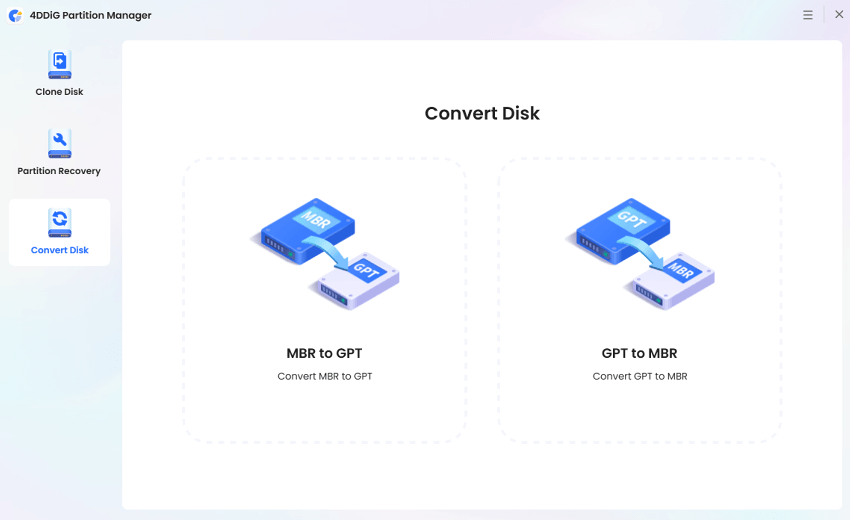
Convert MBR to GPT
4DDiG Partition Manager is the ultimate MBR/GPT disk converter that enables you to convert MBR to GPT or GPT to MBR quickly and safely. You can use this software to easily convert MBR to GPT for Windows 11 upgrade without data loss.
![]() Secure Download
Secure Download
-
Step 1:Download and install 4DDiG Partition Manager on your computer. Then launch the application, select "Convert Disk" in the left navigation panel and click on "Convert MBR to GPT" to proceed.
-
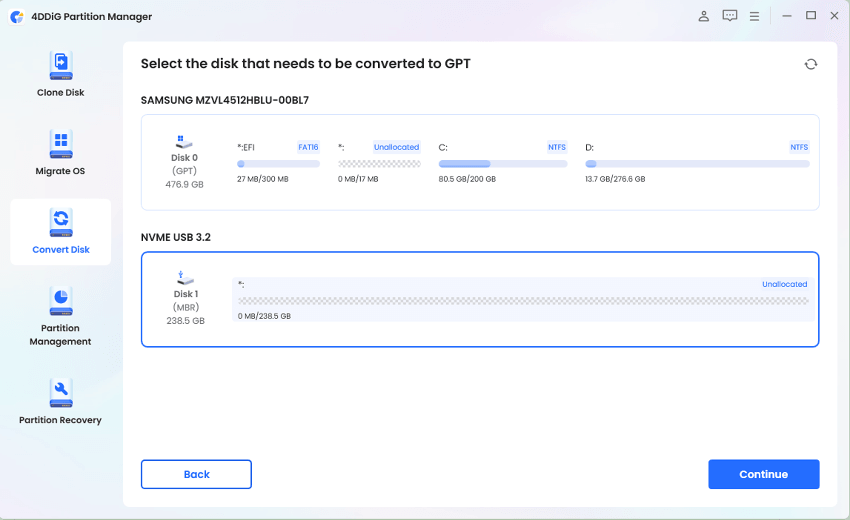
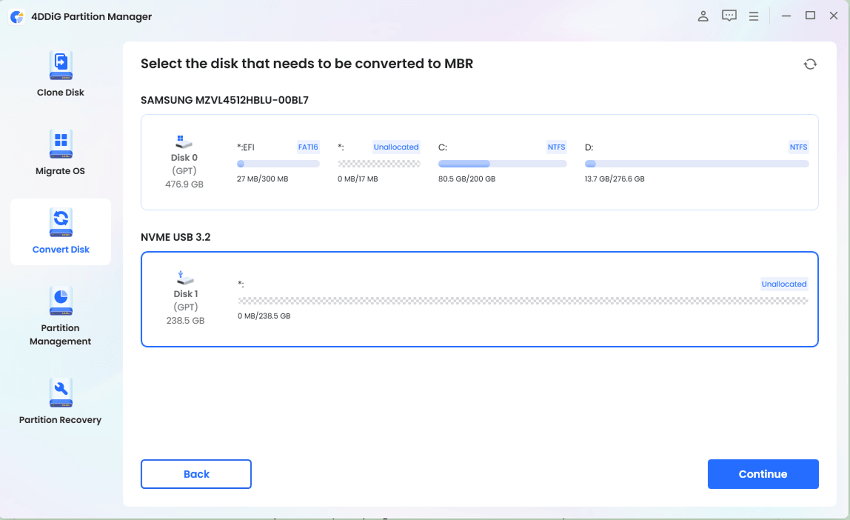
Step 2:Select the disk you want to convert, click ”Continue”, and then you will enter the execution interface.
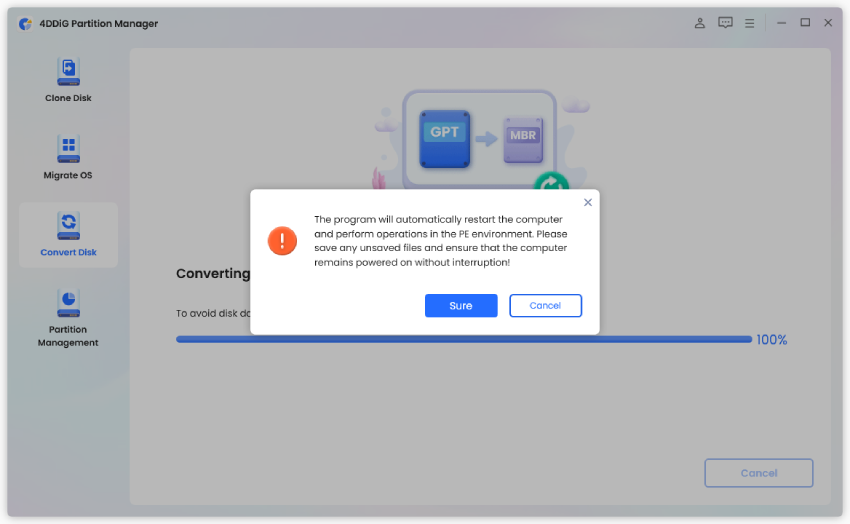
If the chosen disk is the system disk, the program will download the PE component. After successful download, a prompt window will appear. Ensure you save any unsaved files and prevent power loss. Confirm everything is correct, then click "Sure". The computer will restart and enter the PE environment automatically.
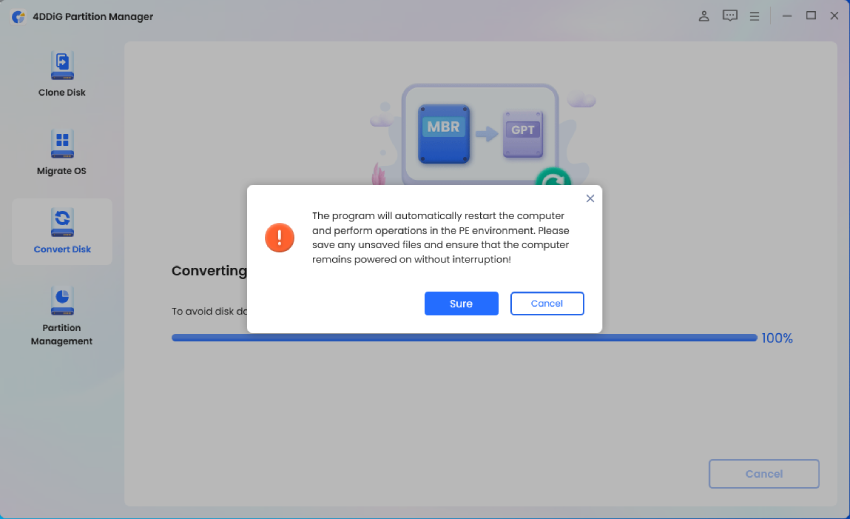 Note
Note
If the disk you want to convert is an external disk, the program will convert it automatically without the need to restart and enter the PE environment.
-
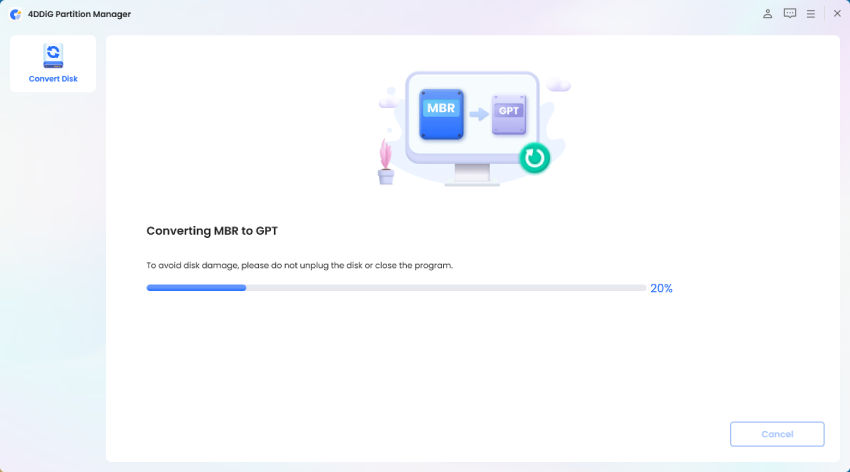
Step 3:After the program starts in the PE environment, select "Convert MBR to GPT" to proceed.
-
Step 4:Select the disk you want to convert, click ”Continue”.
 Note
Note
Please note that in the PE environment, users can only see their own system disk.
-
Step 5:4DDiG Partition Manager is converting MBR to GPT. The speed of disk conversion depends on the number of partitions on the disk.
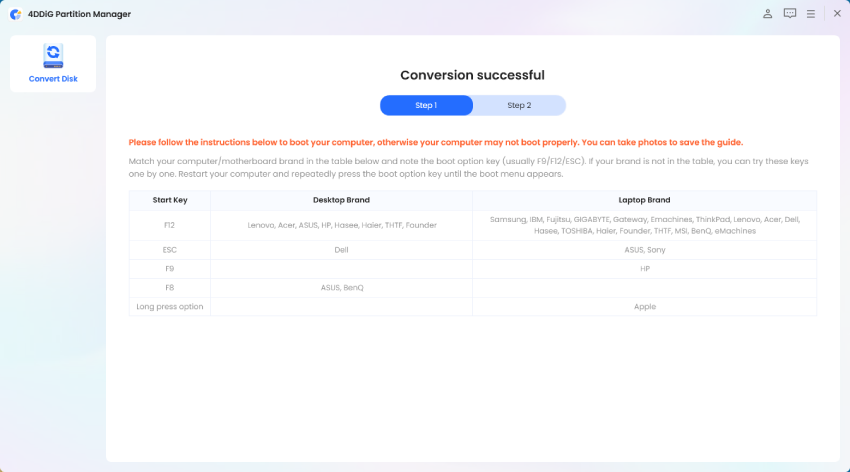
-
Step 6:Conversion successful! Please follow the instructions below to boot your computer, otherwise your computer may not boot properly.
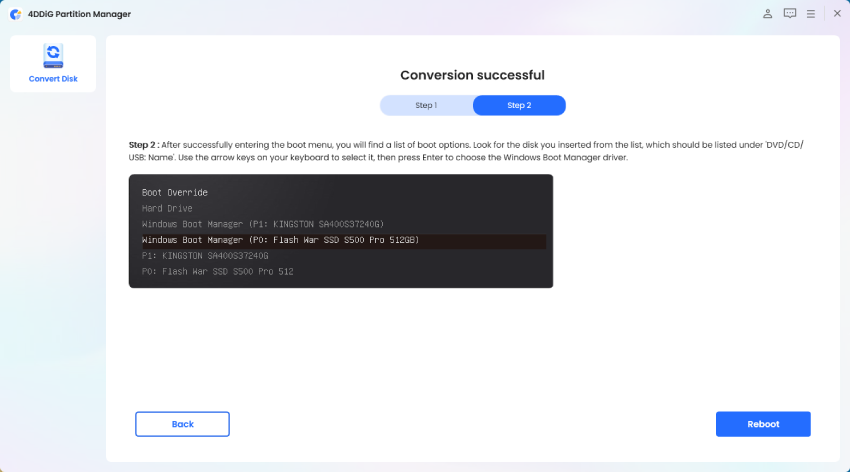
Convert GPT to MBR
4DDiG Partition Manager is the ultimate MBR/GPT disk converter that enables you to convert MBR to GPT or GPT to MBR quickly and safely. You can use this software to easily convert MBR to GPT for Windows 11 upgrade without data loss.
![]() Secure Download
Secure Download
-
Step 1:Download and install 4DDiG Partition Manager on your computer. Then launch the application, select "Convert Disk" in the left navigation panel and click on "Convert GPT to MBR" to proceed.
-
Step 2:Select the disk you want to convert, click ”Continue”, and then you will enter the execution interface.
If the chosen disk is the system disk, the program will download the PE component. After successful download, a prompt window will appear. Ensure you save any unsaved files and prevent power loss. Confirm everything is correct, then click "Sure". The computer will restart and enter the PE environment automatically.
 Note
Note
If the disk you want to convert is an external disk, the program will convert it automatically without the need to restart and enter the PE environment.
-
Step 3:After the program starts in the PE environment, select "Convert GPT to MBR" to proceed.
-
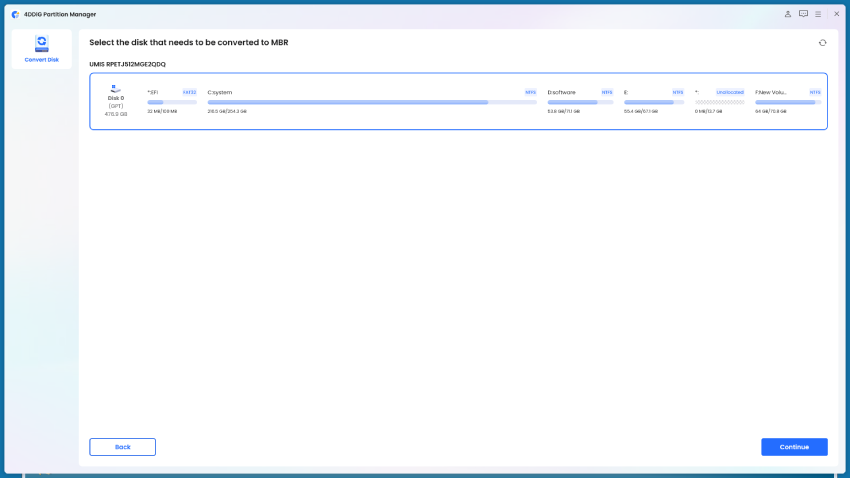
Step 4:Select the disk you want to convert, click ”Continue”.
 Note
Note
Please note that in the PE environment, users can only see their own system disk.
-
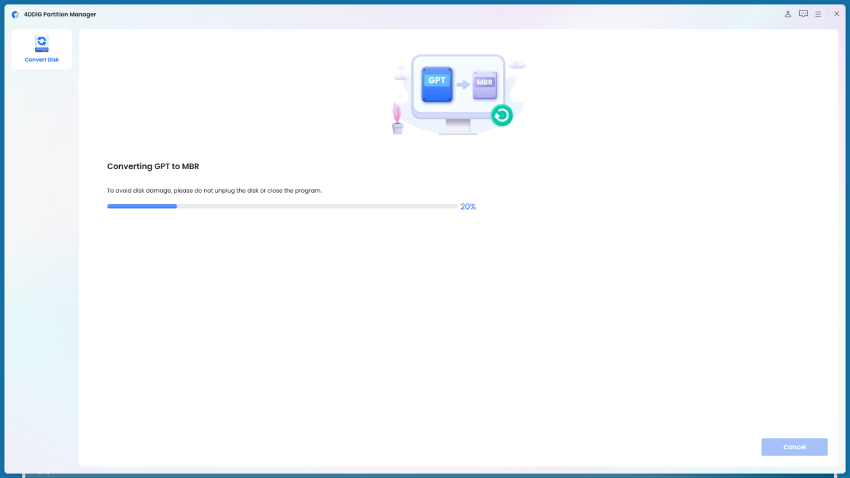
Step 5:4DDiG Partition Manager is converting GPT to MBR. The speed of disk conversion depends on the number of partitions on the disk.
-
Step 6:Conversion successful! Please follow the instructions below to boot your computer, otherwise your computer may not boot properly.
Create WinPE
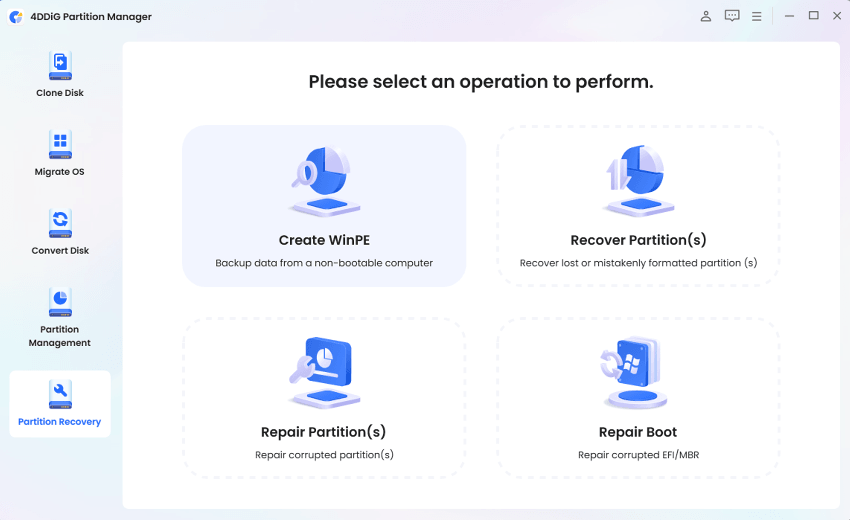
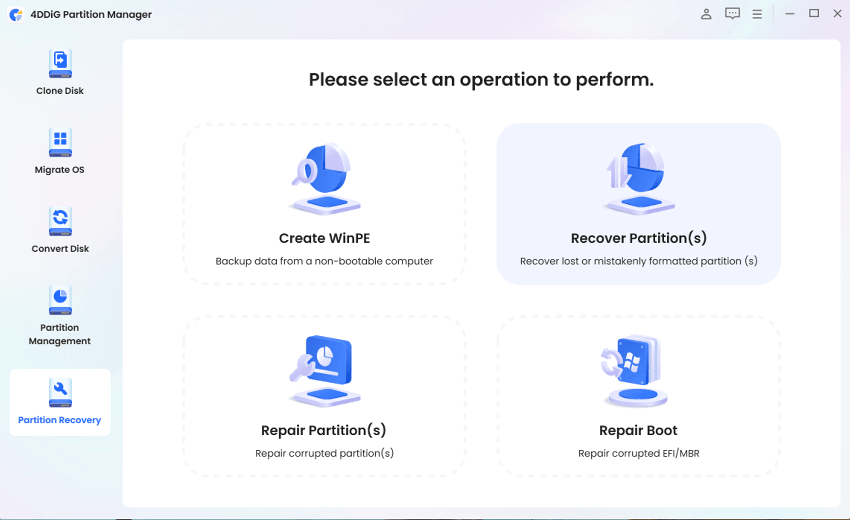
4DDiG Partition Manager is reliable partition recovery software. It offers a comprehensive solution that enables you to recover deleted or formatted partition, repair raw partition and repair boot easily and safely. Also, it can help you create WinPE, so you can clone disk, repair partition and convert disk on a computer that cannot boot up normally.
![]() Secure Download
Secure Download
How to Create a Bootable WinPE Media with 4DDiG Partition Manager?
-
Step 1:Install and launch 4DDiG Partition Manager and then connect a USB flash drive or CD/DVD to your computer. Select "Partition Recovery" in the left navigation bar, then select "Create WinPE" to proceed.
-
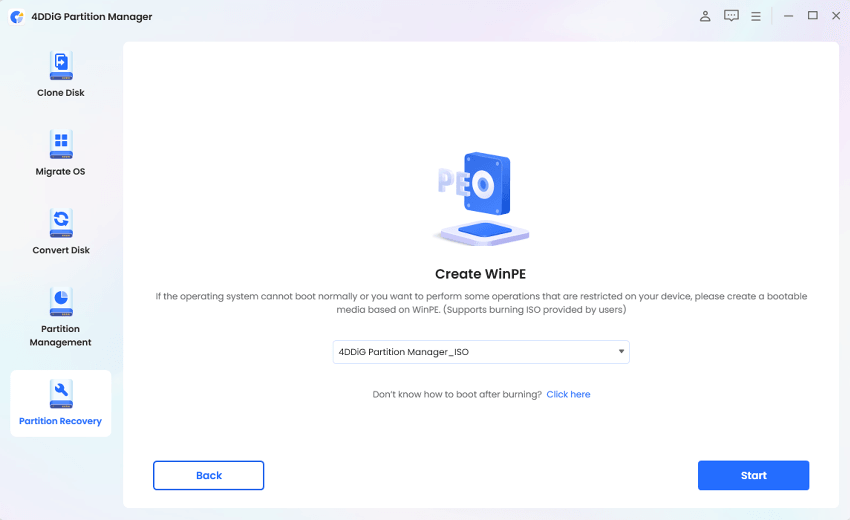
Step 2:Select a way to create the WinPE bootable media based on your needs, then click on "Start" button to proceed.
-
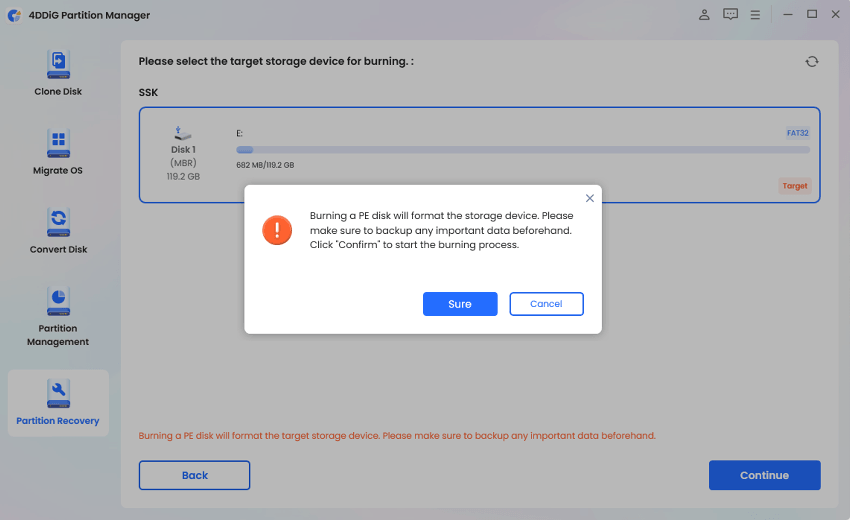
Step 3:After you select the connected USB as the target disk, click the Continue button and a pop-up window will appear to remind you that the USB flash drive will be formatted. Please confirm that you have backed up the important data inside, and then click the "Sure" button.
-
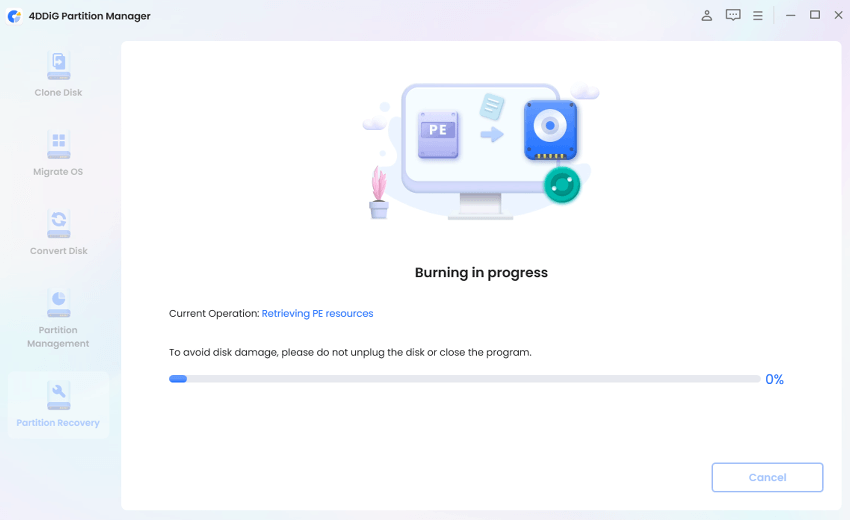
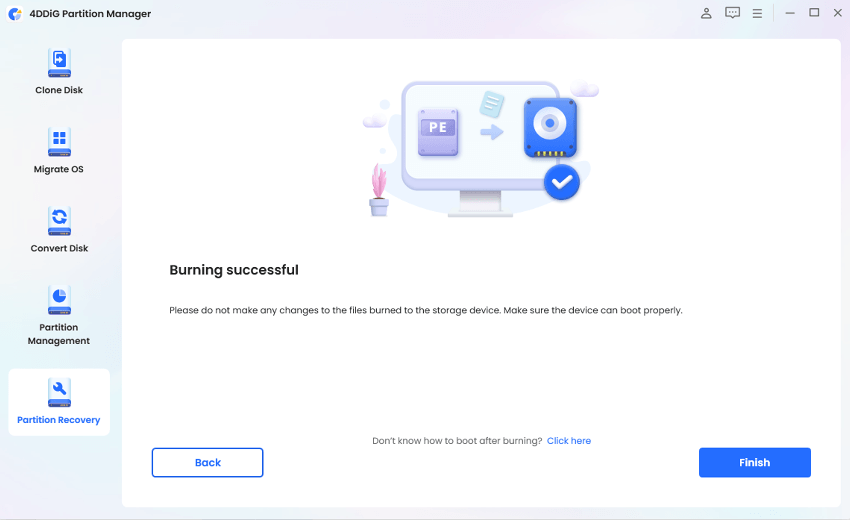
Step 4:The creation process will begin now. It may take a few minutes to create a WinPE bootable USB drive. Once it is complete, click "Finish".
How to Boot from the USB?
-
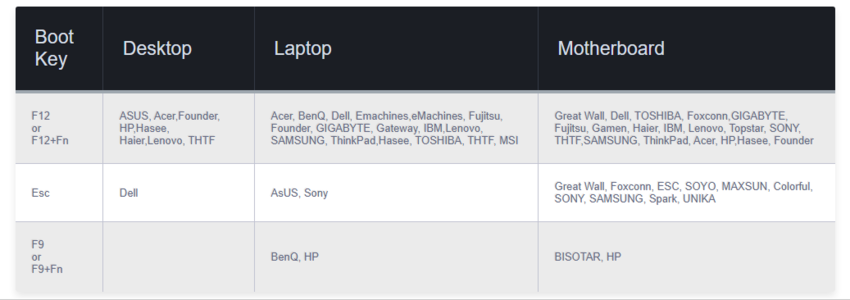
Step 1:Insert the burned USB into the dead computer. Start the computer and use the Boot Menu hot-key(s) to enter the Boot Menu on your device.
-
Step 2:When you get into the boot menu, use the arrow keys to navigate the bootable media and simply tap on "Enter" to select it as a boot drive.
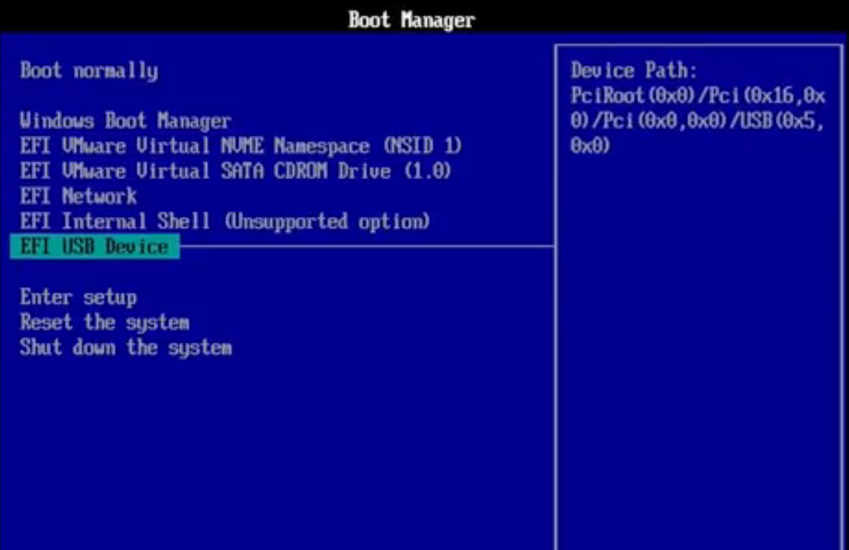
-
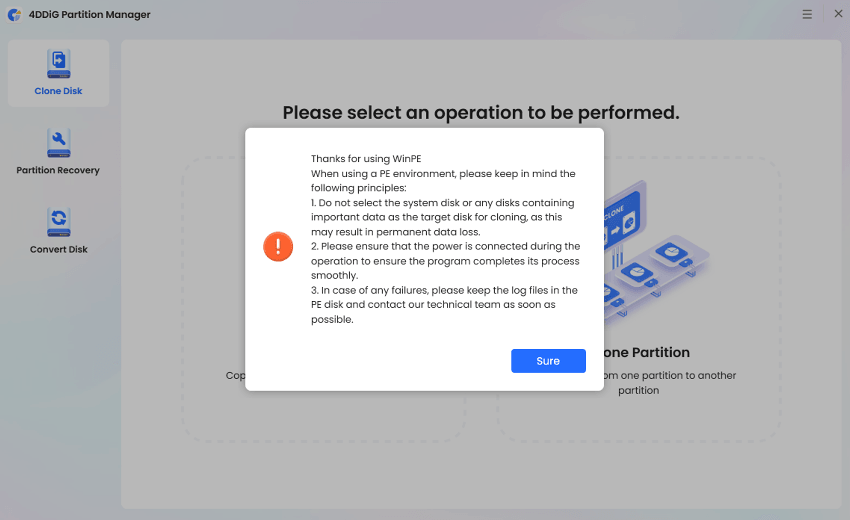
Step 3:Once you are in the boot disk system, you can use 4DDiG Partition Manager PE version. In PE environment, you can clone disk, repair partition and convert disk easily and safely.
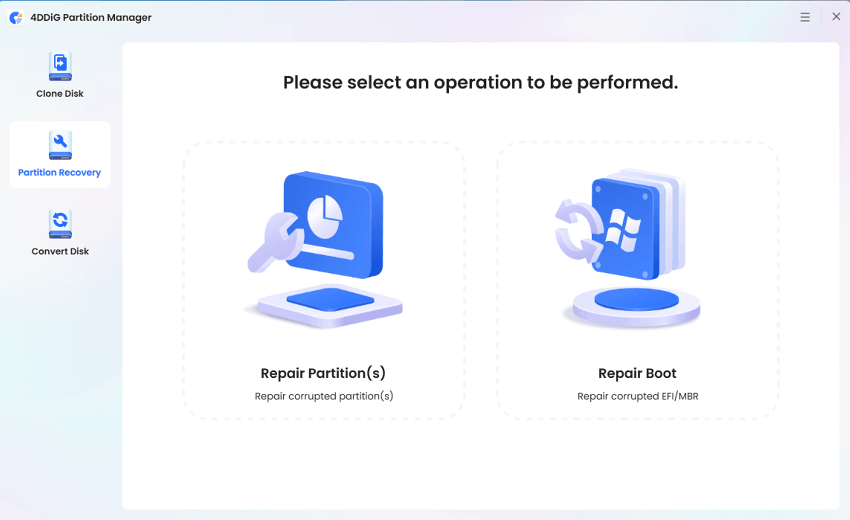
Recover Partition(s)
4DDiG Partition Manager is reliable partition recovery software. It offers a comprehensive solution that enables you to recover deleted or formatted partition, repair raw partition and repair boot easily and safely. Also, it can help you create WinPE, so you can clone disk, repair partition and convert disk on a computer that cannot boot up normally.
![]() Secure Download
Secure Download
-
Step 1:Install and launch 4DDiG Partition Manager. If you need to recover partition on an external hard drive, please connect your external hard drive to your computer. Select "Partition Recovery" in the left navigation bar, then select "Recover Partition(s)" to proceed.
-
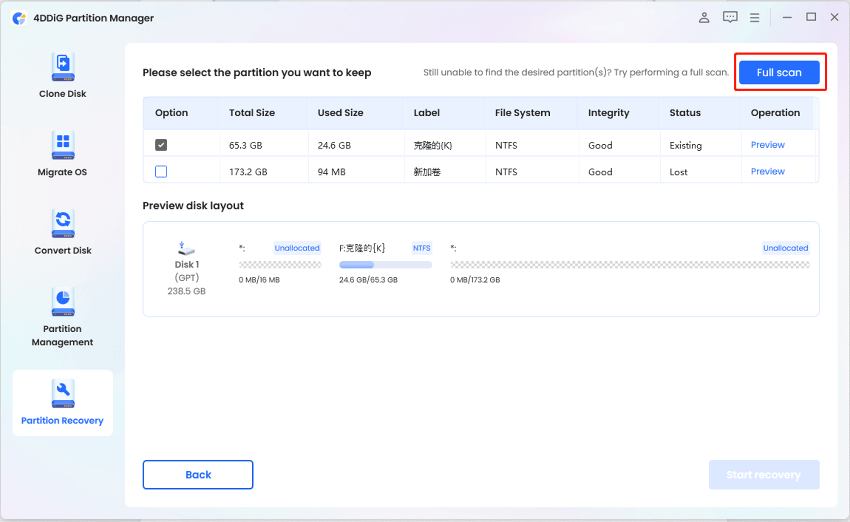
Step 2:Select the disk where the partition you want to recover is located and then click on "Quick scan" to proceed.
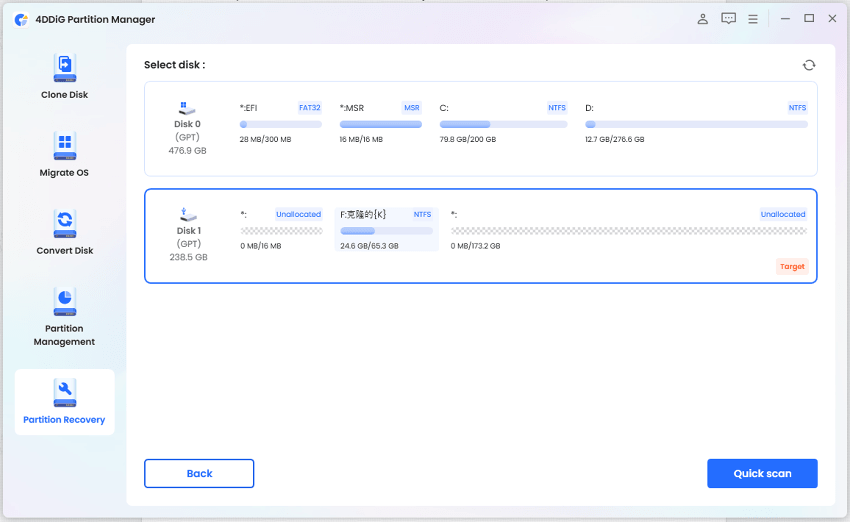
If you can't find the partition you're looking for, please try a deep scan.
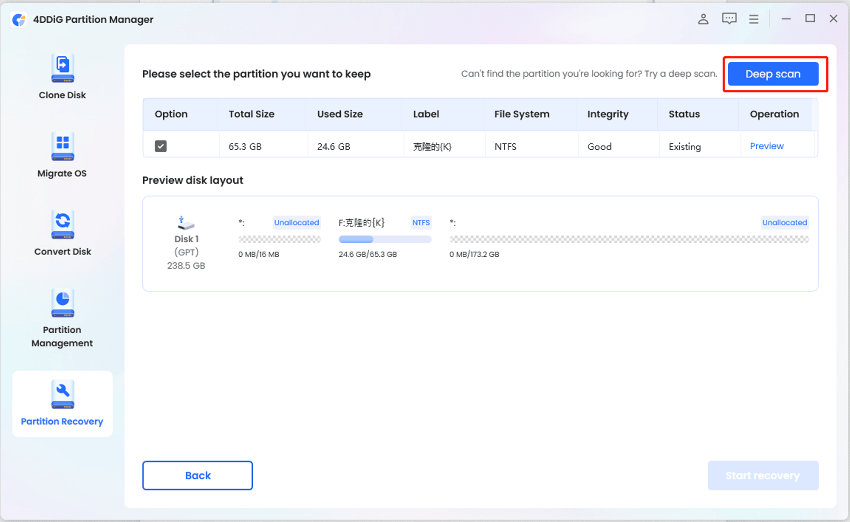
If you still unable to find the desired partition(s), you can try performing a full scan.
-
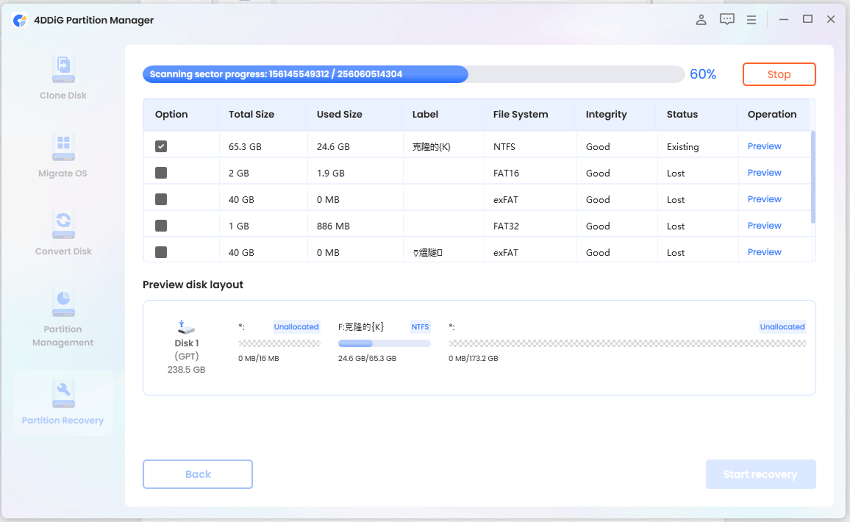
Step 3:The full scanning process will take some time, so please be patient. Once you find the partition you want to recover, you can click the Stop button to pause the scan at any time.
-
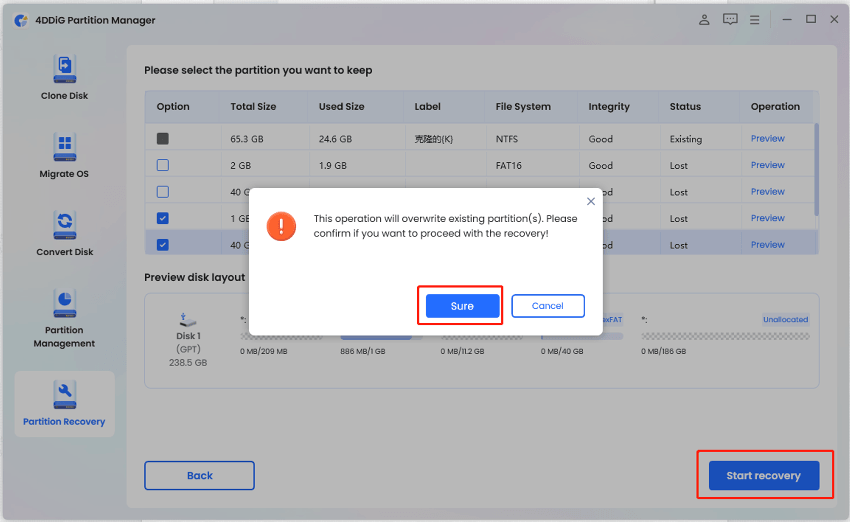
Step 4:Choose the partition(s) you want to restore. Please noted that this operation will overwrite existing partition(s), so you need to confirm whether you want to perform the operation. After that, click on "Sure" and then click on "Start recovery" to proceed.
-
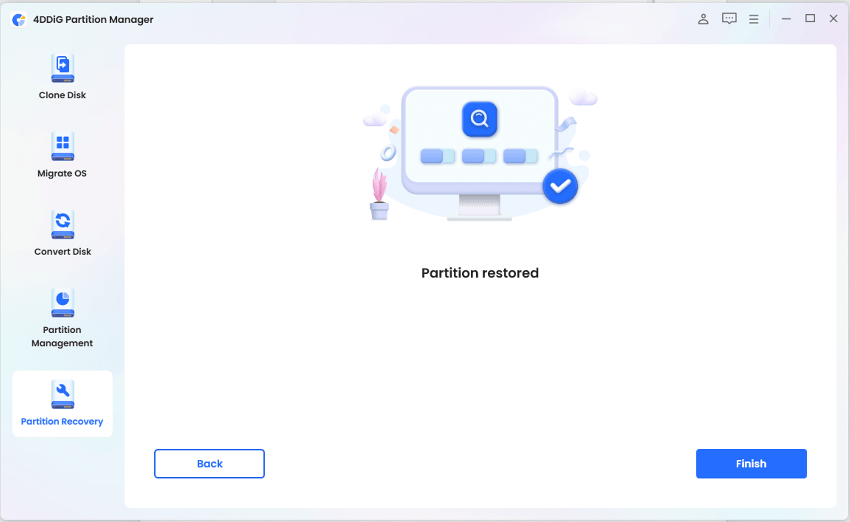
Step 5:Click Finish when the partition is successfully restored.
Repair Partition(s)
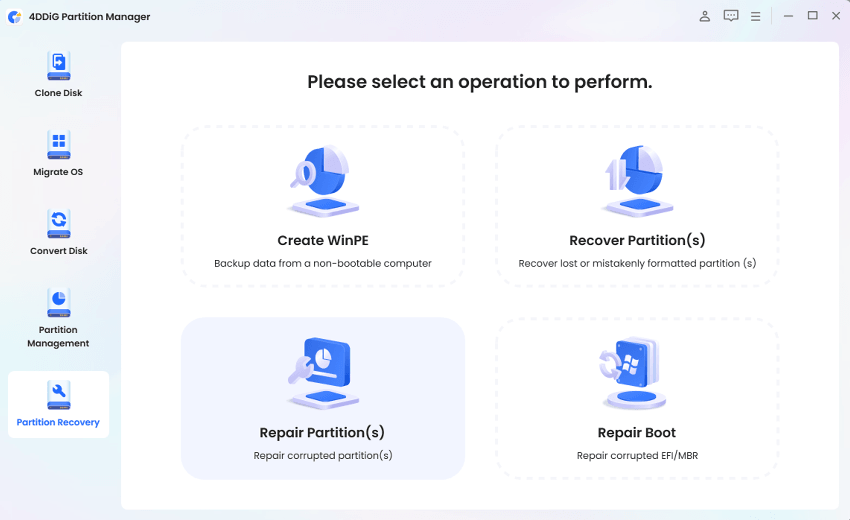
4DDiG Partition Manager is reliable partition recovery software. It offers a comprehensive solution that enables you to recover deleted or formatted partition, repair raw partition and repair boot easily and safely. Also, it can help you create WinPE, so you can clone disk, repair partition and convert disk on a computer that cannot boot up normally.
![]() Secure Download
Secure Download
-
Step 1:Install and launch 4DDiG Partition Manager. If you need to repair partition on an external hard drive, please connect your external hard drive to your computer. Select "Partition Recovery" in the left navigation bar, then select "Repair Partition(s)" to proceed.
-
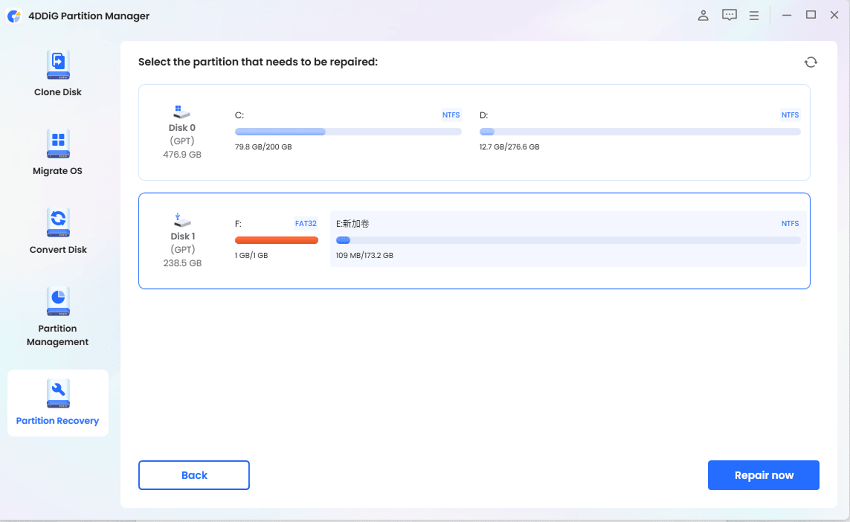
Step 2:Select the disk where the partition you want to repair is located and then click on "Repair now" to proceed.
-
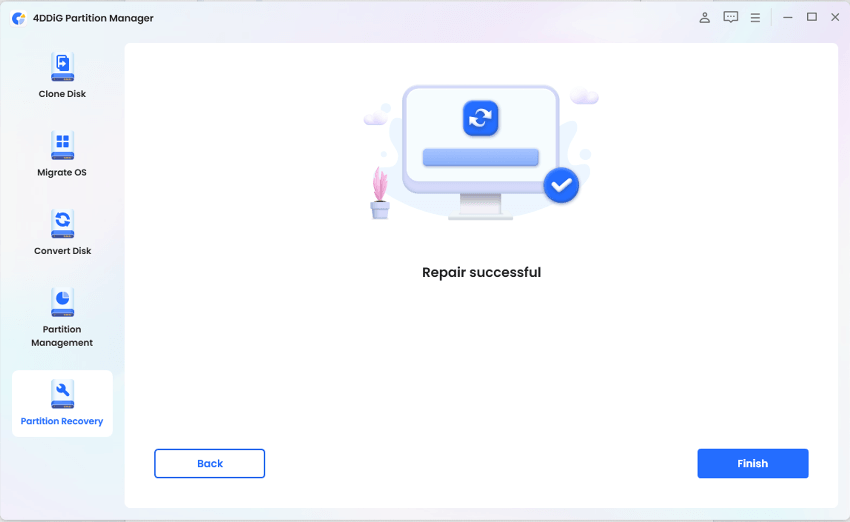
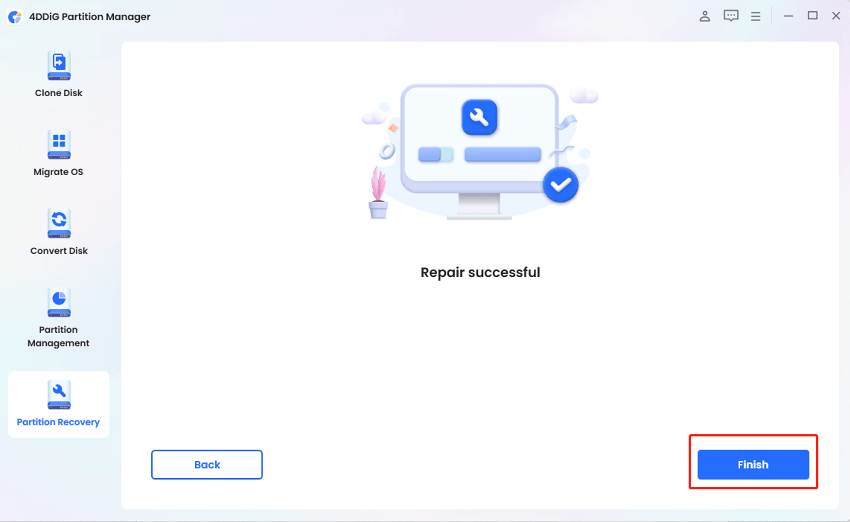
Step 3:Click Finish when the partition is successfully repaired.
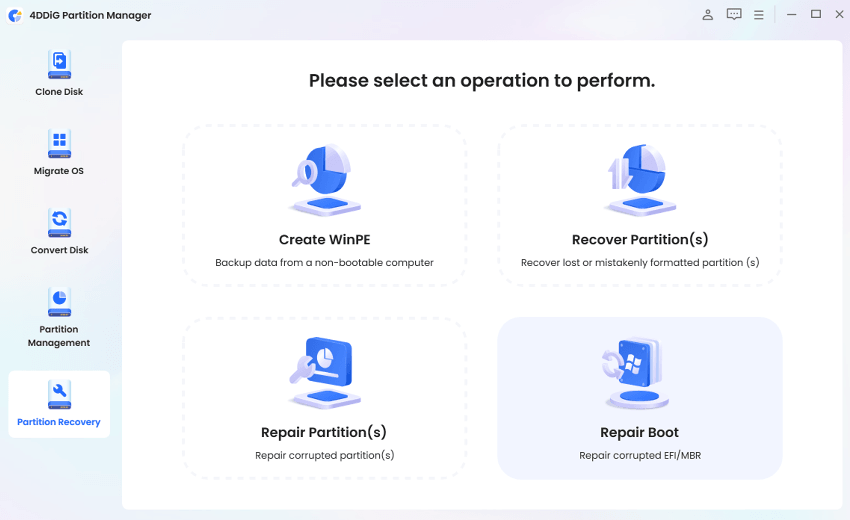
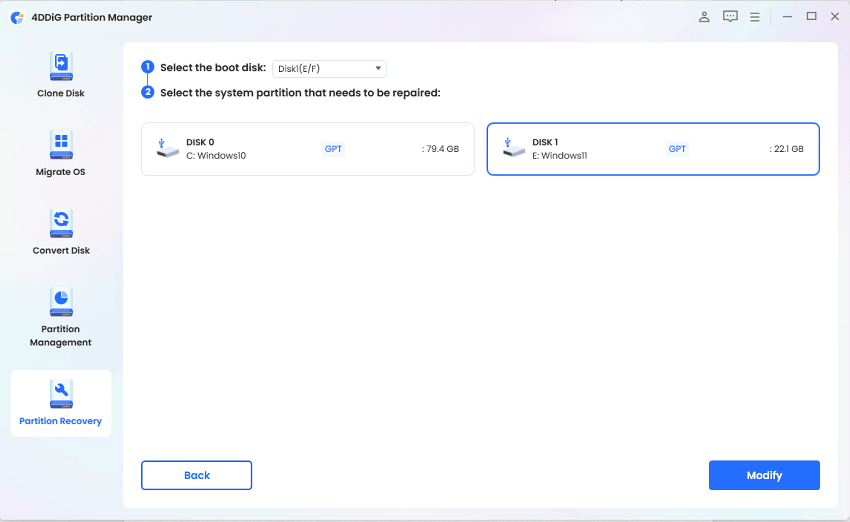
Repair Boot
4DDiG Partition Manager is reliable partition recovery software. It offers a comprehensive solution that enables you to recover deleted or formatted partition, repair raw partition and repair boot easily and safely. Also, it can help you create WinPE, so you can clone disk, repair partition and convert disk on a computer that cannot boot up normally.
![]() Secure Download
Secure Download
-
Step 1:Install and launch 4DDiG Partition Manager. Select "Partition Recovery" in the left navigation bar, then select "Repair Boot" to proceed.
-
Step 2:Select the boot disk and then select the system partition that needs to be repaired.
-
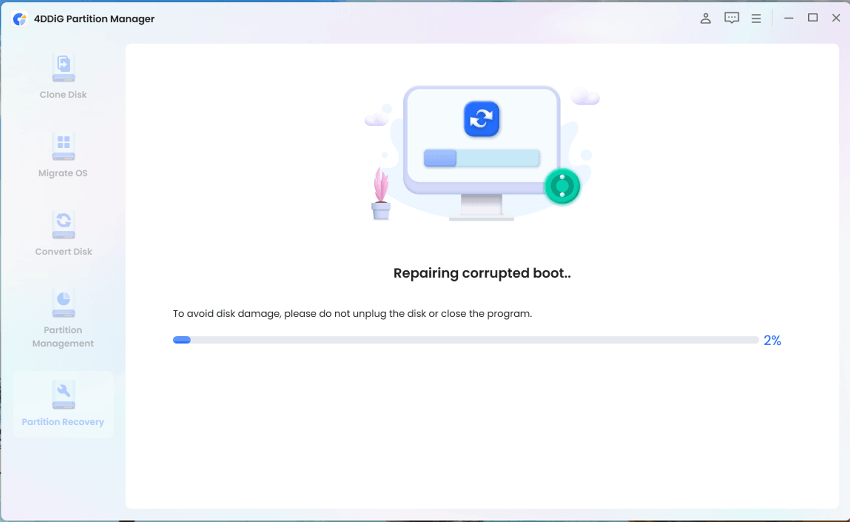
Step 3:It will take some time to repair the corrupted boot, please be patient. To avoid disk damage, please do not unplug the disk or close the program.
-
Step 4:Click Finish when the corrupted boot is successfully repaired.