Top 3 Methods to Transfer/Import/Move Photos from Mac to iPhone
by Jenefey Aaron Updated on 2024-04-18 / Update for iOS File Transfer
There are a lot of reasons why users transfer pictures from PC to iPad.But without any suitable options, many are struggling. The longtime iOS users know about iTunes and other Apple certified apps but the newcomers are having a real problem transferring files. Although iTunes has been supporting iOS users for ages, the complicated steps to perform the task are really messing with the users. They are randomly searching the internet for solutions on how to transfer photos from Mac to iPhone but it is getting them nowhere. So, we have two of the most simple and efficient ways to get photos from Mac to iPhone detailed below other than iTunes. So, let’s begin.
- Way 1: How to Transfer Photos from Mac to iPhone with iTunes
- Way 2: How to Import Photos from Mac to iPhone with iCareFone
- Way 3: How to Move Photos from Mac to iPhone with Airdrop
Way 1: How to Transfer Photos from Mac to iPhone with iTunes
Most of the iOS users usually tend to lean towards the iTunes app when they are about to perform any activity, let alone transferring photos from one device to another. As one of the oldest apps of the iOS community, iTunes has helped a lot of users, resulting in a huge follower base. Most importantly, if you want to transfer photos from Mac to iPhone with iTunes then you should know that the app works differently compared to other apps on the App Store. iTunes not only transfers the data it also syncs it with other devices so that you can get access from anywhere you want.
Now, if you want to know how to get photos from Mac to iPhone, just read the instructions below,
1. First, you need to make sure that you have the latest version of the iTunes app on your Mac.
2. Run the iPhoto app on the Mac then select the photos and drag them to the iPhoto Library.
3. Now, connect both of the devices with a USB cable.
4. iTunes will be launched automatically and go to the Photos tab on the iTunes panel.
5. Now, choose “Sync Photos” and then tap “Copy Photos From” option to sync all of your photos or only a few selected ones.
6. Finally, click “Apply” to transfer the photos from Mac to your iPhone.
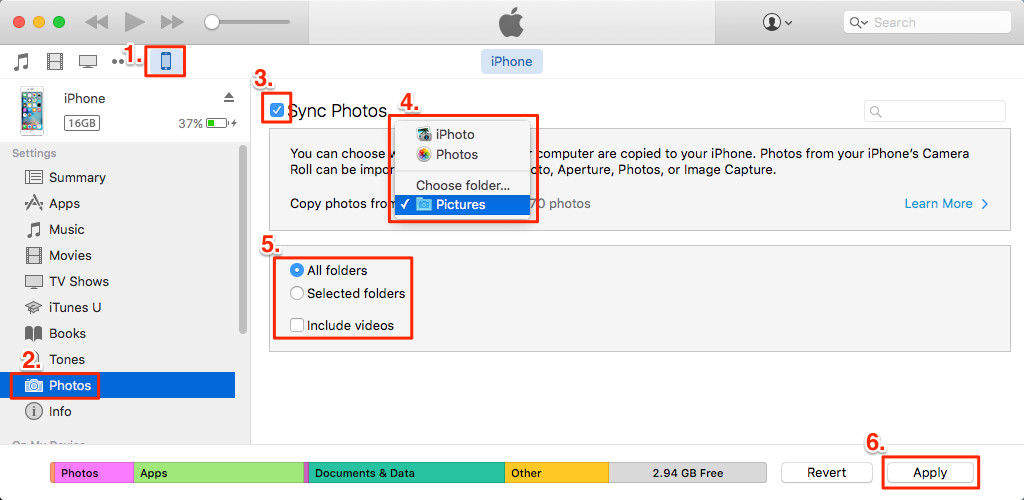
As you can see transferring photos with iTunes is easy, the app is efficient as well. It tends to become slow sometimes and transfer speeds also suffer from time to time. But one thing you should know if you are going to use iTunes for data transfer, that the moment you sync photos between your computer and iPhone all the existing photos on your phone will be erased.
Way 2: How to Import Photos from Mac to iPhone with iCareFone
If you are struggling to find out how to import photos from Mac to iPhone, then you can look into the Tenorshare iCareFone. It is considered one of the best software of this generation. Although it is not Apple certified and developed by an independent company, the data transferring tool has made its mark on the users by being the most efficient software on the market. It comes with a Manage feature which is capable to import and export any kind of photos or any data. Regardless of its origin, if you are looking for how to export photos from Mac to iPhone without using iTunes, then you can do it easily with Tenorshare iCareFone. The steps are discussed below:
1. Download and install the app on your Mac.
2. Run the software.
3. Then connect both of the devices with a USB cable
4. After iCareFone detects the iPhone, navigate to “Manage” and select the “Photos” tab.

5. Now, click on “Import” on the top of the panel and choose the photos.
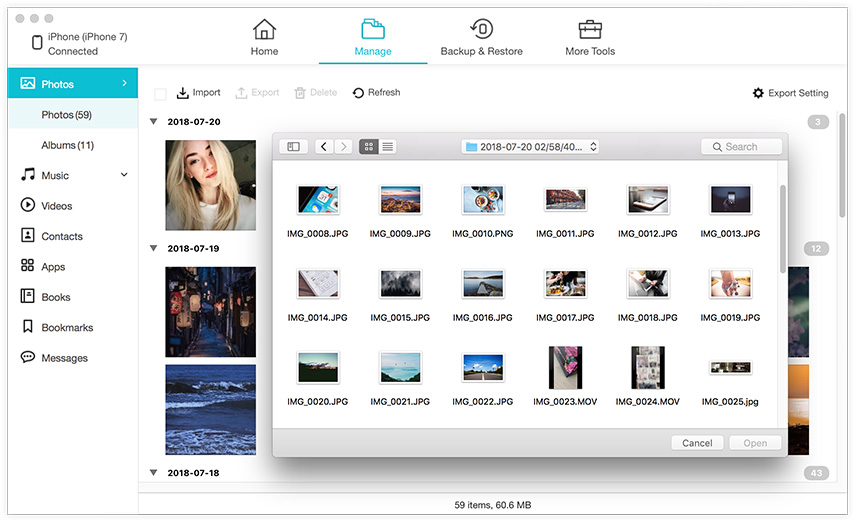
6. Choose the download destination, and on the pop-up message select “Open”.
The transfer will start immediately. Tenorshare iCareFone is one of a kind! It is fast and efficient and the interface is so simple that you can operate it with your eyes closed. So, if you are looking for how to put photos from Mac to iPhone with a free third-party software then go for Tenorshare iCareFone.
Way 3: How to Move Photos from Mac to iPhone with Airdrop
Like iTunes, AirDrop is also an Apple certified app that comes with the new MacOS. What made the app so popular is the fact that it can transfer data wirelessly, you just have to keep the devices within a certain range. The transfer rate is fast and the process is very convenient for the users.
The AirDrop app transfers photos from Mac to your iPhone wirelessly by using the Wi-Fi and Bluetooth. Now, if the Wi-Fi connection is weak the file transfer will fail, so be sure to connect to a strong Wi-Fi network before transferring the files. Now, if you want to know how to move photos from Mac to iPhone, read the instructions below,
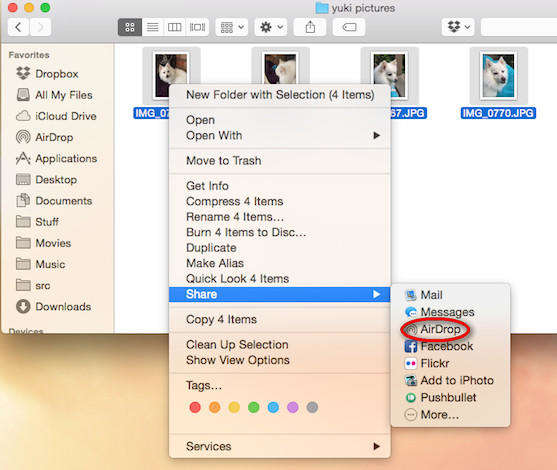
1. Go to Finder on Mac and launch AirDrop. Select “Everyone”
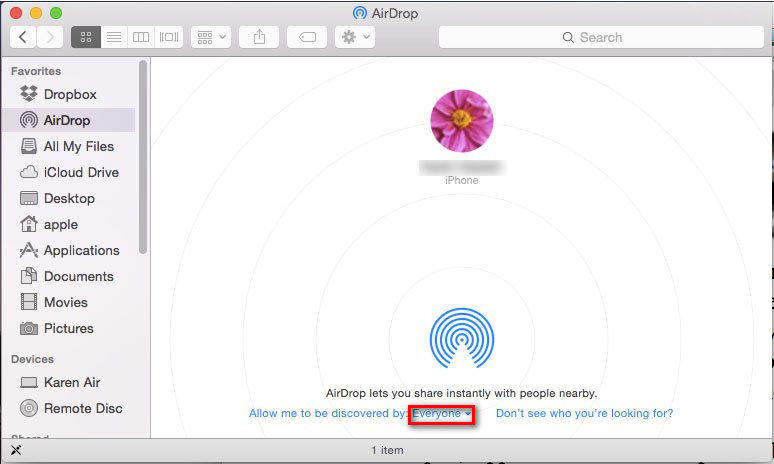
2. Now, open your iPhone and launch AirDrop from the Control Center. Select “Everyone” for visibility.
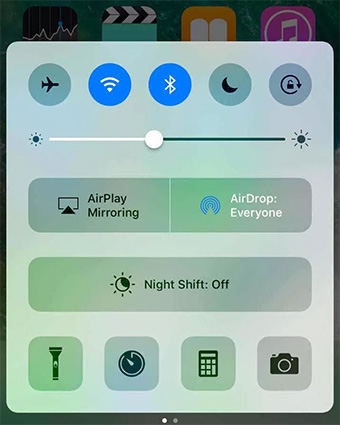
3. Now, from the Finder panel, find and select the photos you want to send.
4. Then drag and drop those selected files on the iPhone icon on the AirDrop window.
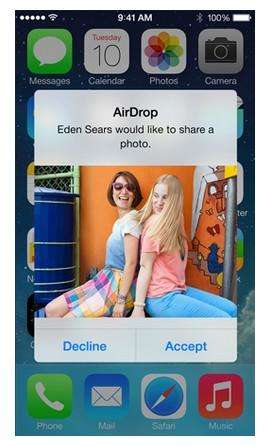
5. Choose “Accept” option on the iPhone X/8/7/6/6S/5/5S/SE.
Needless to say that it is one of the most efficient ways to transfer files from one device to another, you can do it anywhere and anytime! Unfortunately, the app is not suitable for transferring files of large sizes.
Comparison Table
| Features | Tenorshare iCareFone | iTunes | AirDrop |
|---|---|---|---|
| Both way data transfer capability | Yes | No | Yes |
| Supported by multiple-platforms | Yes | Yes | No |
| Wireless data transfer | No | No | Yes |
| Transfer speed | Fast | Slow | Fast |
| Wi-Fi needed | No | Yes | Yes |
| Selective data transfer | Yes | No | Yes |
| Supports large file transfers | Yes | Yes(very slow) | No |
| Storage Limitations | No | No | Yes |
Conclusion
Transferring photos from Mac to iPhone is a task performed by a lot of users but there are not too many apps that can perform the task very easily. But these three apps mentioned in this article are better than most apps on the market now. They have a simple interface, perform the job efficiently and work fast. In terms of overall performance and features, you can already see, Tenorshare iCareFone is the winner. Following the comparison table, we highly recommend this program too!

